🔥Better Photos Fast

Get your FREE Lightroom Color Editing Course & Learn How to:

✅ Create Color Harmony

✅ Improve Tonal Range

✅ Establish Color Separation

✅ Make Colors Tastefully Pop!

    I’ll never share your email address with anyone. Unsubscribe at anytime. Email Policy

    Should You Revisit a Landscape Photography Location?

    Should you revisit a landscape photography location or explore new unknown places? – that’s the question… and a great one indeed! It’s a question that all landscape photographers have faced one time or another.

    When you set out on an outdoor photography adventure, the location you’re visiting always falls into either the explore or revisit category. It’s either a location you’ve been to before or a location that you’ll be exploring for the very first time. There are positive factors to both sides of the discussion. In this article, I tackle each in the hope that the next time you’re faced with this choice, you have additional information you can apply to your decision-making process.

    Should You Revisit a Landscape Photography Location?

    Revisiting a Landscape Photography Location

    As landscape photographers many of our favorite images online or in a gallery are not only photographs of beautiful locations, but they’re incredible locations that are photographed under amazing conditions. The latter component of this statement being the key piece of information here – amazing conditions. They don’t happen often and being able to accurately predict when they’ll occur can be a rather difficult task. There are many mobile apps and websites that can certainly aid in determining the likelihood of a colorful sunrise or the likelihood of fog for example, but as with most weather predictions, they’re always subject to a certain degree of error. Having the “perfect” conditions on your initial visit to a location seldom happens. It usually takes multiple attempts and, even then you might not get the conditions you’re after.

    Should You Revisit a Landscape Photography Location?

    Each time you revisit a landscape photography location, the conditions are different. Sometimes these conditions are great and other times not so great, but nevertheless they are different. By revisiting a location, you’re increasing the odds that you’ll receive the conditions you’ve envisioned for your photograph.

    Revisiting during different seasons is another positive for this side of the discussion and is something I try to do often. I frequently make an effort to visit my favorite locations during different seasons as this, much like weather conditions, can completely change the look and feel of a location.

    Should You Revisit a Landscape Photography Location?

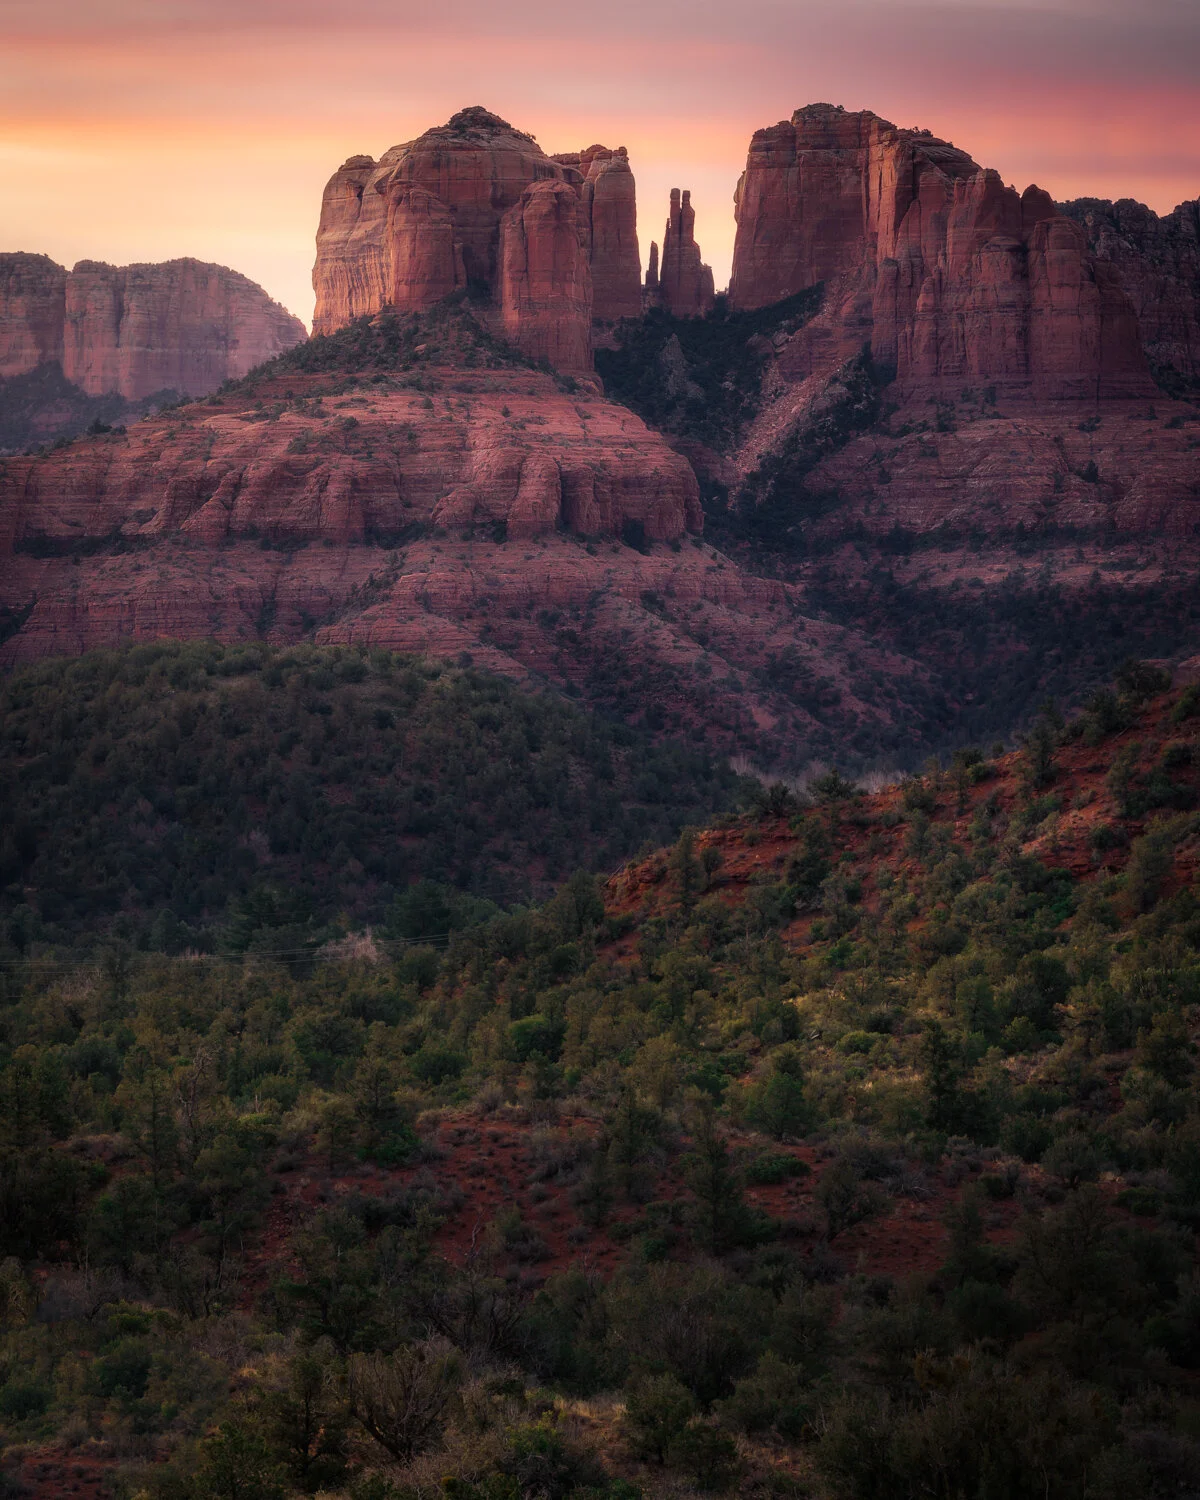
    Another top benefit for revisiting a location is that you become familiar with the terrain and the location itself. This ultimately enables you to identify better and perhaps more unique compositions. It also aids in the overall exploration of the area. It takes time and patience to become familiar with a location regardless of how much prep work you do beforehand. Read More>

    Check out my Photo & Video Gear Kit!

    📨 Join 52k Readers

    The Morning Blaze - my free, email newsletter where I share photography education, tutorials, & inspiration I’ve gained throughout my journey from beginner to professional landscape photographer.

      I respect your privacy. Unsubscribe at any time.

      Simple Secret of Creating Dramatic Landscape Photos

      Typically, when I begin an edit on one of my landscape photos the very first thing I do is try and determine exactly where I think the viewers eye will travel throughout my image. And, at the same time I look for any possible distractions that could compete for the viewers attention. I always want the viewer to be drawn away from the edges and corners of my photo and into the center portion of the image. I’ve come to the conclusion that the longer a viewers eye lingers around the edges or corners of an image the higher the likelihood they’ll abandon it to look at something else. And, my end goal is always the same when editing photos and that’s to maximize the amount of time the viewer spends looking at my image, and this is where a vignette comes in.

      Now I know a vignette is not the most exciting editing tool to discuss, but when used effectively it can be a powerful option for creating a focused and dramatic landscape photo. A vignette has a unique ability to create a concentrated effect that directs the viewers attention to certain areas of your scene while at the same time directing the viewers eye away from other areas. But, like most things in photography there isn’t a one size fits all approach and certainly not when it comes to creating a vignette either.

      In this article I want to share with you four ways you can improve your landscape photos by applying a vignette inside of Lightroom. If you’re not familiar with what a vignette is, it’s basically the act of darkening the corners or edges of an image while leaving the center area brighter. The human eye always gravitates to the brighter areas of a photograph and a vignette is a great way to draw the viewers attention into your scene.

      Vignette Slider

      Perhaps the easiest and most common way to apply a vignette is by using the dedicated vignette slider. This isn’t the approach I use most often, but it is the easiest and fastest method. Within Lightroom you have the ability to determine how dark or bright you’d like to make the vignette along with the size and shape of the center area.

      Simple Secret of Creating Dramatic Landscape Photos

      Perhaps one of the more important adjustments is the amount of feather in your vignette which determines how quickly the transition of the vignette occurs. I generally keep the feather between 50 and 80 in order to keep the transition as subtle as possible. 

      Simple Secret of Creating Dramatic Landscape Photos

      Radial Filter

      This is one of my favorite applications for creating a custom vignette. Often is the case where the main area of interest is not in the dead center of your image and this is where creating a custom vignette is a must. The trick here is to be sure to check the invert box be esther the Feather slider to reverse the effect of the radial filter. Then you adjust the exposure level and the amount of feather you want to apply.

      Simple Secret of Creating Dramatic Landscape Photos

      Graduated Filter

      A similar use case to that of the radial filter except this method is better served when the need for creating a circular or oval vignette isn’t required. However using this method doesn’t require the need to select an inverse box, but the same exposure and feather approach still applies. 

      Simple Secret of Creating Dramatic Landscape Photos

      Adjustment Brush

      This is my favorite method for creating a custom vignette. This gives you all the power and control to create any type of vignette that complements the specific image you’re working on. I like to change the zoom level on my photo to 1:4 or 1:8 in order to give myself plenty of room around my image to work. Then just select the adjustment brush, adjust the size and flow of your brush. The flow is the amount of the effect that’s released on a single brush stroke - I keep this around 50 to 70. Next just make your exposure adjustment and then begin painting the vignette around the edges and corners of your photo. I generally like to start a brush stroke on the image in the corners and then swipe to the outside of the frame. 

      Simple Secret of Creating Dramatic Landscape Photos

      Out of all the photo editing wizardry available to us today, I’ve found there to be only one editing effect that I use on just about every single one of my landscape photos and that’s a vignette. I find it to be the easiest and fastest way to create a powerful, focused and dramatic landscape photo. I hope this article was helpful and that you were able to pick up some useful information that you can apply to your landscape photos moving forward.

      As always, thanks for reading and sharing!

      Mark

      Check out my Photo & Video Gear Kit!

      📨 Join 52k Readers

      The Morning Blaze - my free, email newsletter where I share photography education, tutorials, & inspiration I’ve gained throughout my journey from beginner to professional landscape photographer.

        I respect your privacy. Unsubscribe at any time.

        5 Worst Editing Mistakes in Landscape Photography

        When it comes to landscape photography I think there are two categories of mistakes that are common amongst photographers. You have your in-field and on-location mistakes and then you have your post processing and photo editing mistakes. I’ve always found on-location mistakes easier to resolve as opposed to post processing mistakes due to the subjective nature of photo editing. It can be rather difficult to determine whether or not you’re making photo editing mistakes when you’re in the “moment” going through your post processing workflow.

        In this article, I review the five photo editing mistakes that have negatively impacted my landscape photography. I’ve found these five mistakes to be the hardest for me personally to resolve for various reasons. Some of these editing mistakes are caused by sheer laziness when it comes to my own post processing workflow and others have to do with my inability to identify when I’m actually committing a post processing mistake. Much like anything, being able to determine when you’re making mistakes is critical in order to have any chance at resolving them. 

        5) Bright Shadows

        When it comes to identifying the appropriate level of shadow recovery I tend to struggle. I’m much better now than I used to be, however I still find myself scratching my head upon reviewing some images I’ve released over the past year. Shadows are meant to be dark, but determining how dark is the real question. What I’ve found helps is to turn on the shadow clipping indicator inside of Lightroom and using this as a leading indicator to assist me in determining an adequate level of shadow recovery.

        5 Worst Editing Mistakes in Landscape Photography 3.jpg

        4) Leaving in Distractions

        I’m typically laser focused when it comes to looking for distractions within my photos, whether that’s on-location or during post processing. But, sometimes I get lazy or I rush through an edit and don’t take the time to properly examine an image in it’s entirety only to find out later there are distracting elements that I didn’t notice during my initial review process that should have been removed. 

        5 Worst Editing Mistakes in Landscape Photography

        3) Poor Cropping

        There’s a lot more to cropping outside of just “crop or don’t crop”. You have things like aspect ratios, uneven horizons, and corner management to take into account. I believe the crop tool is not only highly under appreciated, but also one of the most powerful photo editing tools at our disposal..when used effectively. When I review my images, I often find small cropping errors or uncover better ways to crop a particular photo in order to create a more impactful composition. 

        5 Worst Editing Mistakes in Landscape Photography

        2) Bad Contrast

        This is perhaps the single largest photo editing struggle that exists for me today. I often find myself either adding too much contrast or not enough contrast to an image. It can be difficult to see where an appropriate level of contrast lives within a photograph. Something I’ve found that helps is to create a virtual copy and edit a second version in order to make an additional contrast adjustment, whether it’s adding or reducing contrast. This gives me two versions with two different levels of contrast to compare and decide which image has the more appropriate amount applied. 

        5 Worst Editing Mistakes in Landscape Photography
        1. Over-Editing

        With all the post processing tools at our disposal it’s very easy to get carried away and end up with an over-edited photo. This is something that plagues all photographers at one point or another throughout their photographic journey. The best advice I’ve heard that assists in determining when you might be over-editing an image is to simply stop and walk away. Let your eyes rest, reset, and revisit at a later time. It’s amazing how quickly our eyes can adjust to something especially when you’ve been working for awhile on a single photo. Subtlety is the real key - personally, I feel that post processing should not distract from an image rather it should enhance or compliment the photograph. If the first thing you notice upon looking at one of your images is the edit then you’ve probably gone too far. 

        Disclaimer: A highly exaggerated example of over-editing:)

        Disclaimer: A highly exaggerated example of over-editing:)

        This is my final and much more realistic version.

        This is my final and much more realistic version.

        Those are the 5 worst editing mistakes that have negatively impacted my landscape photography and I hope that you’re able to walk away from this article with some beneficial information that you can apply to your photography moving forward. 

        Mark

        Check out my Photo & Video Gear Kit!

        📨 Join 52k Readers

        The Morning Blaze - my free, email newsletter where I share photography education, tutorials, & inspiration I’ve gained throughout my journey from beginner to professional landscape photographer.

          I respect your privacy. Unsubscribe at any time.

          The Issue with Winter Landscape Photography

          One of the most difficult yet rewarding seasons for outdoor and landscape photography is during the winter months. It’s tough to beat the look of a freshly fallen blanket of snow. It has a way of simplifying a scene thus creating a very minimalistic composition, but it’s not all roses. Winter photography comes with a unique set of challenges that you have to solve for in order to capture these beautifully frosty images. 

          Winter Landscape Photography Tips

          Personal Comfort

          The problem I encountered on my first few attempts at winter landscape photography is that I grossly under estimated how cold I would get once I arrived at my location and I stopped moving around. This frigid stationary down time while I waited for the “good light” to arrive is something I didn’t appropriately prepare for. I now focus on the “warmth pyramid” of my head, hands and feet. Paying extra attention to these areas will ensure a much more enjoyable and most importantly safe experience while on-location. There’s nothing worse than losing basic dexterity in your frozen fingers while attempting to manipulate tiny dials on your camera. 

          Winter Landscape Photography Tips

          Cold Gear Care

          One of the biggest issues associated with cold weather photography has to do with rapid battery drain. What I’ve found works best is to keep your batteries stored in an internal pocket of your jacket ideally as close to your body as possible in order to keep your batteries warm. This will ensure that when the time comes to place a battery in your camera that it’s not already drained well below 100% due to the cold weather conditions.

          However, it’s not all about the batteries, another big issue has to do with your gear after your shoot. You want to pay extra special attention to your camera and lens once you return to your car or home. Your gear will be extremely cold after your shoot and you want to ensure that you don’t introduce condensation build up from warming your gear up to quickly. I always place my camera and lens in a ziplock bag while outside, seal it up and place it in my camera bag before I return to my car or home. I then leave it there for an hour or so in order to bring the temperature of my camera up slowly, thus avoiding any chance for moisture to build on the electronic components of my camera and/or lens.

          Winter Landscape Photography Tips

          Camera Settings

          Now that you’re comfortable and your gear is cared for, the next issue you may encounter has to do with the struggle of properly exposing snow. A good best practice to get into is to always overexpose your winter photos by a stop or so while paying extra attention to your histogram to ensure you’re not clipping your highlights. Even if your camera’s metering system is indicating a proper exposure, you want to consult the histogram to confirm how much further you can actually push the exposure level of your image. Ideally, you want your snow to be white and not underexposed and grey. 

          Winter Landscape Photography Tips

          Post - Processing

          White balance and exposure are generally the most difficult issues associated with post processing a winter scene. White balance can be tricky due to the reflective nature of snow. Depending if it’s a clear blue sky day or if it’s overcast, the snow in your image can either take on a blue color cast or a gray / yellowish look. Either way, you want to correct this as part of your editing workflow while also correcting for any underexposed areas of your scene. 

          Winter Landscape Photography Tips

          Winter is definitely one of my favorite seasons for landscape photography, but it does present a unique set of challenges that no other season has. The end result however is absolutely worth the frigid temperatures, early sunrise wake up, and the additional steps required to capture this seasons beauty. 

          Mark

          Check out my Photo & Video Gear Kit!

          📨 Join 52k Readers

          The Morning Blaze - my free, email newsletter where I share photography education, tutorials, & inspiration I’ve gained throughout my journey from beginner to professional landscape photographer.

            I respect your privacy. Unsubscribe at any time.

            Beginner Landscape Photography Advice To Ignore

            When you’re beginning a new endeavor it’s common to receive advice from various different sources, whether it’s directly from someone or indirectly from books, podcasts or tutorial videos. Some of this advice can be highly beneficial and others can be, well not so good. When trying to determine the good from the bad, I believe it’s equally as important to understand what not to do as it is to understand what to do. In this article I discuss the nine worst pieces of advice I received during my first year of landscape photography. 

            #9 Always Shoot in Manual 

            I do agree that it’s important to understand how to use Manual mode on your camera as it will help you better understand how the exposure triangle works, but I don’t think that always shooting in manual mode is a must. It really comes down to the specific situation you find yourself in.  

            Beginner Landscape Photography Advice To Ignore

            #8 Must Have Graduated ND Filters

            I believe there’s only one filter that’s a “must have” for landscape photography and that’s a circular polarizer as it’s effects cannot be replicated during post processing. However, a Graduated ND filters effects can easily be replicated in post, so I don’t think this is a must have filter for landscape photography.  

            Beginner Landscape Photography Advice To Ignore

            #7 Always Expose to the Right

            I actually do the opposite now where I underexpose my images in order to protect the highlights. The dynamic range of camera’s today is better than ever, you can easily pull a couple stops of clean shadow detail from the darker areas of an image. So I think it really just depends on the specific camera you’re using, but not something that should be done in every scenario. 


            #6 Always Shoot on a Tripod

            This is a good habit to get into, but it’s not something that must be done in every situation. If things are unfolding quickly there’s no problem with handholding your shot. We’re often using a fast enough shutter speed that we can easily handhold the photo, especially with the stabilized cameras and lenses available today.  

            Beginner Landscape Photography Advice To Ignore

            #5 Only Shoot Golden Hours

            I do agree that sunrise and sunset are two of the best times to photograph landscapes, but a great landscape photo can be captured at any time of the day. It really depends on the light more than anything as you can’t assume that afternoon light is always going to be harsh. I personally love shooting on overcast days where the light is clean and evenly lit. 

            Beginner Landscape Photography Advice To Ignore

            #4 Must Have Full Frame

            I believe the only time a full frame camera is almost required is for astro photography. The larger sensor will perform much better in extreme low light situations, but for a beginner that predominately shoots during the day, I don’t think a full frame camera is a requirement. Today’s crop sensor and micro four thirds cameras are more than adequate.

            #3 Don’t Get an L Bracket

            I was told years ago not to waste my money on an L bracket as it would make my camera heavy and bulky and if I needed to switch my composition into a vertical orientation than I should roll my ball head over into the “notch”. The problem with this is that it’s not only a clunky solution, but it also changes your composition and make a pano near impossible! 

            Beginner Landscape Photography Advice To Ignore

            #2 Never Crop

            This is a big one for me - the old adage “get everything right in camera” philosophy! I always heard that cropping your images will ruin the overall resolution of your photo, but with modern day cameras shipping with the resolution that they do, you have more than enough room to crop into your composition. So, I don’t think you need to get everything right in camera.  

            Beginner Landscape Photography Advice To Ignore

            #1 “Holy Trinity of Lenses” 

            This is the advice that impacted me the most from a financial perspective. It’s not so much the “trinity” of lenses as it is the thought track that you should fill out a specified focal range from wide to telephoto and purchase lenses that covers everything in between. This is exactly what I did and spent a small fortune in the process. I think the better advice is to start small and build up, figure out the focal lengths you enjoy shooting and only get those specific lenses. 

            I’m sure everyone’s list of bad advice they’ve heard is a bit different, but I hope that mine resonates with you and provides you with an additional point of view that’ll enable to you to determine if this is advice that’s beneficial to you.

            Mark

            Check out my Photo & Video Gear Kit!

            📨 Join 52k Readers

            The Morning Blaze - my free, email newsletter where I share photography education, tutorials, & inspiration I’ve gained throughout my journey from beginner to professional landscape photographer.

              I respect your privacy. Unsubscribe at any time.

              The Most Powerful Way To Transform Your Landscape Photos

              There’s a common misconception amongst beginner photographers, especially those that are just getting started with post processing and editing their landscape photos. This mistaken belief is that dodging and burning is a highly complex procedure that should only be attempted by seasoned professionals and Photoshop wizards - and this belief could not be further from the truth! When I first got into landscape photography I was one of these mistaken believers, I assumed that since I was a beginner and didn’t understand Photoshop that this editing sourcery was something I should avoid as it most certainly had to be far above my skill set. 

              It wasn’t until three years into my then landscape photography hobby that I decided to put my editing skills to the test and attempt to wrap my head around this “advanced” post processing technique. Once I began digging into the details surrounding dodging and burning, I was flabbergasted to find that this all intimidating procedure was actually easier to comprehend than originally thought. 

              In this article, I discuss three simple ways to dodge and burn your landscape photos in Lightroom. And why you should try this technique now as opposed to delaying as I did, but before we jump into the ‘How’, it’s important to first understand the ‘What’ and the ‘Why’. 

              What is Dodging & Burning?

              It’s quite simple honestly, dodging means to brighten an area of your image and burning means to darken an area of your image.

              Why should you Dodge & Burn?

              There’s many reasons to dodge and burn a photo, but the main reasons for me are to create shape and dimension in an otherwise flat looking image and to complexify light and direct the viewers attention to certain areas of a photo. The eye is naturally drawn to areas of brightness and at the same time generally ignores areas of darkness. Dodging and burning allows you to take advantage of this.

              How do you Dodge & Burn?

              There’s three ways to dodge and burn your photos in Lightroom. Below are the methods I use on my landscape images.

              Adjustment Brush

              In this section within Lightroom there’s actually an effect called ‘Dodge (Lighten)’ and Burn (‘Darken)’. I always start with dodging and set the feather to 100 and flow to 50 and paint the effect directly onto areas of highlights and then do the adverse with burning by painting areas of shadow. This will add shape and dimension to your image.  

              Radial Filter

              This approach is similar to the adjustment brush, but is designed around creating circular or oval areas of the effect. You still have access to the Dodge (Lighten) and Burn (Darken) effects and the premise is really the same. Dodge areas of highlights and Burn areas of shadows to create dimension and direct the viewers attention to specific portions of your image.  

              Range Mask

              This is a great option if you’re looking to get really refined with your Adjustment Brush or Radial Filter selection. You can use either the Luminance or Color Range Mask depending the specific situation to get a bit more targeted with your adjustment.

              To close out, that’s the What, Why, and the How with regards to Dodging and Burning inside of Lightroom. Once I began practicing this technique, I was not only surprised by how easy it was to begin implementing, but I was also impressed by the results that could be achieved. I quickly found that Dodging and Burning is one of those techniques that you don’t fully understand what you’re missing until you try it for yourself. 

              Mark

              Check out my Photo & Video Gear Kit!

              📨 Join 52k Readers

              The Morning Blaze - my free, email newsletter where I share photography education, tutorials, & inspiration I’ve gained throughout my journey from beginner to professional landscape photographer.

                I respect your privacy. Unsubscribe at any time.

                The Best Tool For Improving Composition In Your Landscape Photos

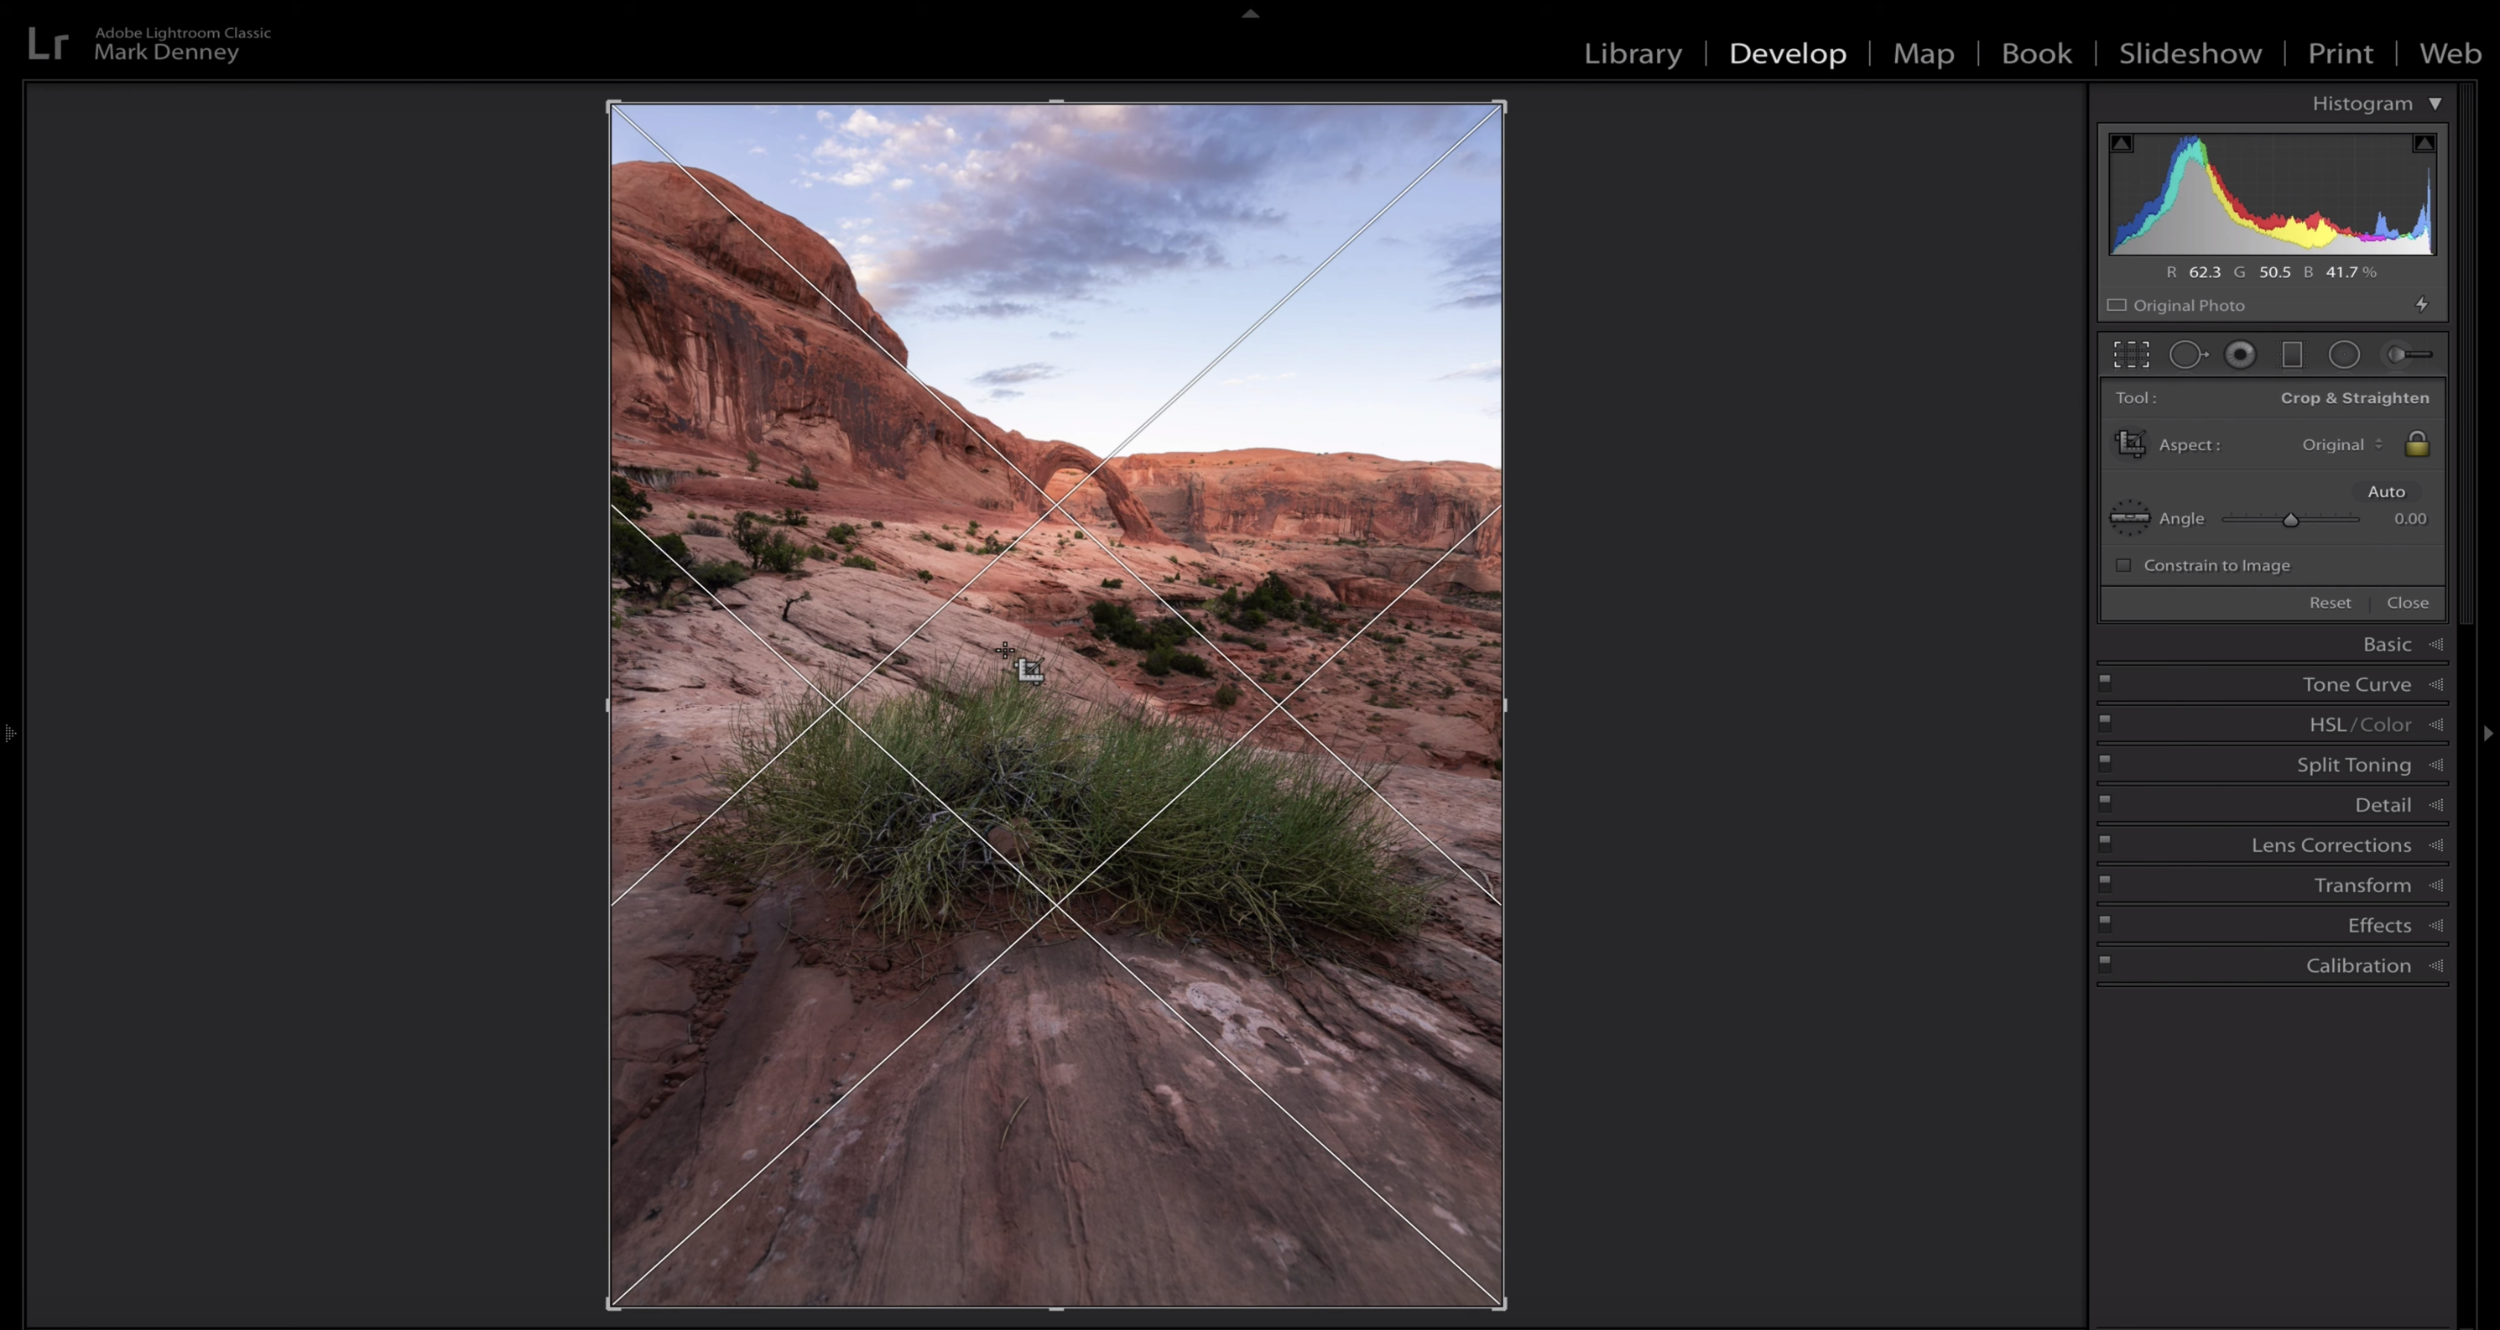
                How many times have you returned from what you felt was a productive landscape photography trip only to find that some of the compositions of your favorite images aren’t exactly what you expected. This happens to me rather frequently, but fortunately for us we have access to one of the best tools for improving composition in our landscape photos, the Crop Tool! In this 15 minute video, we discuss not only the crop tool, but perhaps the greatest aspect related to the Crop tool within Lightroom and that’s the Crop Overlay’s. 

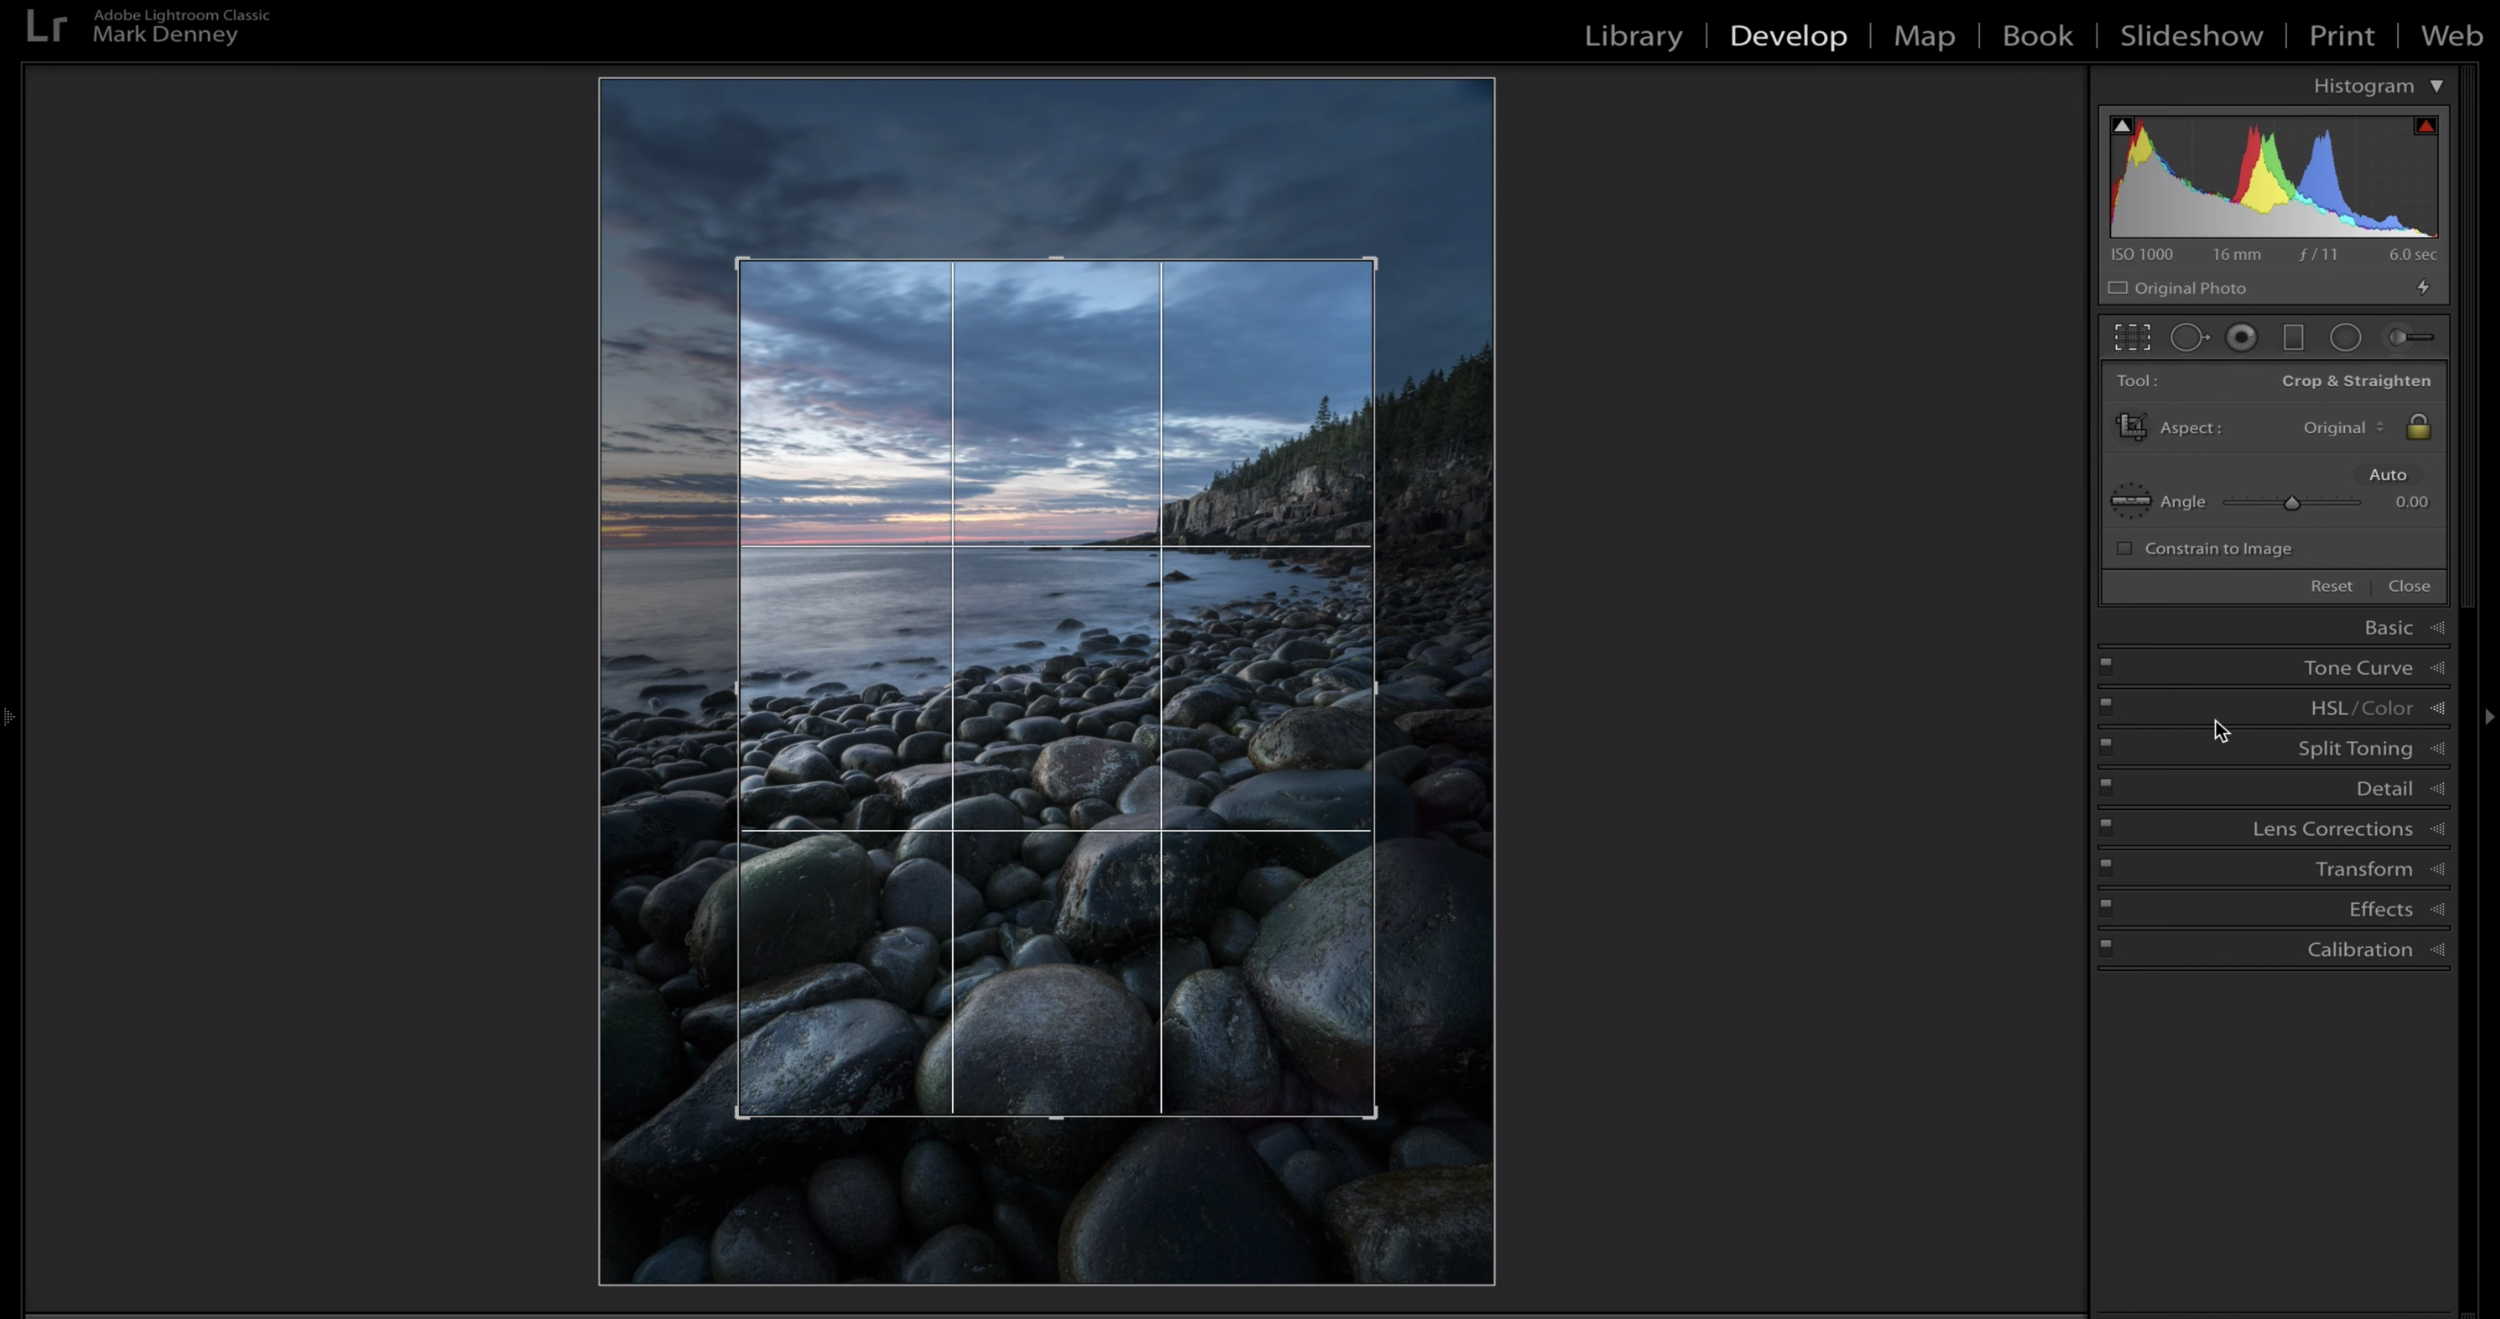
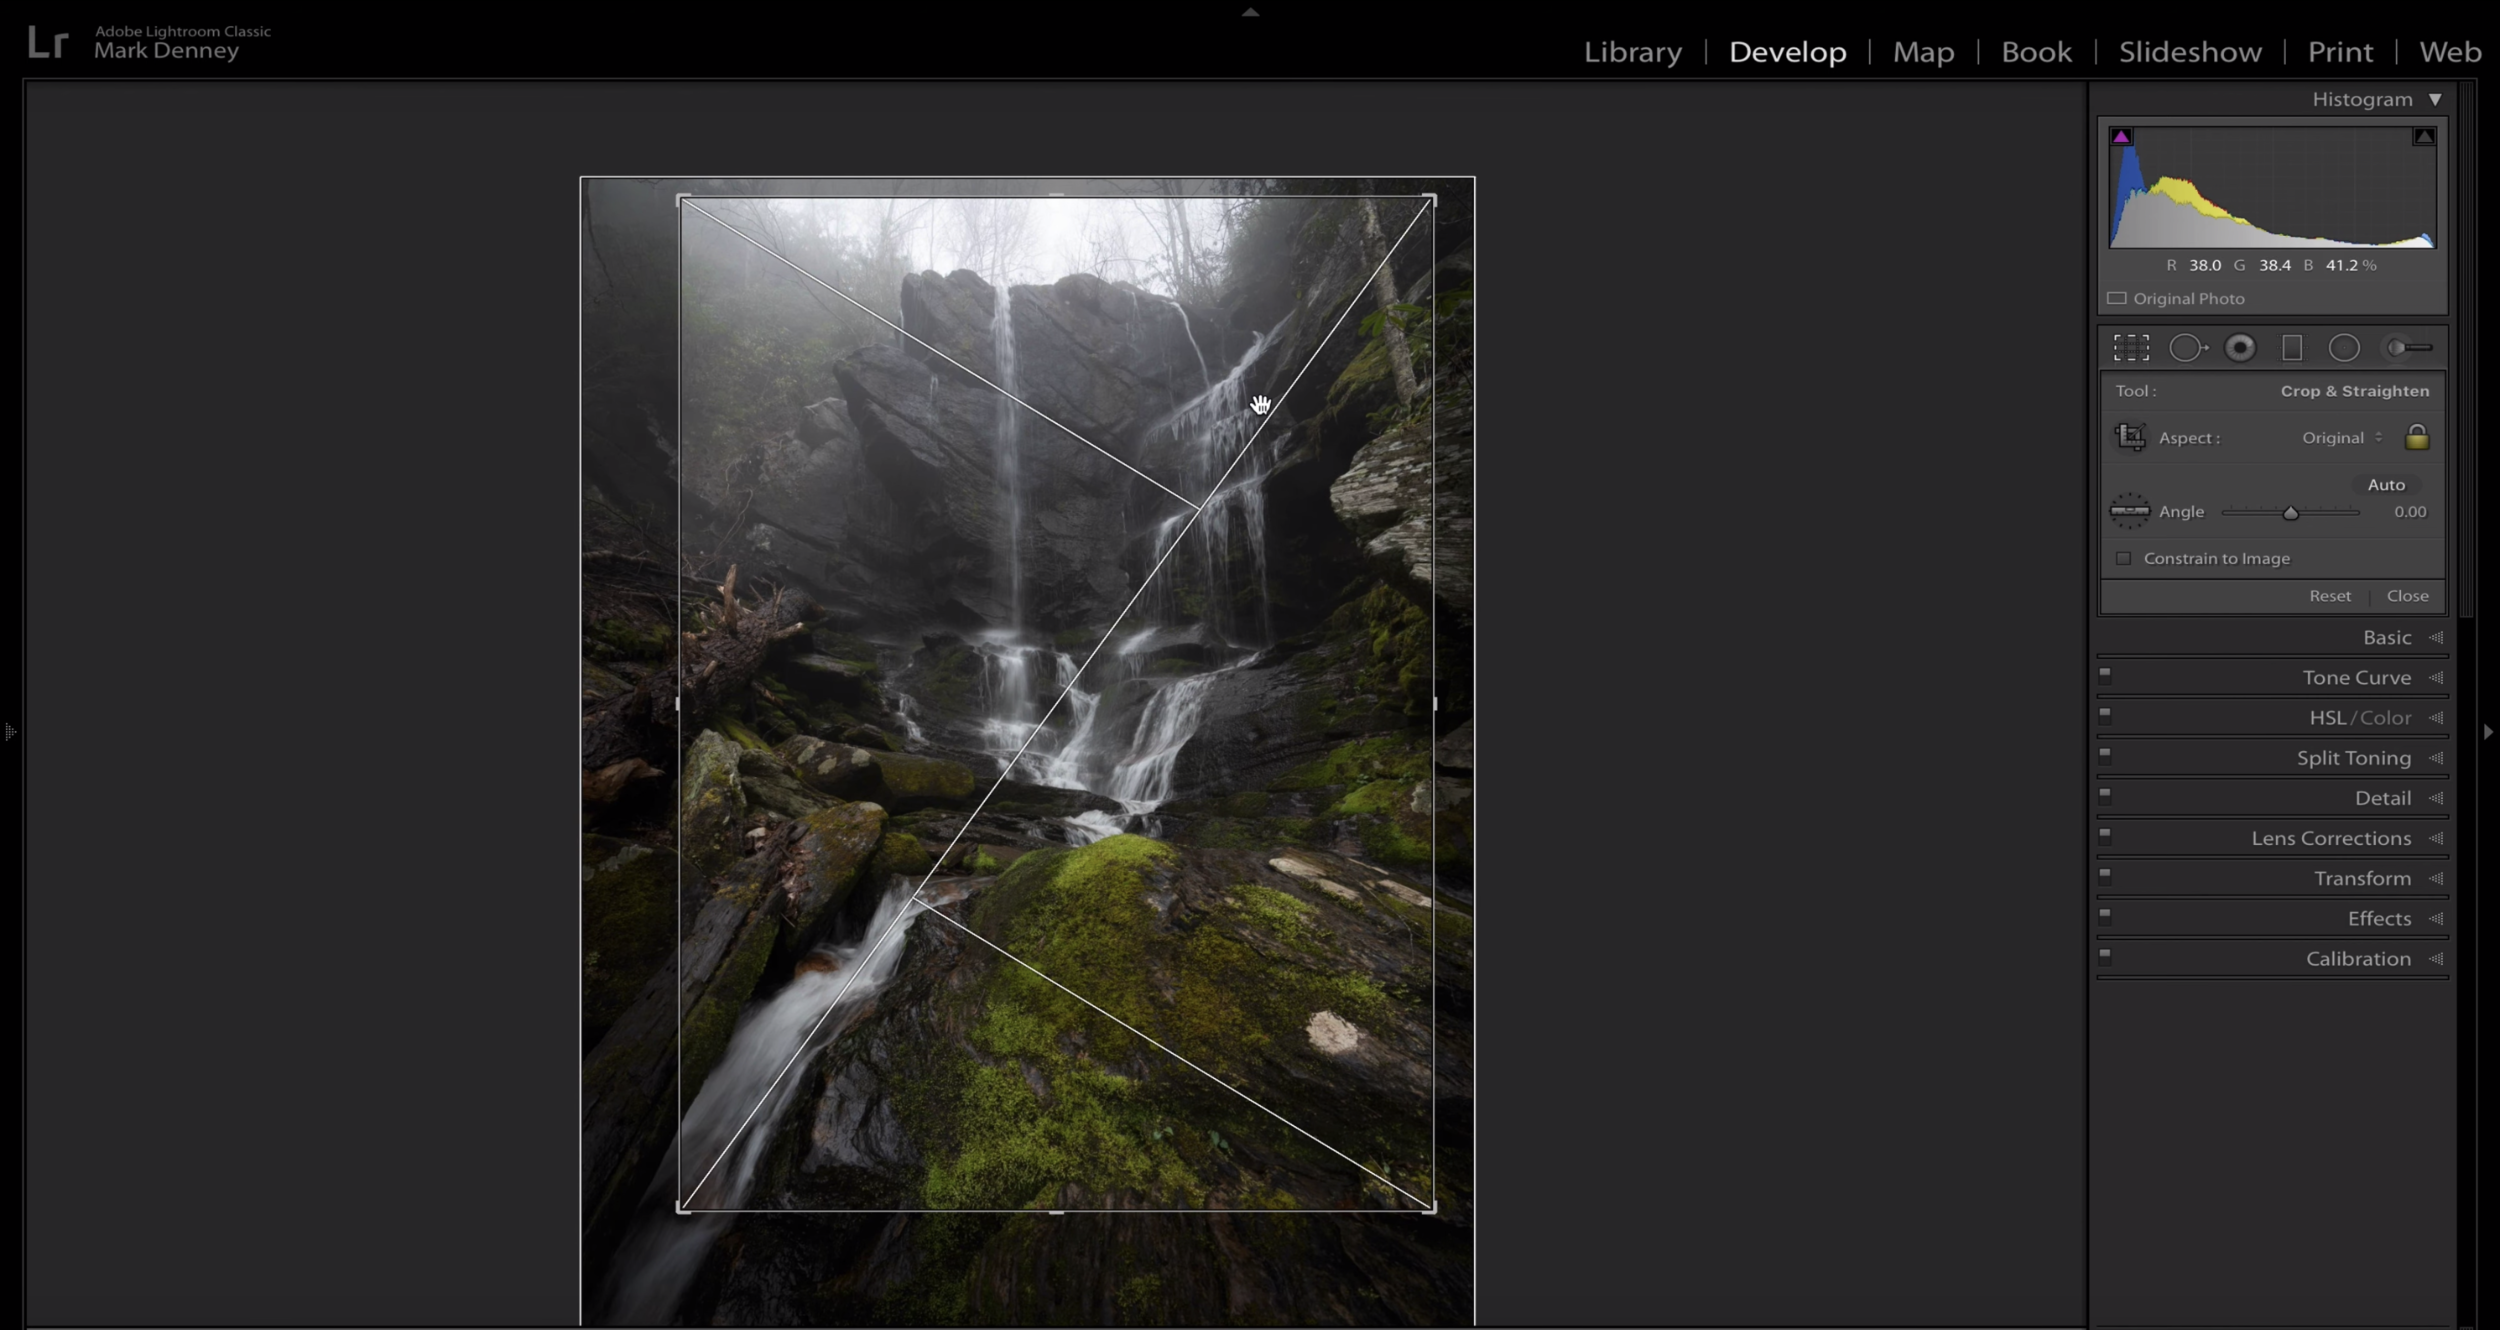
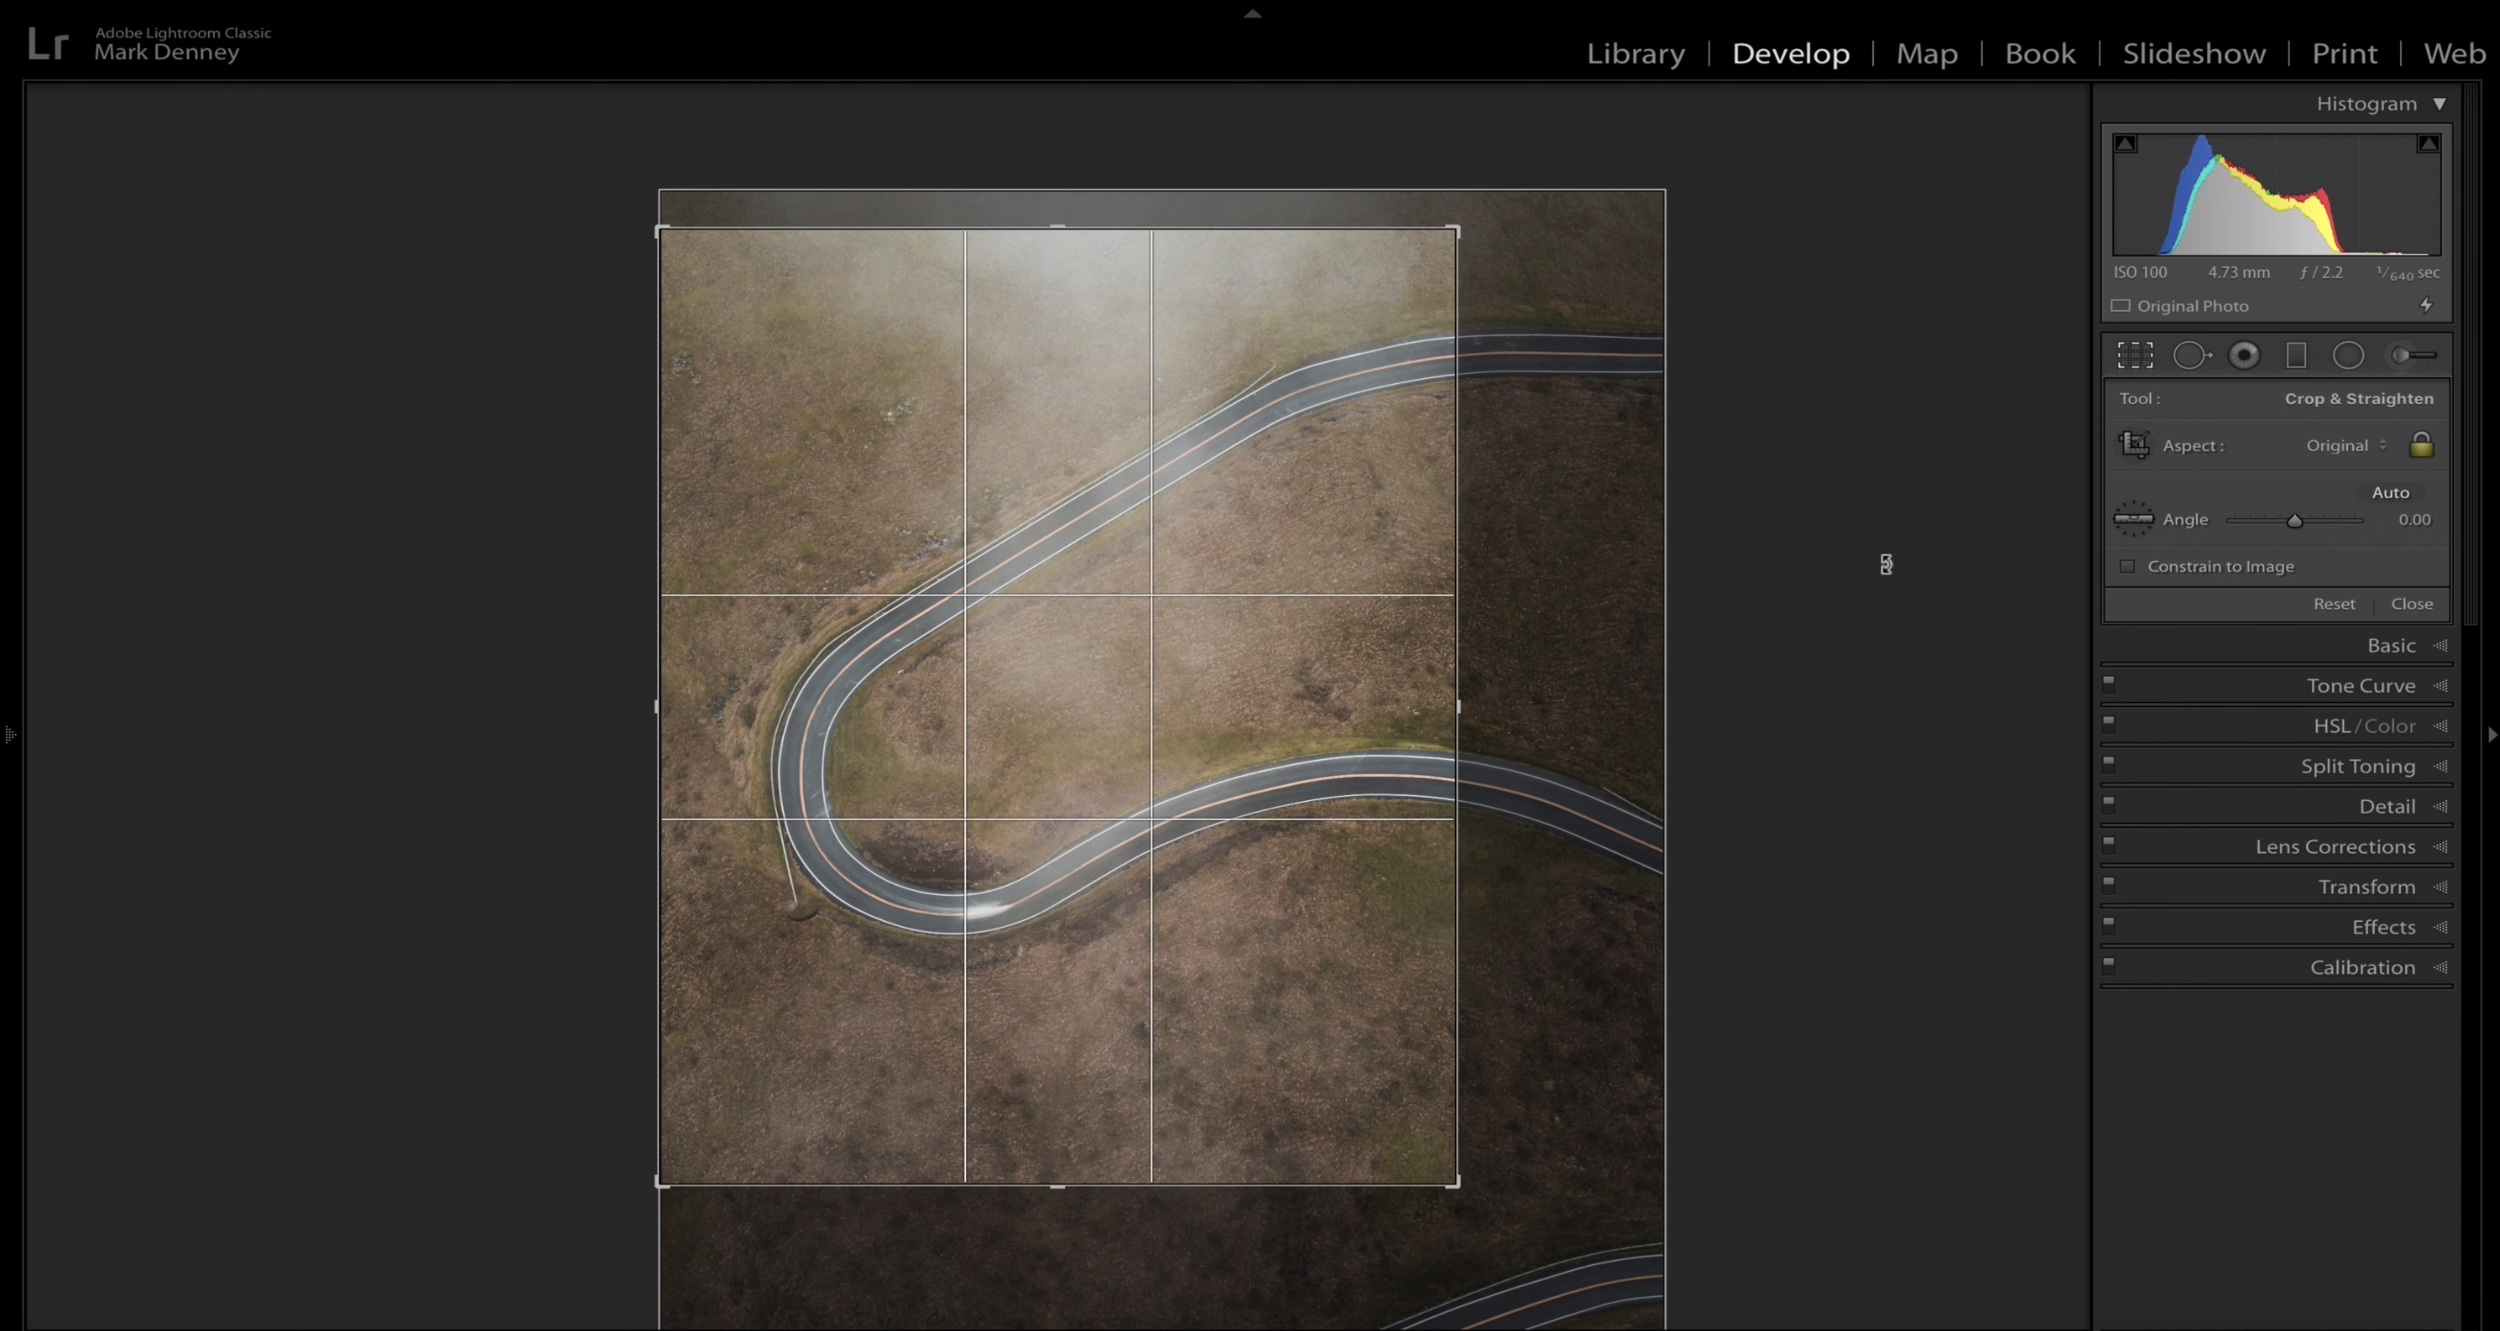
                For years I only used the crop tool as a means of cleaning up the edges of my images by removing overlooked distractions. But, when the crop tool is used most effectively, it’s as if you’ve accessed a time machine that enables you to go back and recompose your composition to something that’s more pleasing. In order to access the crop overlays within Lightroom, open the crop tool and simply press the shortcut key O to cycle through the various crop overlays. There’s a total of 7 available, but I typically only use 5 of them.

                Rule of Thirds

                This is perhaps one of the more common compositional techniques used today. The rule of thirds overlay divides your image into equal thirds. It’s great for ensuring that you don’t place your subject in the dead center of the frame and also assists you when it comes to the placement of the horizon. The basic premise here is to place areas of visual interest on the intersecting points of the grid.

                Crop Overlay: Rule of Thirds

                Diagonal

                This crop overlay is fantastic for images that have diagonal qualities associated with it. This technique will apply multiple 45 degree lines from the corners and is helpful for aligning diagonal subjects within your photograph.  

                Crop Overlay: Diagonal

                Triangle

                This approach really helped me with one of my favorite images of 2019 (below). This crop overlay resembles a series of triangles flipped in multiple directions. If you press Shift + O, you can flip the entire grid in the opposite orientation. The purpose here is to place points of interest within each of the seperate triangles.  

                Crop Overlay: Triangle

                Golden Ratio

                This overlay is considered to be a more advanced version of the rule of thirds, but with additional emphasis placed on the corners. The overall premise however remains the same, place areas of interest on or near the intersecting points. 

                Crop Overlay: Golden Ratio

                Golden Spiral

                This is perhaps the most interesting one of them all, the golden spiral. This is another overlay that you can flip by pressing Shift + O. This works well for images that have sweeping aspects to the composition with the end result being the main point of emphasis placed towards the area of converging lines. 

                Crop Overlay: Golden Spiral

                The two remaining crop overlays are ‘Aspect Ratios’ and another simply called ‘Grid’. It’s also important to note that these overlays are only meant to be applied as guidelines or suggestions and shouldn’t be taken too literal, but once you begin using them I’m sure you’ll find that they’re a great way to gain some additional compositional creativity.  

                Mark

                Check out my Photo & Video Gear Kit!

                📨 Join 52k Readers

                The Morning Blaze - my free, email newsletter where I share photography education, tutorials, & inspiration I’ve gained throughout my journey from beginner to professional landscape photographer.

                  I respect your privacy. Unsubscribe at any time.

                  Tips to Sharpen Your Photos in Lightroom

                  Perhaps one of the most sought after qualities amongst outdoor and landscape photographers is overall image sharpness. Understanding how to properly sharpen your landscape photos during post processing has become a rather complex and highly detailed procedure over the years due to the advancements in editing software. The interesting thing about sharpening though, is that the entire process is merely an illusion as there isn’t any way to actually “sharpen” a photograph.

                  The wizardry known as sharpening in Lightroom (or any other software) is the result of selectively applying small amounts of contrast to the edges of your image. This modest amount of edge contrast is what creates the illusion that an image is actually sharper than it was straight out of camera. Sounds easy enough, but the tricky part is understanding the best way to sharpen multiple types of detail and textures within your image. Not all details are the same and they shouldn’t be enhanced as if they are.

                  Sharpening Workflow

                  When it comes to sharpening in Lightroom for nature photography, there is no one-size-fits-all approach. Within a single nature photo you can have various types of detail and textures that require enhancing. These include small to fine-sized detail, medium and large-sized detail, or maybe all three. Each level of detail should be enhanced or sharpened independently using specific tools and methods of application.

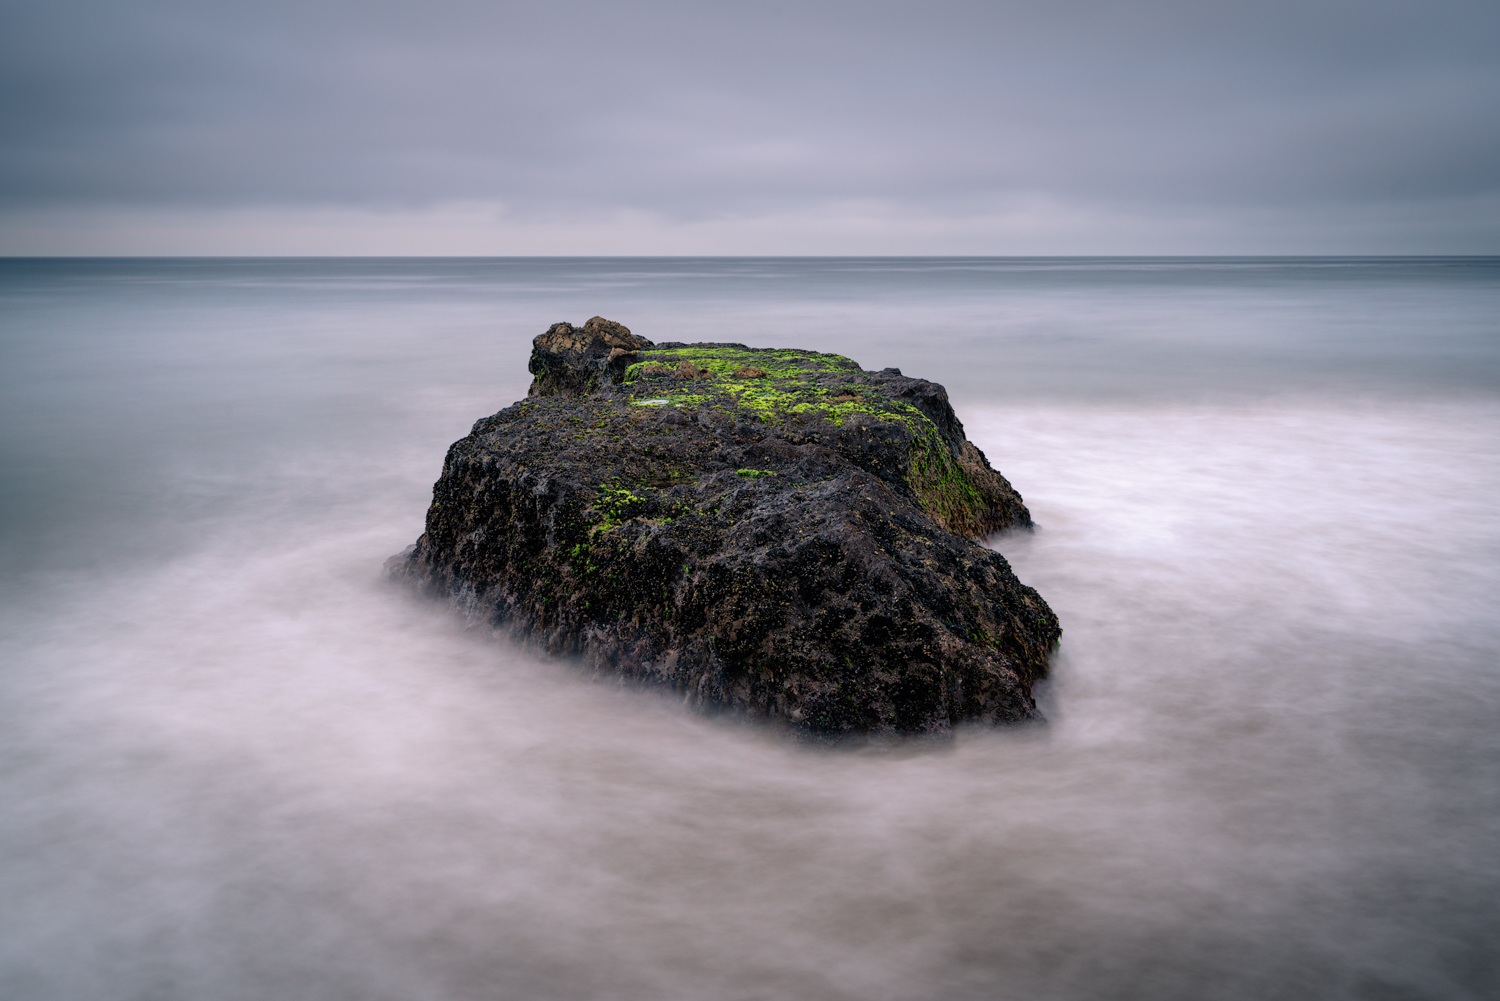
                  For example, in the image above, a strong edge sharpening is required only in the rock and not in the rest of the image. Similarly the ocean surrounding the rock along with the sky can benefit from enhancing texture.

                  There’s multiple tools available within Lightroom to enhance details and textures. Each method creates a similar yet different result depending on the level of detail you're looking to enhance. Below are a few of my favorite tools that I use to sharpen my landscape photos. 

                  Detail Panel

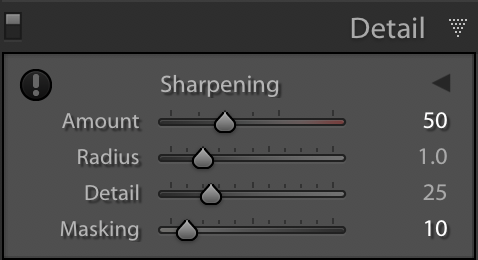
                  This tool is perhaps the most popular technique when it comes to sharpening in Lightroom. This approach is comprised of four sliders: Amount, Radius, Detail, and Masking. It is a fantastic option to sharpen the small to fine-sized details contained within your image.

                  Sharpening in Lightroom

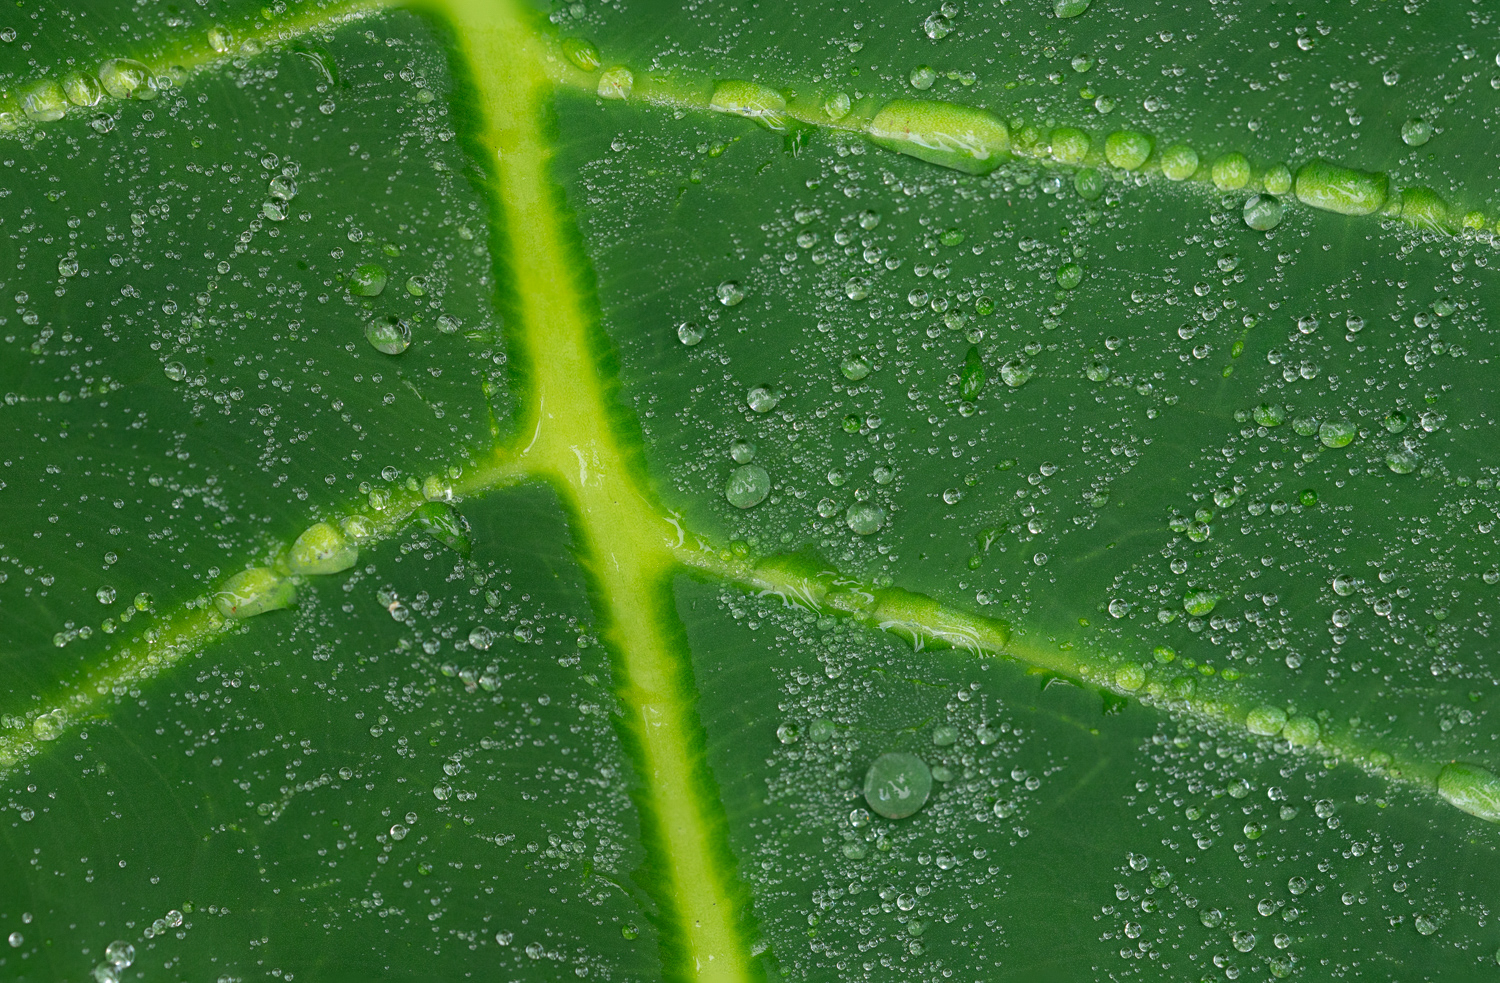
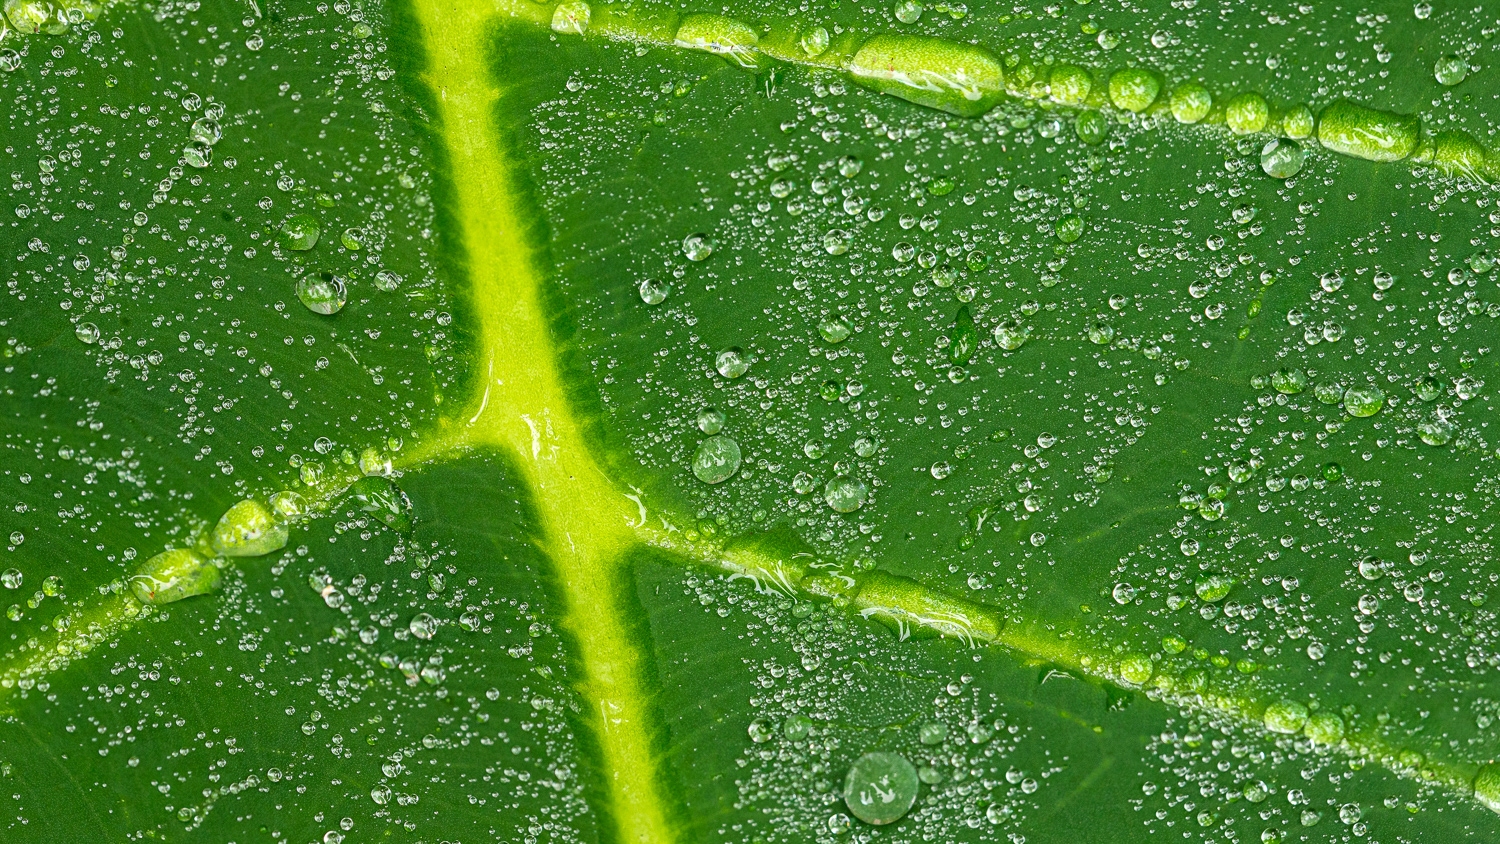
                  Here is an example from my new Sharpening in Lightroom Tutorial that shows you just how effective the Details panel in Lightroom can be.

                  The first image above (Image #1) is an abstract nature photo before I applied sharpening. I sharpened Image #2 using the details panels and other tools in Lightroom.

                  Texture Slider

                  This slider is perfect for sharpening and enhancing small to medium-sized details. I’ve found the best way to see the impact of this tool is to zoom in quite a bit and scrub the slider from -100 to +100. This is an easy way to visualize the level of detail that’s being impacted. Read more>
                  Check out my Photo & Video Gear Kit!

                  📨 Join 52k Readers

                  The Morning Blaze - my free, email newsletter where I share photography education, tutorials, & inspiration I’ve gained throughout my journey from beginner to professional landscape photographer.

                    I respect your privacy. Unsubscribe at any time.

                    How To Bracket For Perfectly Exposed Landscape Photos

                    Perhaps one of the more difficult aspects of landscape photography is determining how to properly expose your scene under less than ideal lighting conditions. These types of situations are a common occurrence with outdoor photography as it’s often a struggle trying to properly expose an image consisting of a bright sky and a dark foreground in a single image. 

                    This is where exposure bracketing comes in handy. In this article we’ll discuss How, Why & When you should bracket your shots for perfectly exposed landscape photos. 

                    What is Exposure Bracketing?

                    Exposure Bracketing is the process of taking multiple versions of the same image with each image representing a different level of exposure. For example, I typically shoot a three shot bracketed series, one image for my main exposure where I expose the scene the best I can, the second image which is two stops below my main exposure and the third which is two stops above my main exposure. This can also be done using various other combinations as well, such as a five or nine image series with one, two, or even three stops of light between each image.  

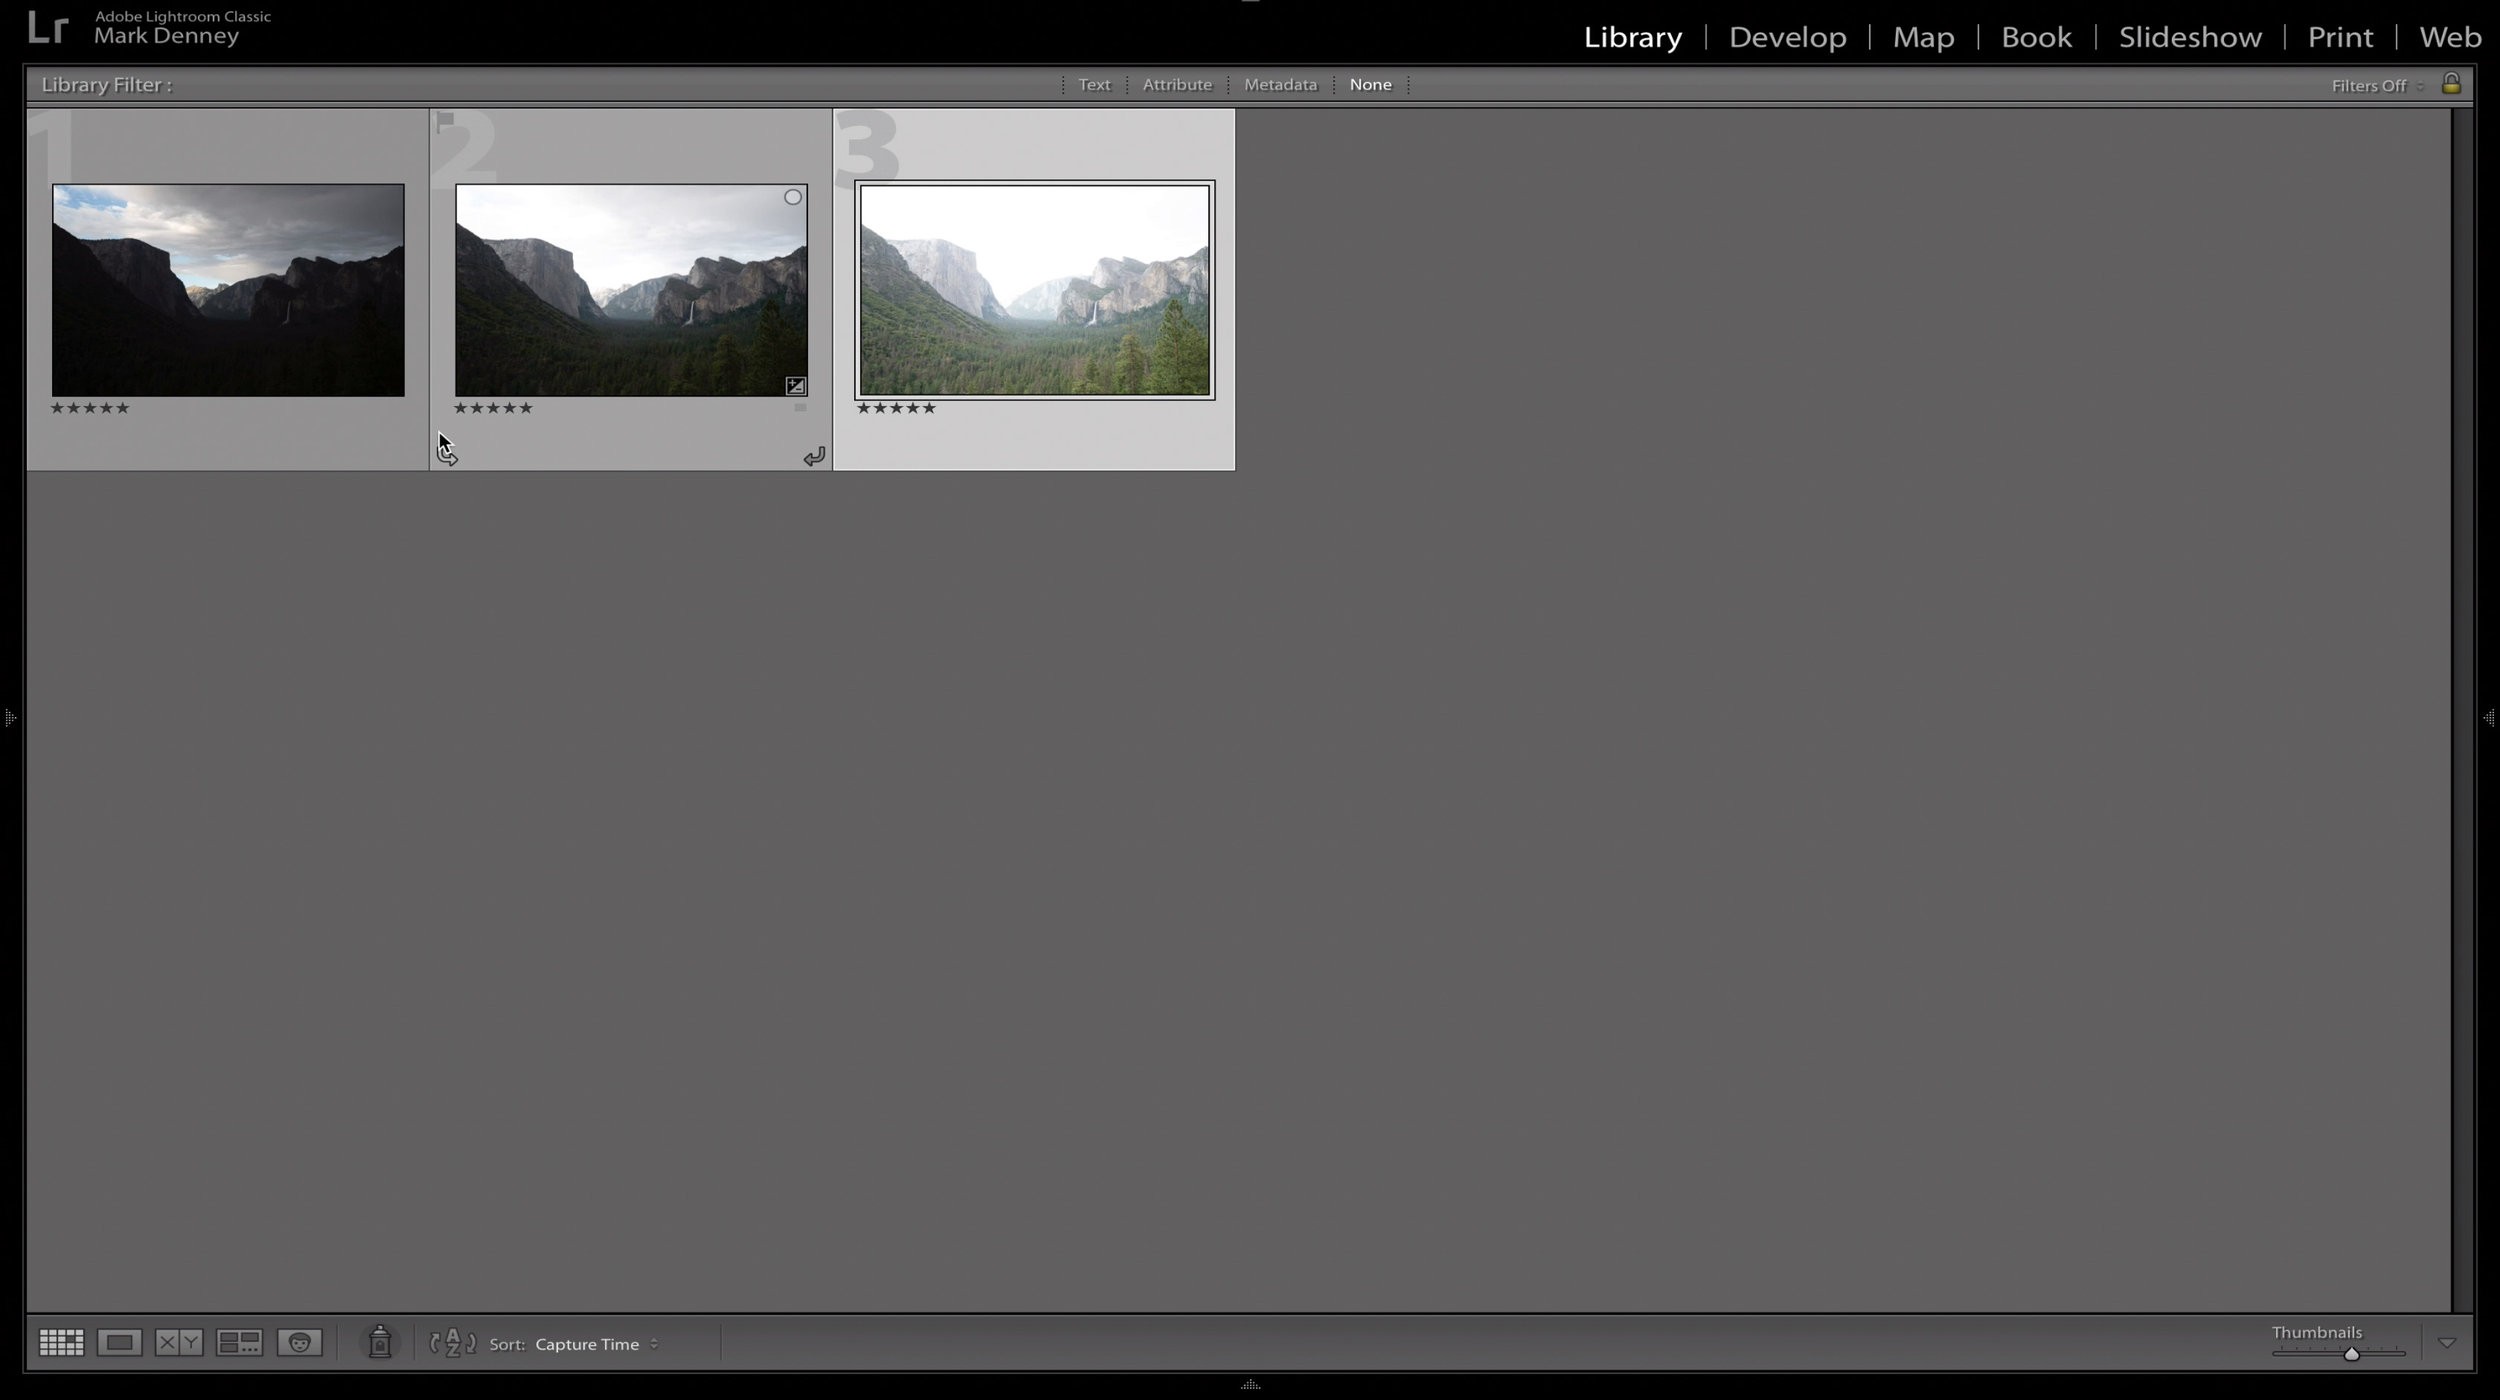
                    The results in Lightroom of a three image exposure bracketed series from Yosemite Valley.

                    The results in Lightroom of a three image exposure bracketed series from Yosemite Valley.

                    Once your exposure bracketed series is complete, you then blend the images together using your post processing software of choice. An easy way to do this is with the HDR feature within Lightroom or you can blend your images together using Photoshop. 

                    Modern-day cameras have the ability to capture a large tonal range within a single image, but it’s still common to encounter lighting conditions that far surpass the ability of your camera. Any camera can bracket exposures, some have automatic bracketing modes and others require this to be done manually, but both options are simple to apply.

                    Automatic Exposure Bracketing (AEB)

                    This feature allows you to set the number of images in your bracketed series along with the number of stops of exposure between each one. You can even take it a step further by setting the AEB function on your camera to Continuous Shooting and have your entire series captured with a single press of the shutter.  

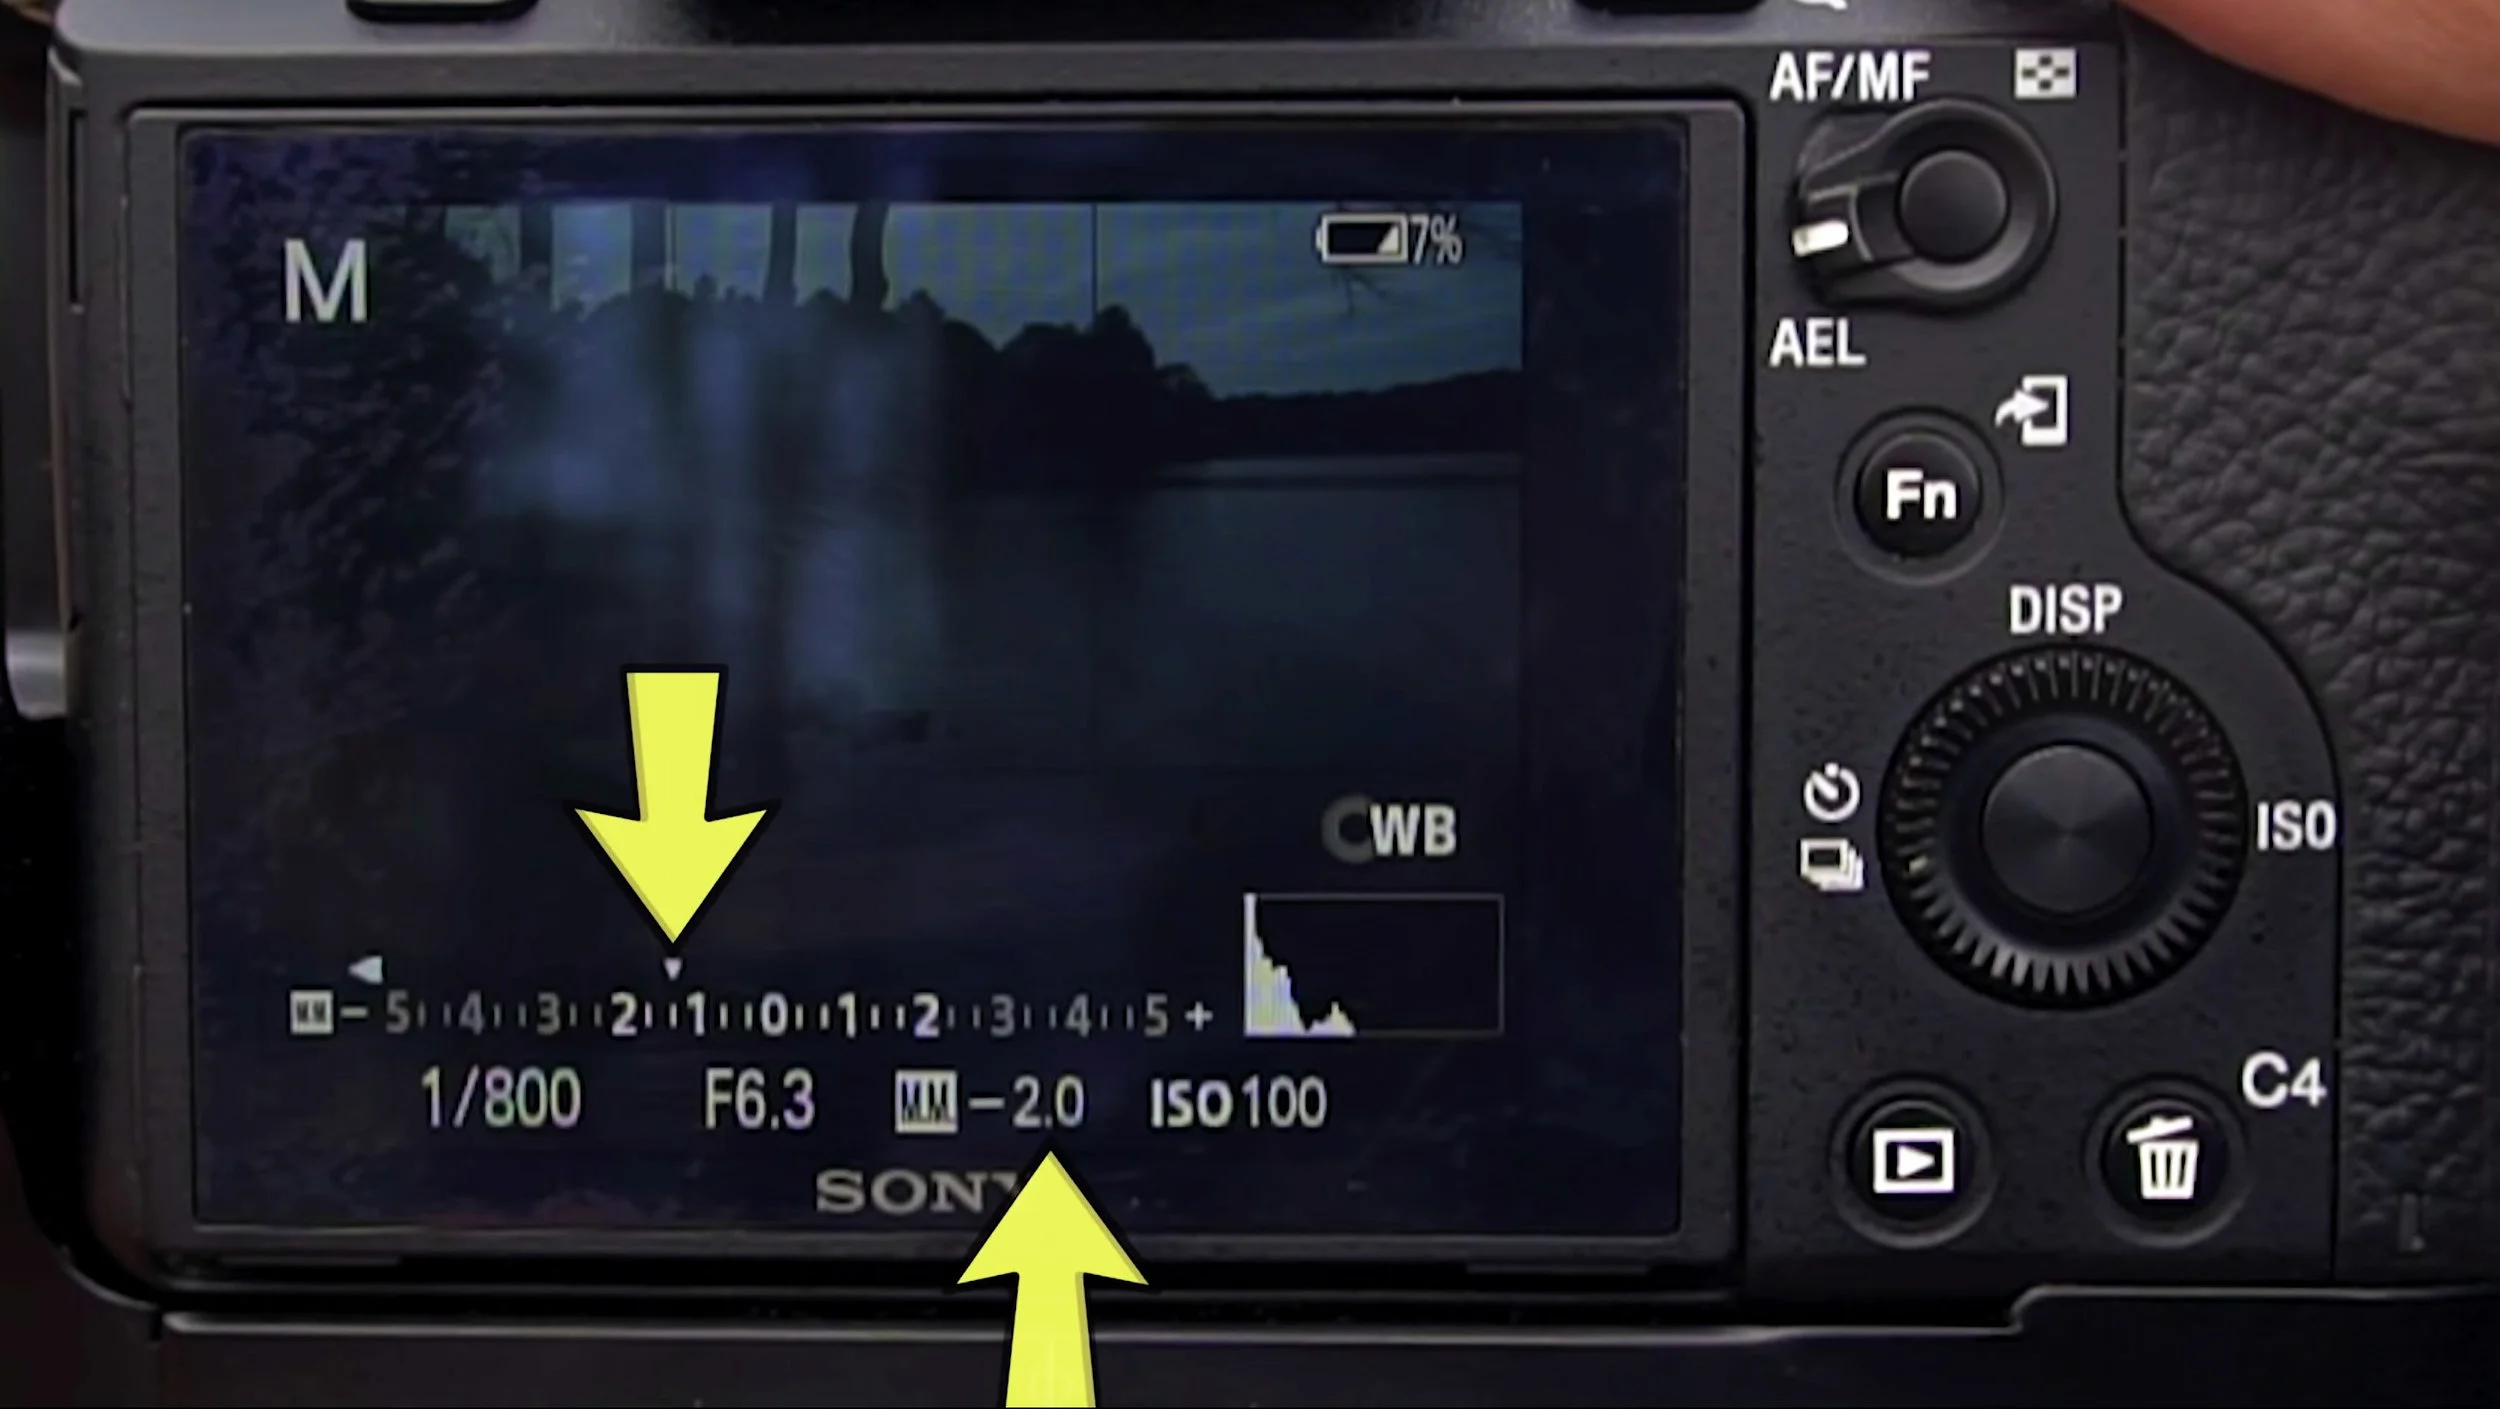
                    Setting Auto Exposure Bracketing on my Sony a7rii for 3 images with 2 stops of exposure between each.

                    Setting Auto Exposure Bracketing on my Sony a7rii for 3 images with 2 stops of exposure between each.

                    Manual Exposure Bracketing

                    If your camera doesn’t have an AEB feature you can always manually exposure bracket. The process here is simple as well - after each image you’ll want to adjust your shutter speed to create your overexposed and underexposed images. You don’t want to use aperture as a means to influence your exposure levels as you want consistency when it comes to depth of field in order to seamlessly blend your images.

                    When Should You Bracket Your Images?

                    I go by something called the ‘One-Stop’ rule to help me determine when to bracket my exposure. Your camera’s light meter is a great way to quickly check this. Adjust your settings to where the light meter is indicating a “proper” exposure, then if you have to adjust your exposure level, plus or minus, more than one stop to properly expose for the sky or foreground than you might want to bracket your exposures. If a proper exposure of your foreground or sky is within a single stop of your main or base exposure then your camera’s dynamic range can more than likely pick up the difference.  

                    This would be a lighting situation that would benefit from exposure bracketing.

                    This would be a lighting situation that would benefit from exposure bracketing.

                    Hopefully next time you find yourself in a challenging lighting situation this information will help you bracket your shots to create a perfectly exposed landscape image. 

                    Mark

                    Check out my Photo & Video Gear Kit!

                    📨 Join 52k Readers

                    The Morning Blaze - my free, email newsletter where I share photography education, tutorials, & inspiration I’ve gained throughout my journey from beginner to professional landscape photographer.

                      I respect your privacy. Unsubscribe at any time.

                      9 Single Key Lightroom Shortcuts I Use Everyday

                      In all honesty, I only use single key shortcuts as opposed to multi key for the simple reason that I can’t remember much beyond a single keystroke. I thought about printing every shortcut and hanging it on my office wall for reference, but that would defeat the purpose of using shortcuts in the first place as I’d have to spend additional time scanning the printout to locate what I’m looking for.

                      In this 12 minute video, I discuss the 9 single key Lightroom shortcuts I use everyday. These are not in any specific order, I use the first shortcut just as much as I use the last. I even have a bonus “setting” at the end and if you’re a little obsessed with organization then you’re going to love this one! 

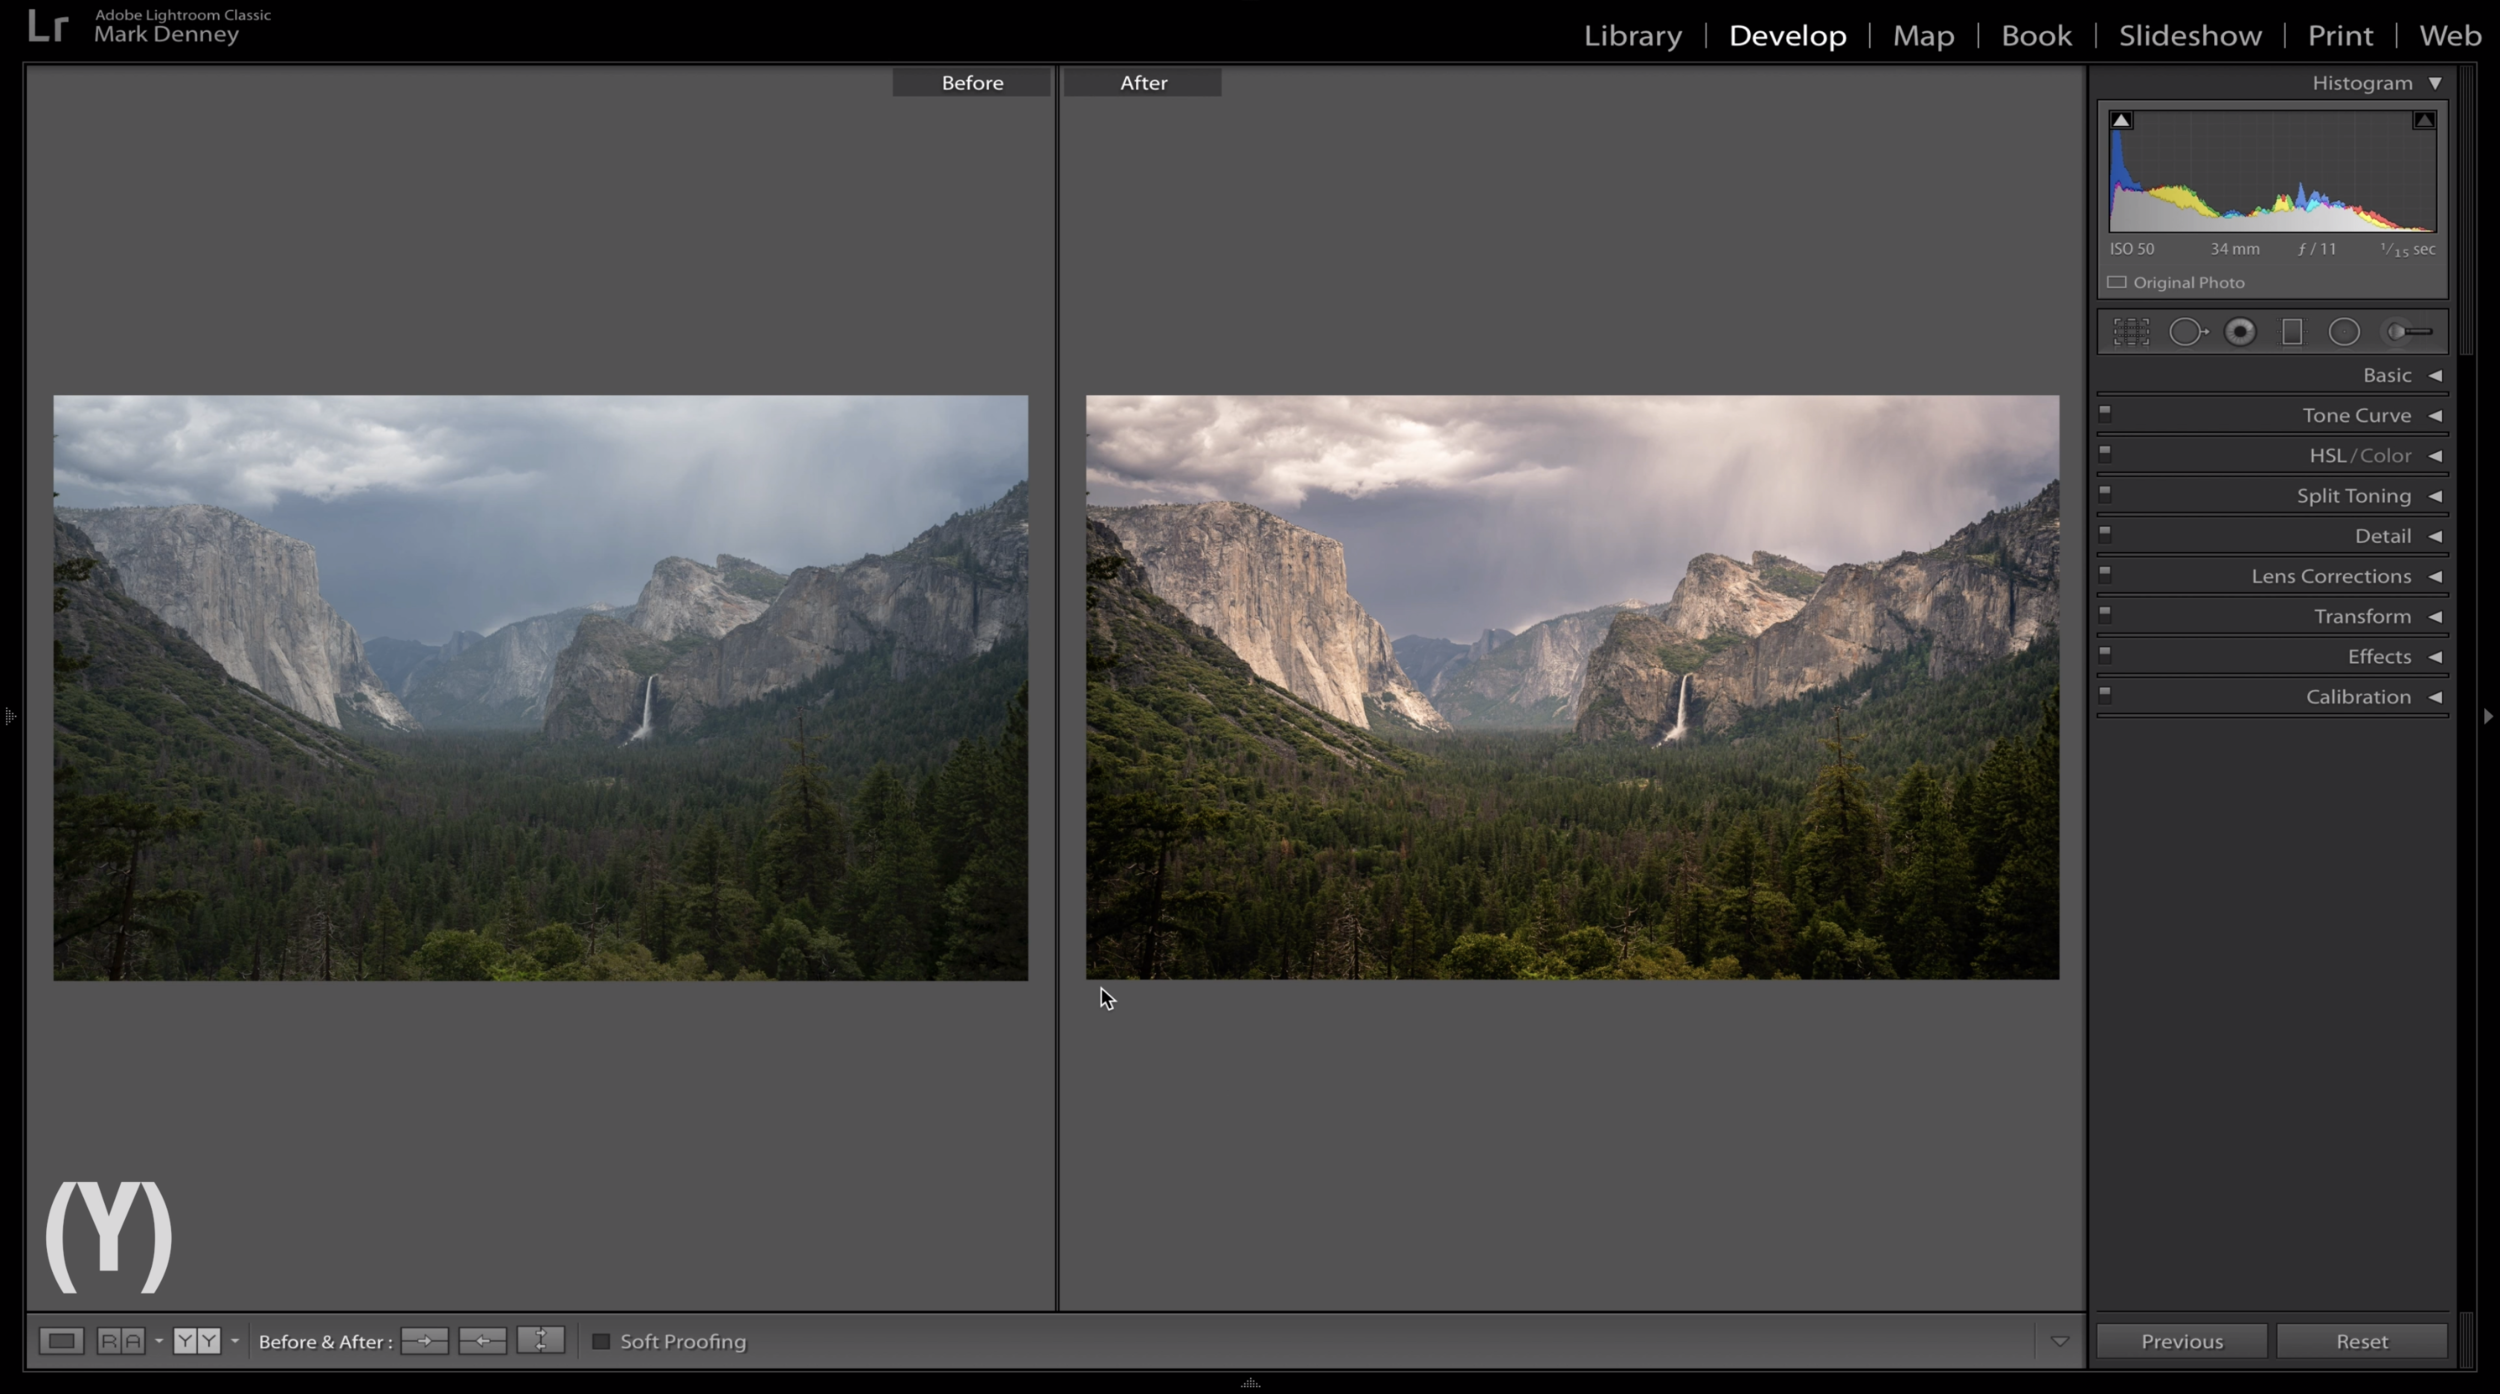
                      1. Shortcut Key (/) & (Y) Before & After

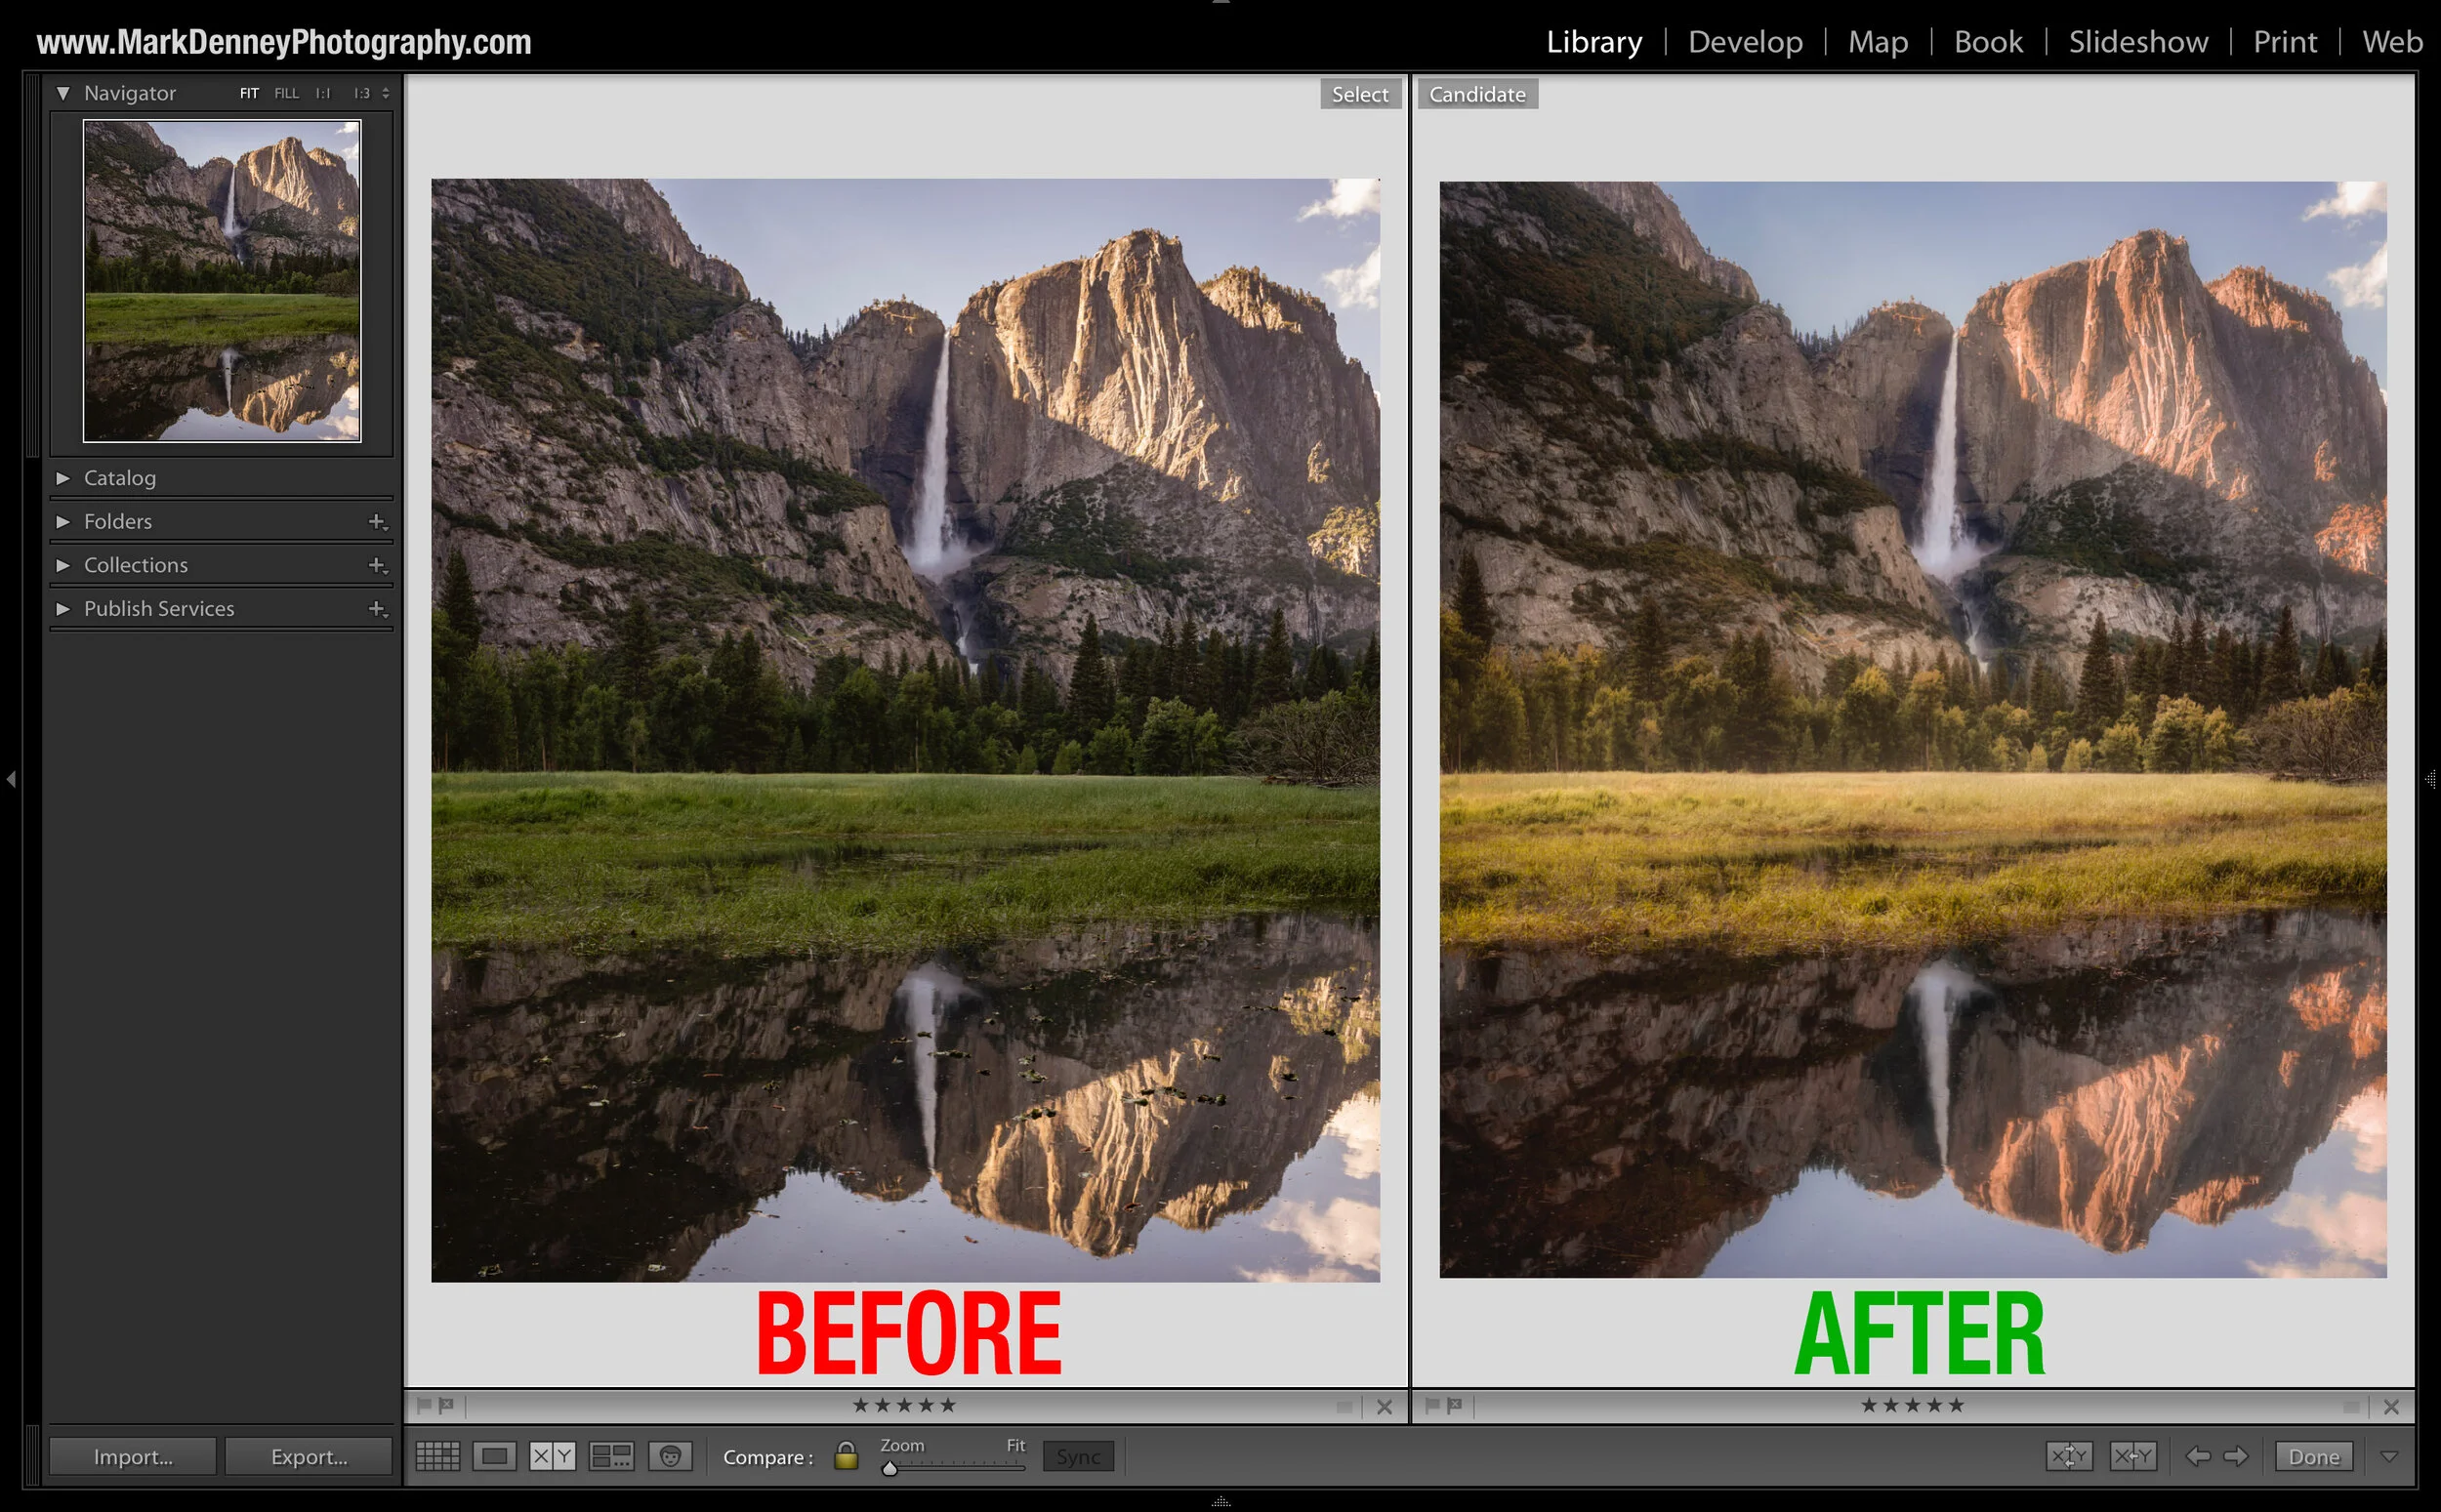
                      This is one of my favorite ways to see how far I’ve taken an edit by comparing the starting point to what the image looks like now.  

                      Tunnel View - Yosemite National Park

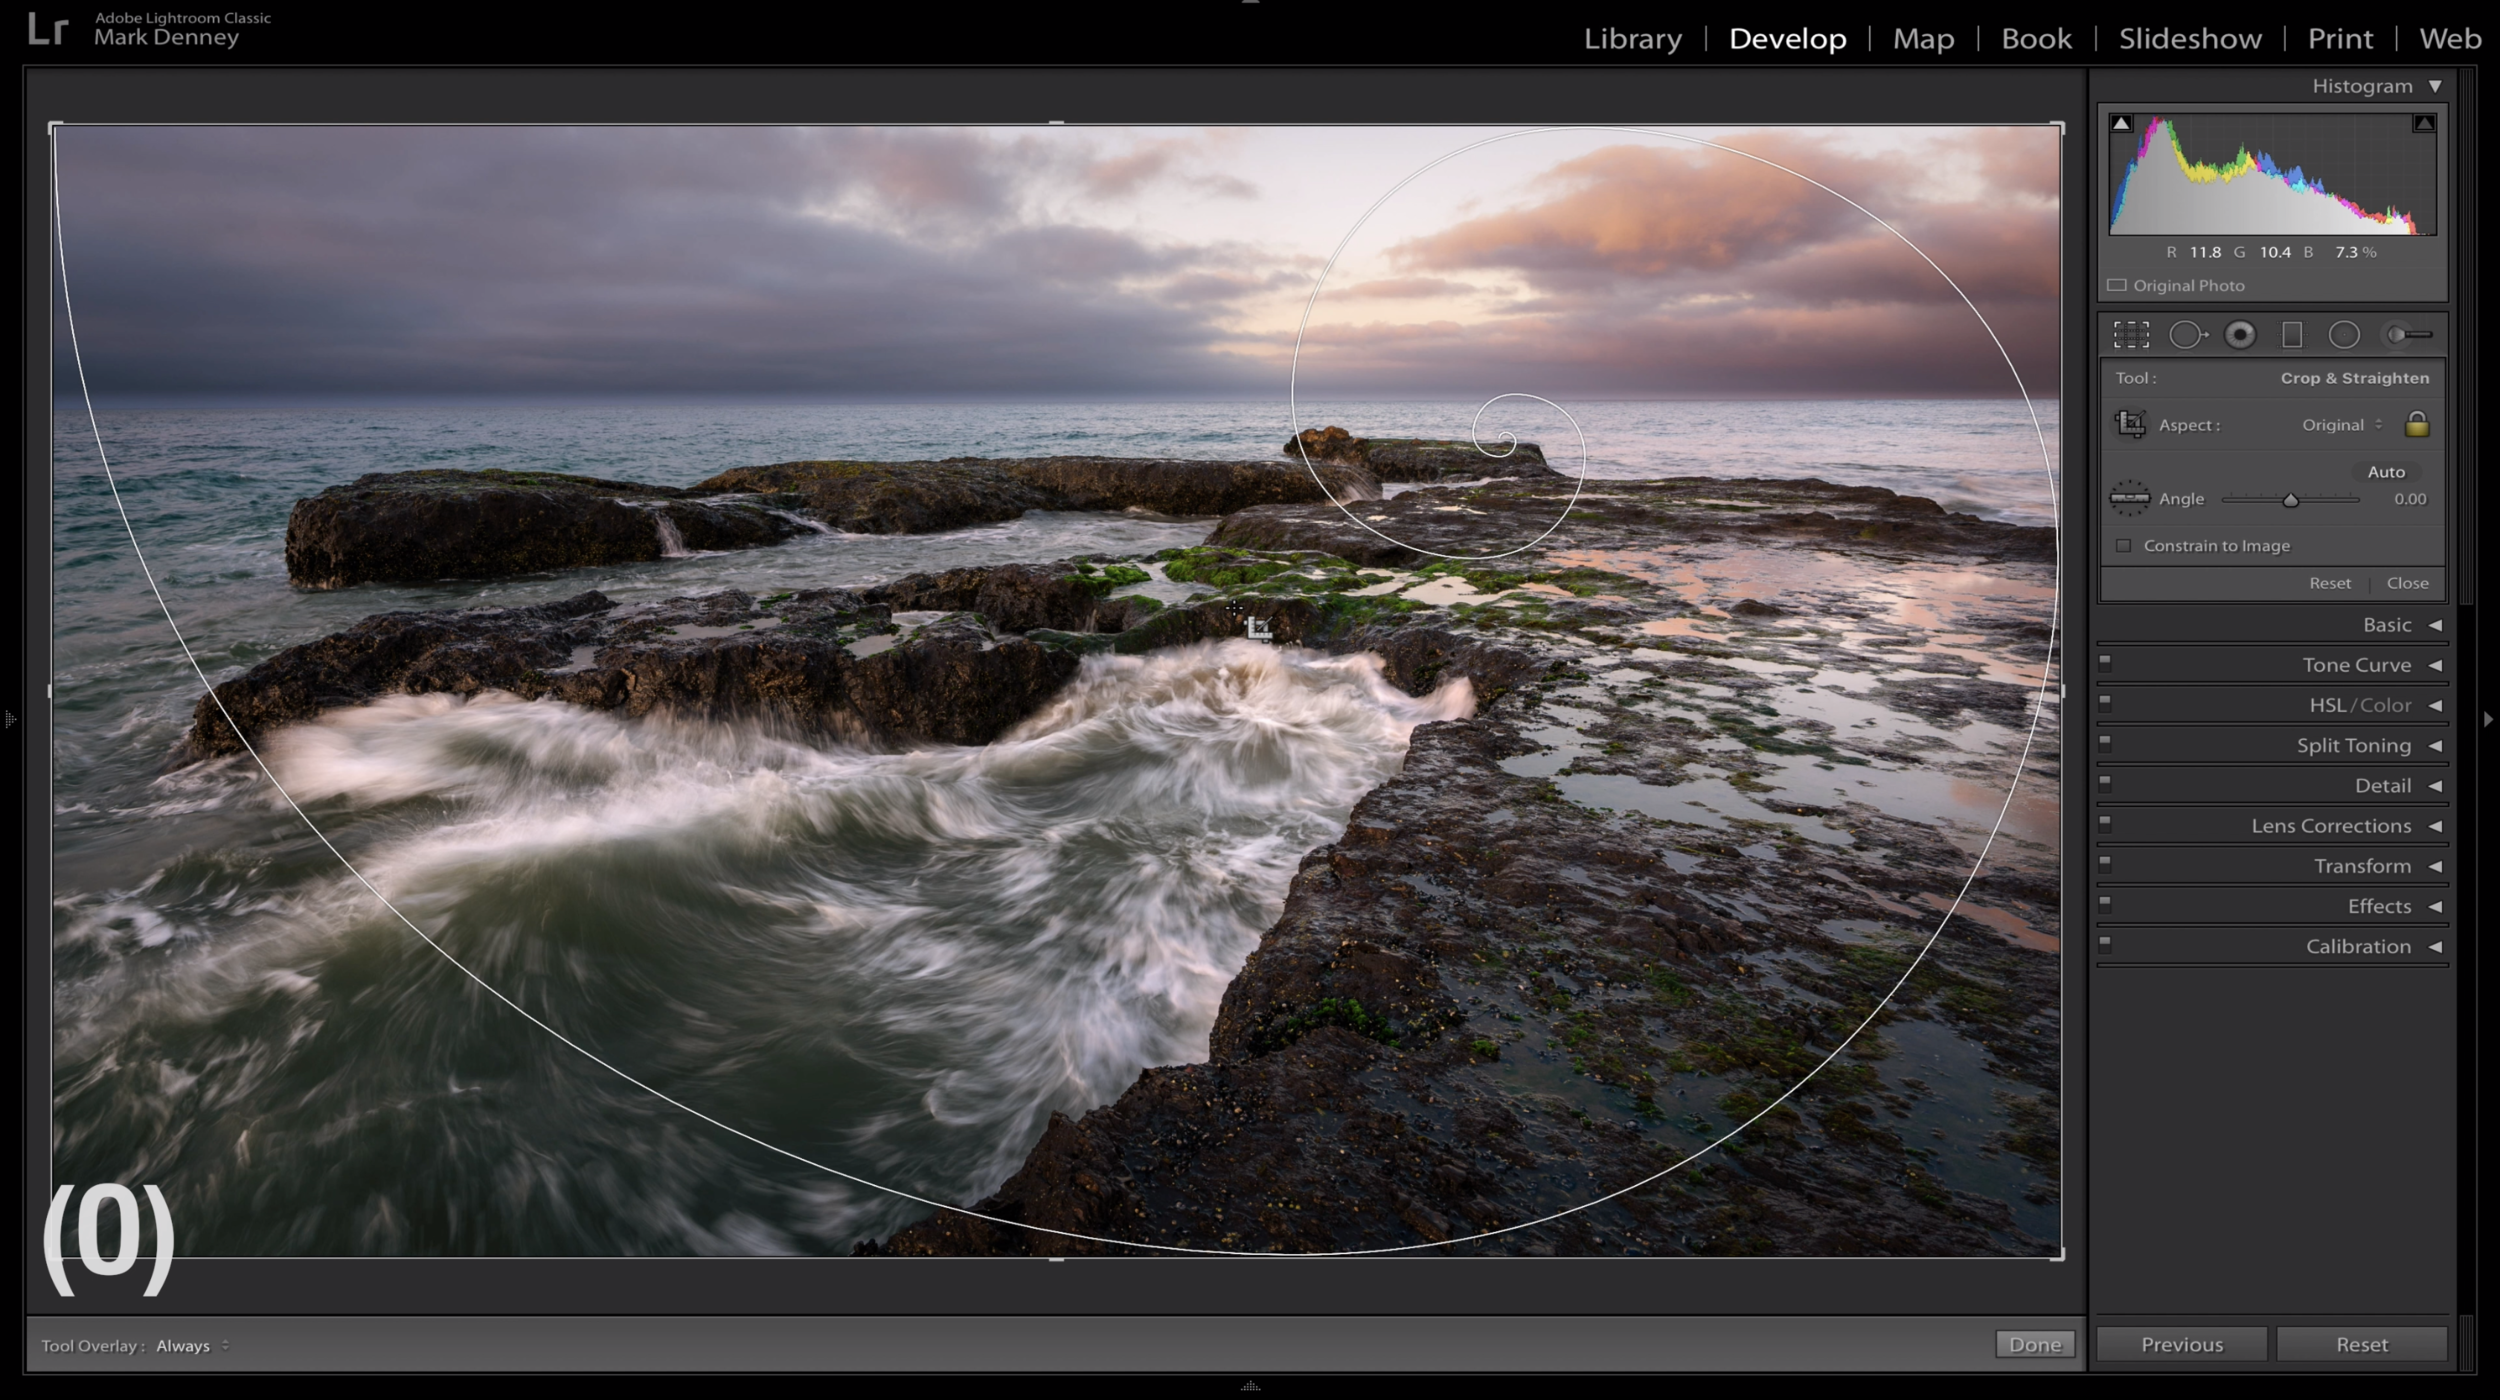
                      2. Shortcut Key (O) Crop Grid Overlay

                      This is a great shortcut to aid in cropping your image in order to perfect the composition. Pressing O repeatedly will cycle through all the available options. 

                      Santa Barbara, California

                      3. Shortcut Key (J) Clipping Indicator

                      The easiest and fastest way to determine if you have areas of your image that are either over or underexposed (red identifies overexposed and blue identifies underexposed areas) 

                      Bridalveil Falls Yosemite

                      4. Shortcut Key (V) Convert to Black & White

                      I don’t often process images in Black & White, but that doesn’t mean I don’t like to quickly check to see if it’s a viable option.  

                      Yosemite Valley Black&White

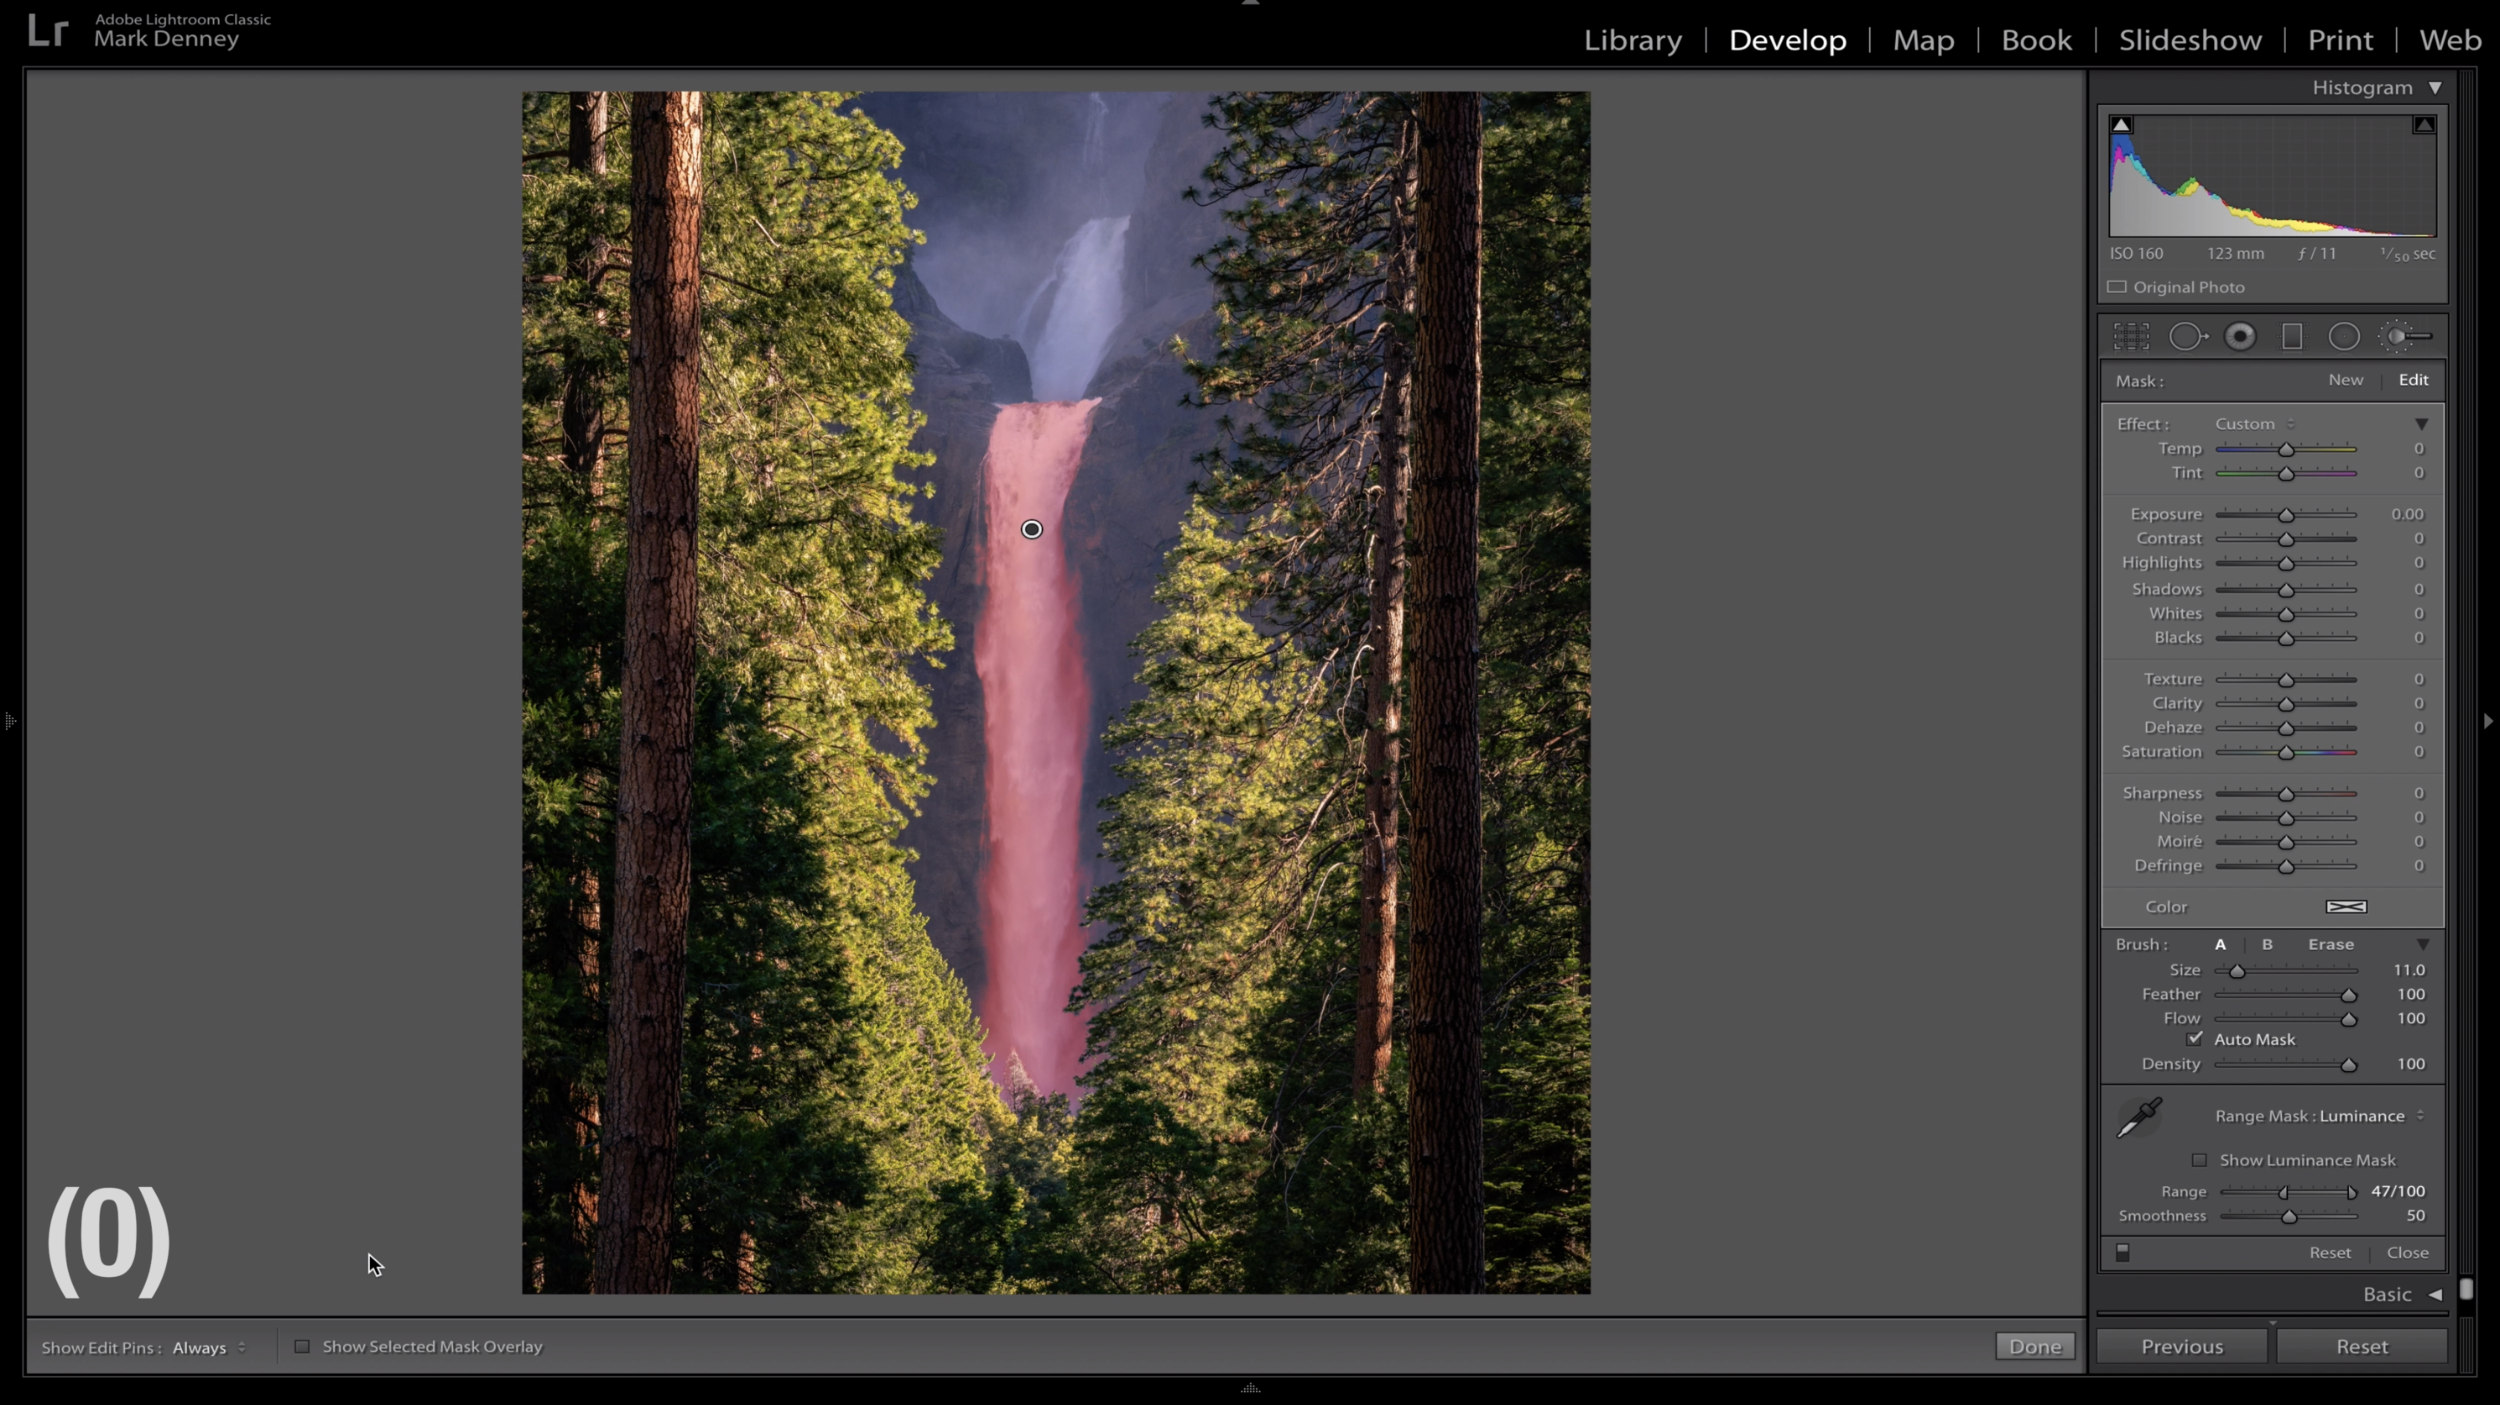
                      5. Shortcut Key (O) Show Mask Overlay

                      The importance of this one speaks for itself! Being able to quickly see what area of your photograph is impacted by a local adjustment is critical.  

                      Yosemite Falls

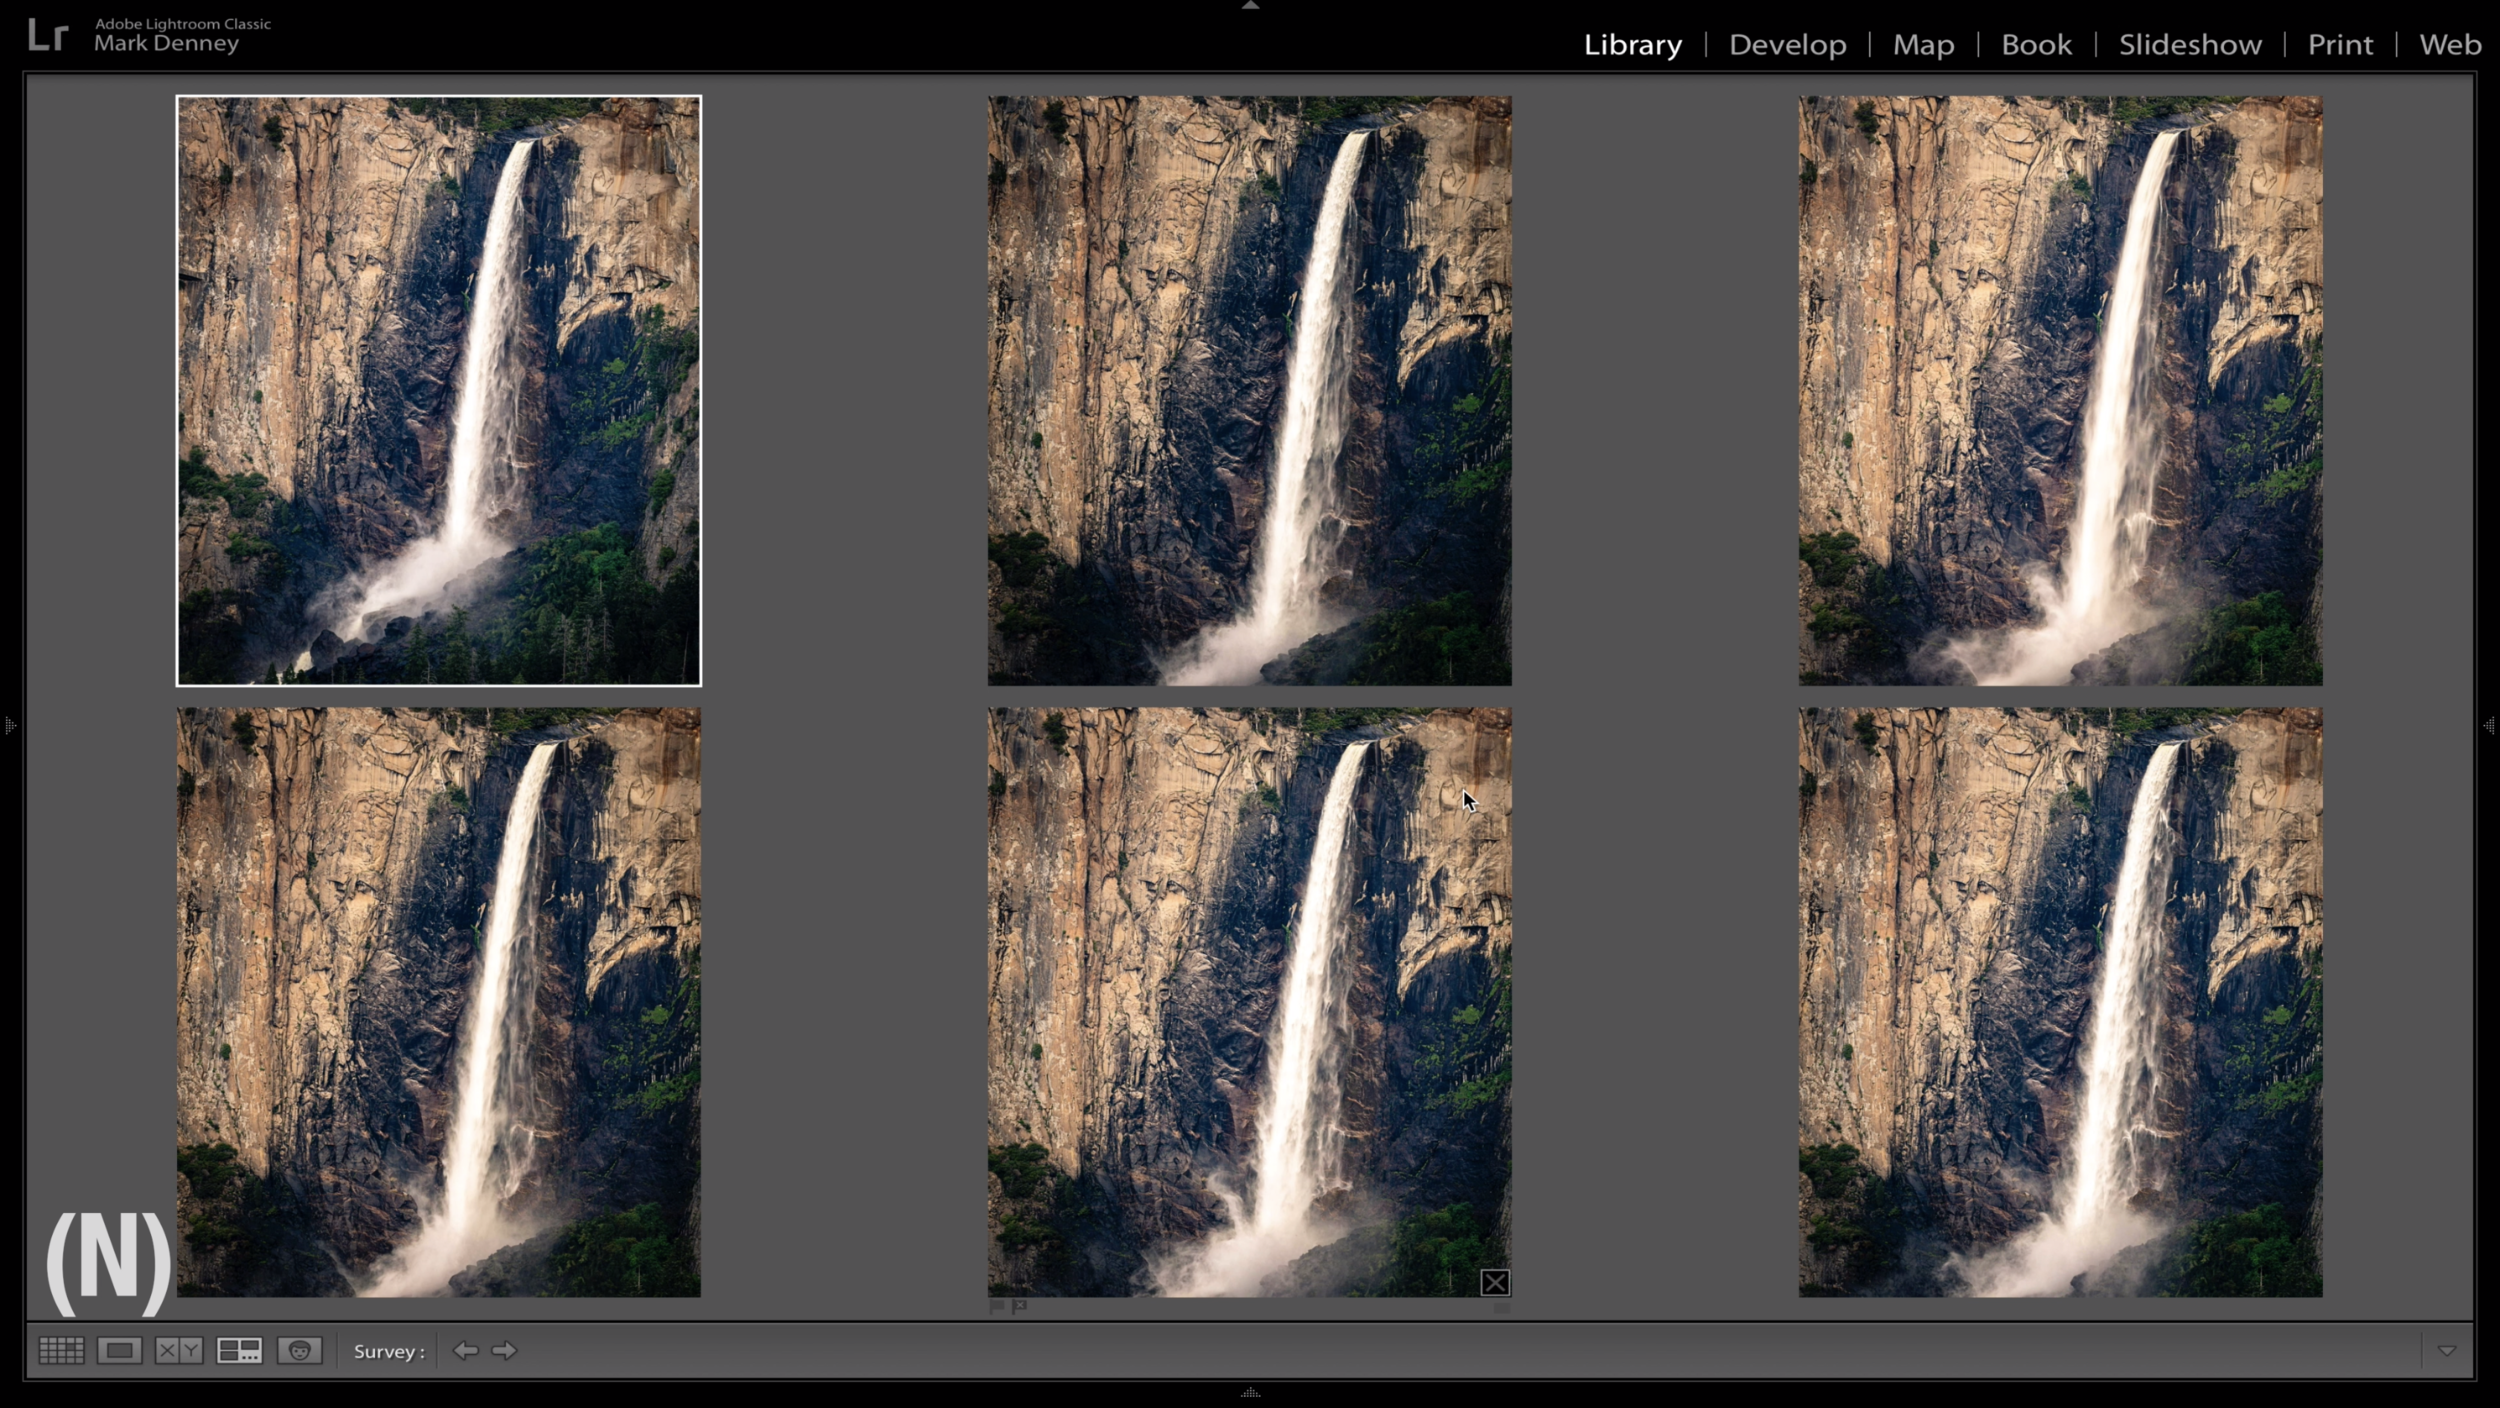
                      6. Shortcut Key (N) Survey Mode

                      If you take multiple versions of the same image with minor changes in settings and composition then this ones for you. This shortcut will help you easily decide which photo is the keeper.  

                      Bridalveil Falls Yosemite National Park

                      7. Shortcut Key (D) & (G) Develop and Library Grid

                      This might be the single most traveled path for all Lightroom users - the Library Grid to the Develop Module and these single key shortcuts will help you quick ly navigate between them both. 

                      8. Shortcut Key (L) & (F) Lights Out and Full Screen

                      This is great for eliminating distractions from your screen to see how an image you’re editing is coming together.

                      Intimate Half Dome Yosemite National Park

                      9. Shortcut Key (X) Crop Flip Aspect Ratio

                      Sometimes I like to crop an image taken in a landscape orientation into a portrait orientation and this shortcut is a great way to quickly do just that.  

                      El Capitan Yosemite National Park

                      And, for the bonus tip - right click the header of any section within the Develop Module and select “Solo Mode”. In my opinion this is one of Lightroom’s best kept secrets to keeping your panels organized without having to close each panel manually after using it. 

                      Intimate Bridalveil Falls Yosemite

                      Hopefully you didn’t know all of the shortcuts mentioned and were able to pick up a couple new ones that you can apply to your editing workflow moving forward. 

                      Mark

                      Check out my Photo & Video Gear Kit!

                      📨 Join 52k Readers

                      The Morning Blaze - my free, email newsletter where I share photography education, tutorials, & inspiration I’ve gained throughout my journey from beginner to professional landscape photographer.

                        I respect your privacy. Unsubscribe at any time.