🔥Better Photos Fast

Get your FREE Lightroom Color Editing Course & Learn How to:

✅ Create Color Harmony

✅ Improve Tonal Range

✅ Establish Color Separation

✅ Make Colors Tastefully Pop!

    I’ll never share your email address with anyone. Unsubscribe at anytime. Email Policy

    What Camera Modes should I use for Nature Photography?

    When you’re first starting out in landscape photography, understanding the many adjustments and settings associated with your camera is paramount. At the same time, this initial learning curve can be rather intimidating. Of all the camera features to understand, arguably the most important to grasp are the different camera modes that are available. The four primary camera modes are Automatic, Aperture Priority, Shutter Priority, and Manual. 

    Fully Automatic mode is more than likely where you’ll feel most comfortable when you’re first starting out, but you’ll want to transition out of this mode as quickly as possible. The longer you spend shooting in full automatic mode, the more difficult it will be to progress to other shooting options. Once you decide to make the leap and venture outside of Automatic mode, where do you go from there? First, you’ll want to understand how each mode operates and become comfortable with when to use mode.

    Photography Exposure Triangle

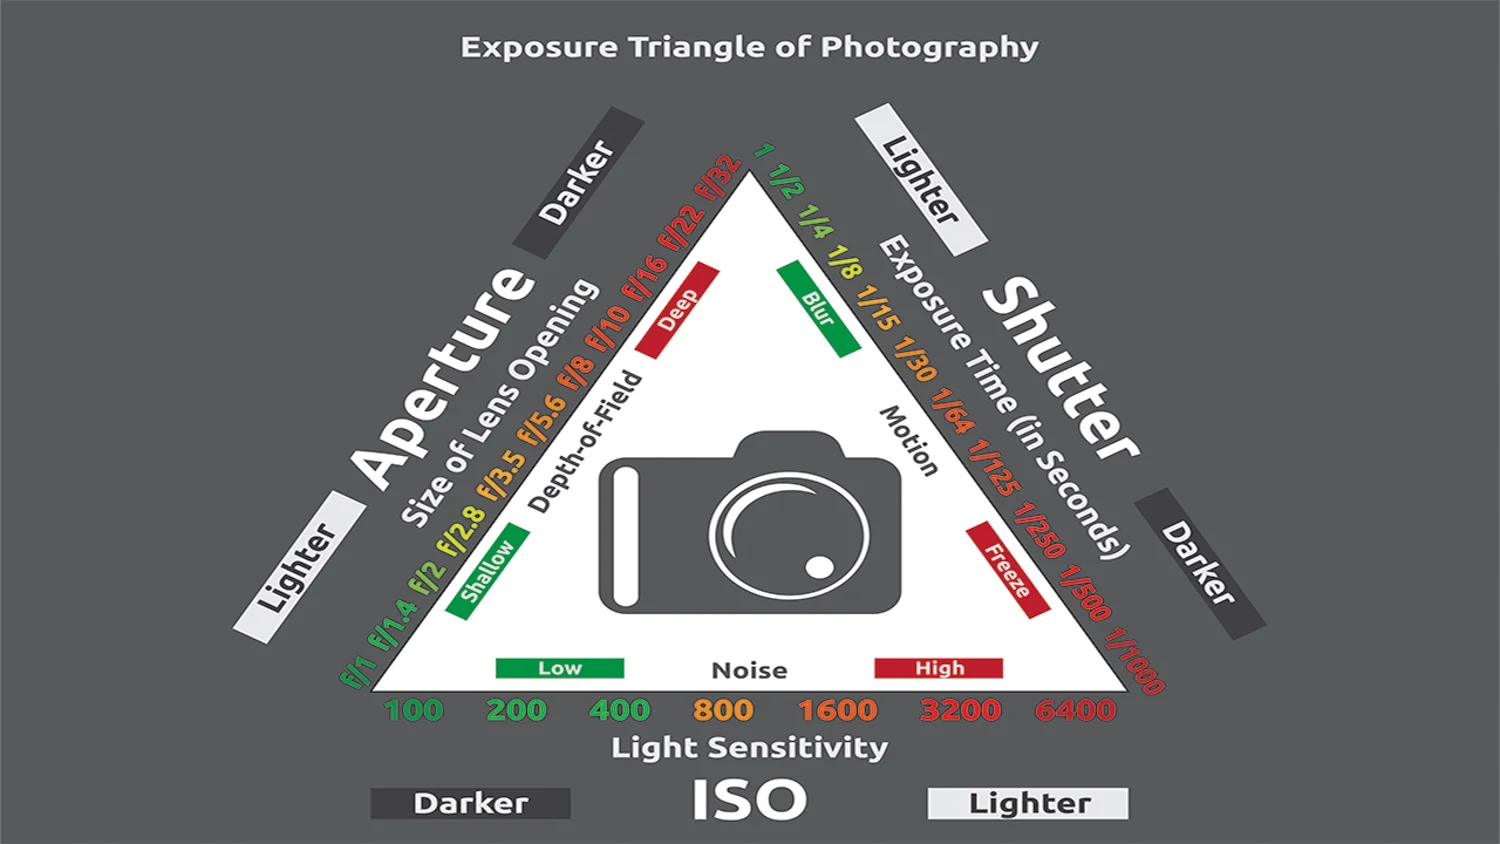
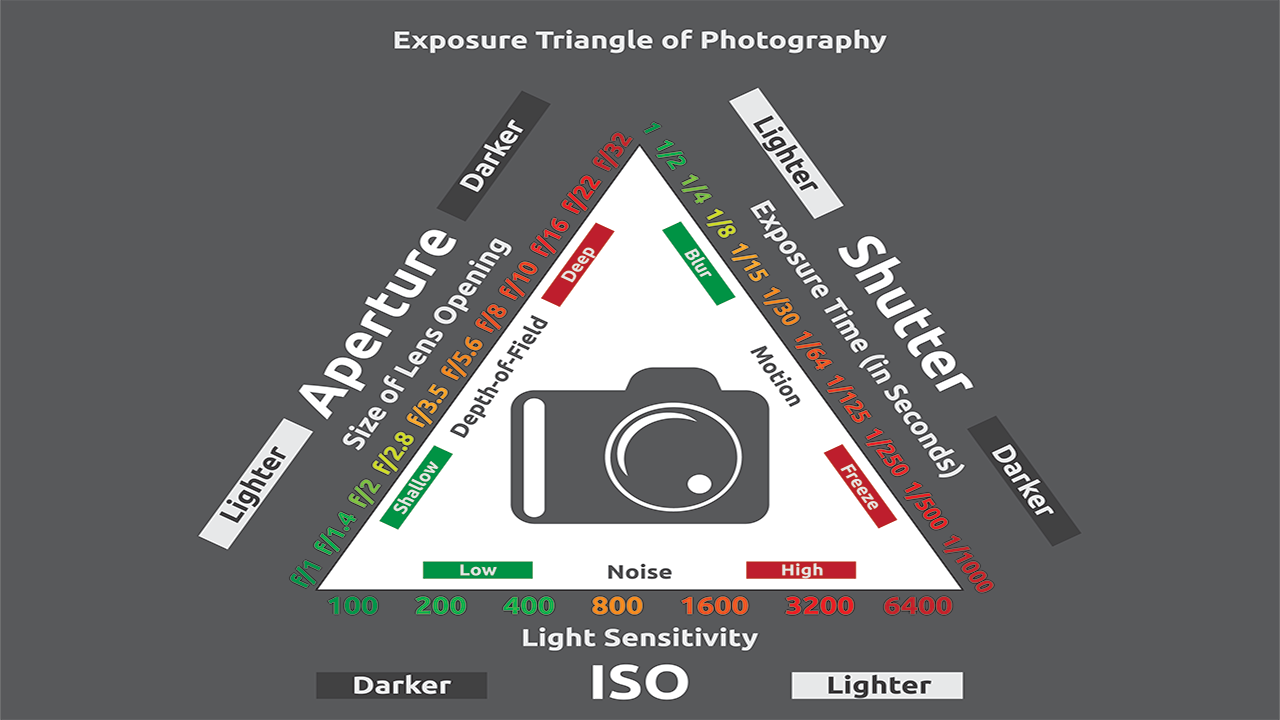
    Before we dive into the individual shooting modes, lets first recap the inner workings of the Exposure Triangle. The three sides of the exposure triangle represent Aperture, Shutter Speed, and ISO. These are the three components that determine the overall exposure of an image.

    Photography Exposure Triangle Diagram

    Photography Exposure Triangle Diagram

    Aperture: Aperture measures the opening of the lens (f-stop) that ultimately determines the amount of light that is allowed to pass through the lens to your camera’s sensor. The higher the f-number (f-stop), the smaller the opening and the lower the f-number the larger the opening.

    Markings on Front element F/5.6 16-35mm Camera Lens

    Markings on Front element F/5.6 16-35mm Camera Lens

    Shutter Speed: Shutter speed measures the amount of time the shutter remains open allowing light to pass through to your camera’s sensor. A slower shutter speed results in more light passing through and a faster shutter speed results in less light.

    ISO: ISO allows you to brighten or darken an image and determines how “sensitive” your camera is to the available light in your scene. The higher the ISO, the brighter your image and the lower the ISO, the darker your image.

    Fully Automatic Shooting Mode

    As the name suggests, this mode is fully automatic. The camera adjusts all settings that it deems necessary to create a properly exposed image. This is a good place to start for a beginner photographer, but you don’t want to spend a great deal of time in this mode. Your goal should be to upgrade from Automatic mode as soon as possible into one of the creative shooting modes such as Aperture, Priority, or Shutter Priority.

    Typical shooting modes and how to set your camera to Full Automatic camera mode

    Typical shooting modes and how to set your camera to Full Automatic camera mode

    Aperture Priority Shooting Mode

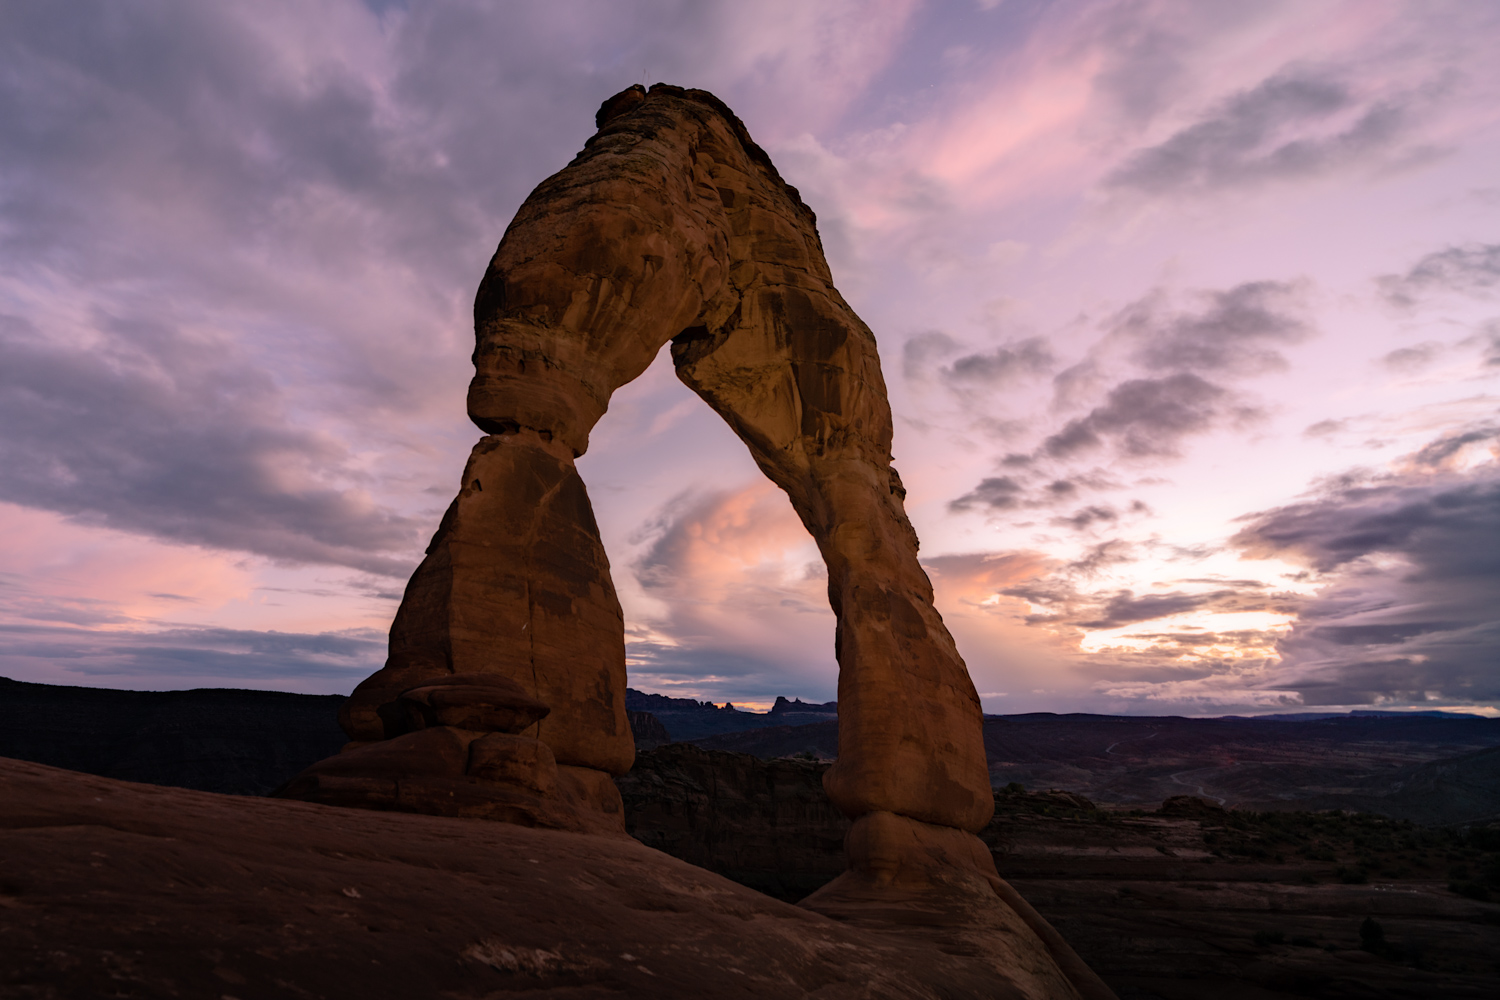
    Aperture Priority is probably the most popular camera mode for photographers. This mode is easy to understand and very functional yet still allows for a great deal of creative flexibility. In this mode, you’ll set the aperture (f-number) along with the desired ISO level and the camera determines the correct shutter speed given the amount of light in the scene. This mode is great for just about every genre of photography including nature photography. In this mode, you’re basically telling the camera that the aperture is the most important setting for what you’re photographing and you want to control that – that’s where the name Aperture Priority comes from.

    Setting a wide aperture using aperture priority camera mode allows you to gather as much light as possible with short shutter speed – Delicate Arch, Moab UT

    Setting a wide aperture using aperture priority camera mode allows you to gather as much light as possible with short shutter speed – Delicate Arch, Moab UT

    Shutter Priority Shooting Mode

    In this shooting mode, you’ll select the shutter speed and ISO and the camera will determine the best aperture to use in order to create a properly exposed image. I rarely use this camera mode for nature photography, but it can be useful when photographing fast moving subjects for sport or wildlife photography. When photographing birds for example, having a fast shutter speed is critical in order to freeze the action of the birds in flight. Read More>

    Mark

    Check out my Photo & Video Gear Kit!

    📨 Join 52k Readers

    The Morning Blaze - my free, email newsletter where I share photography education, tutorials, & inspiration I’ve gained throughout my journey from beginner to professional landscape photographer.

      I respect your privacy. Unsubscribe at any time.

      9 Worst Habits In Landscape Photography

      We all have them, some more than others, but one thing we all have in common is a desire to eliminate them..what I’m referring to are bad habits. I don’t want to speak for anyone else, but in this video, I discuss the 9 worst habits that have negatively impacted my landscape photography over the years.  

      #9 Quick Edits

      When I get back from a shoot I always download the images and back them up, but unfortunately I don’t stop there. My excitement usually gets the best of me and before I know it I’ve reviewed all the images, 5 starred my favorites and even placed a quick edit on many. I’m trying to get better at letting images rest for a day or so and then take a look with a “fresh” set of eyes.  

      Worst Habits In Landscape Photography

      #8 Single Lens Shooting

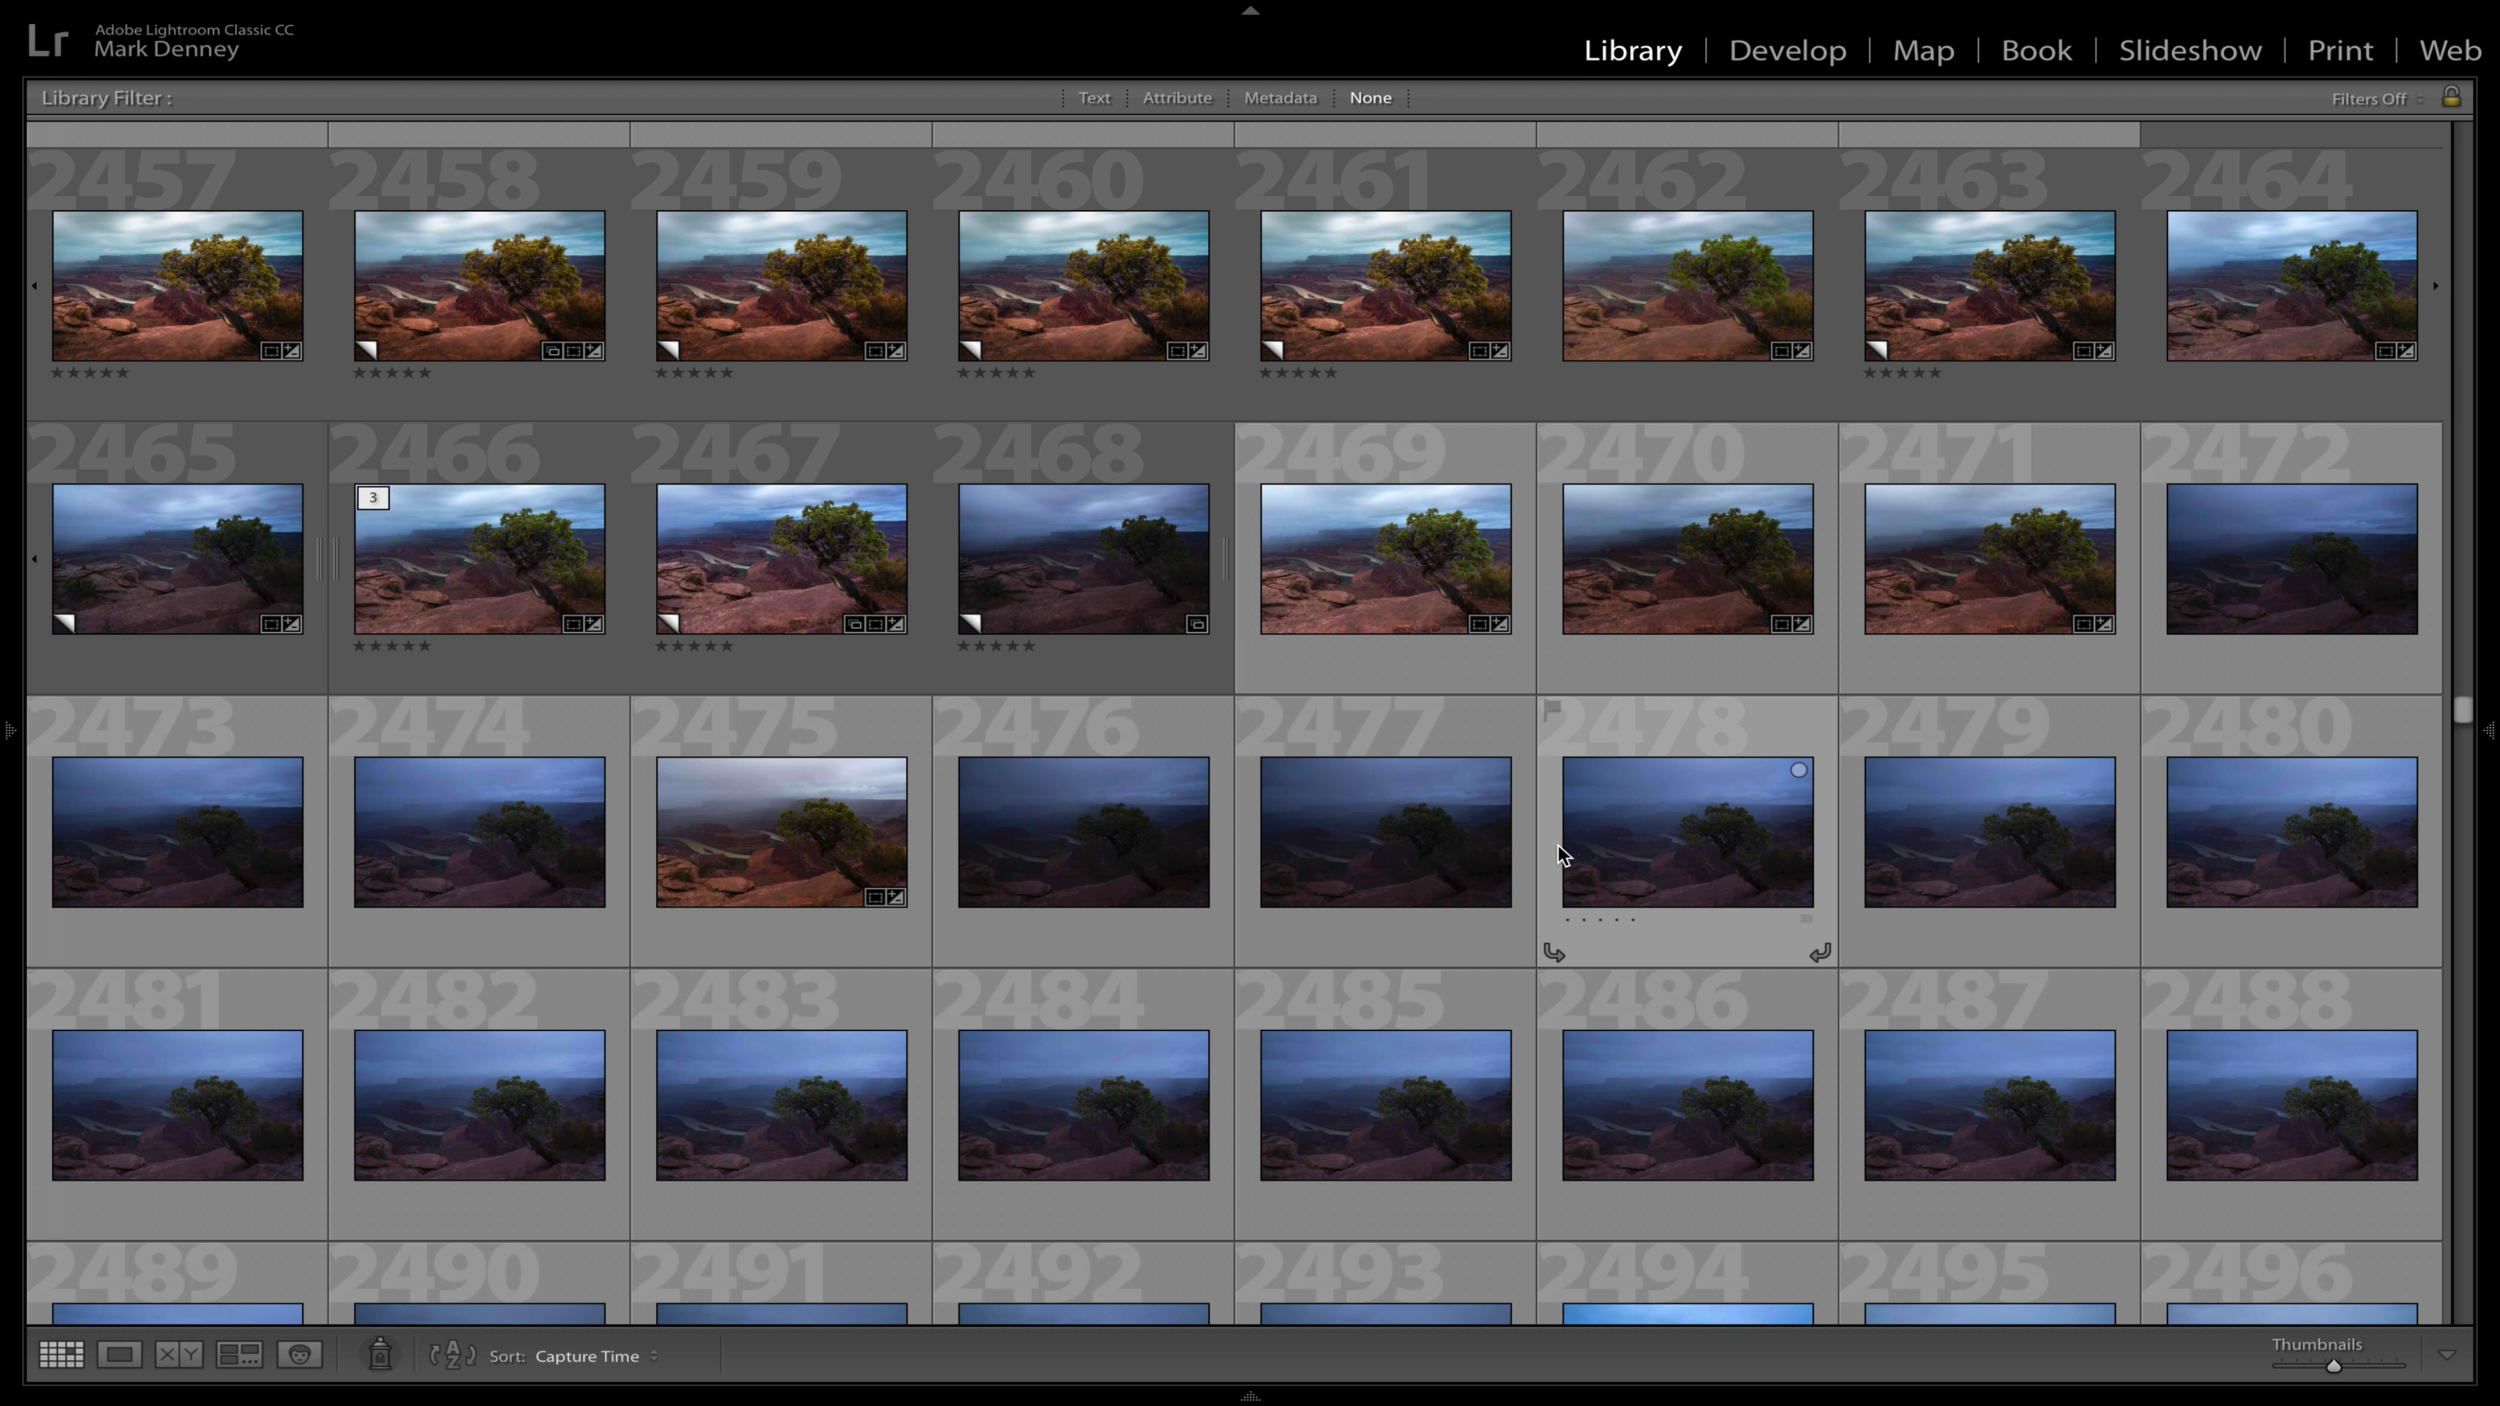
      I often end up shooting the same composition over and over with subtle variations in camera settings. The problem is that I end up sticking with one lens as I don’t want to alter my composition. When this happens I feel as if I’m not maximizing my time at a given location and generally end up with a Lightroom folder that looks like this: 

      9 Worst Habits In Landscape Photography

      #7 Not Chimping Enough

      I frequently hear how you should not chimp, but I think it depends on what you’re photographing. The idea behind the “just say no to chimping” movement is really predicated on photographing things that are unfolding quickly - sports, wildlife, weddings, but generally speaking landscape photography is a bit slower. I say chimp more often and take advantage of the extra time you have. I can’t tell you how many issues I’ve uncovered by zooming into my images while on location.  

      9 Worst Habits In Landscape Photography

      #6 Avoiding “Bad” Weather

      When I see rain and thunderstorms in the forecast, my immediate thought is to reschedule my shoot, but these conditions can produce rather dramatic images. Sure it’s a pain shooting in the rain, but your extra effort is usually rewarded with unique images.  

      Worst Habits In Landscape Photography

      #5 Lazy Lens Changing

      This has to do with changing lenses while your camera is mounted to a tripod in order to avoid altering your composition. I do this all the time and end up leaving my sensor completely exposed to the elements as I reach down to grab another lens.

      Worst Habits In Landscape Photography

      #4 Sleeping In

      A rather common issue within the world of landscape photography. The sun rises early especially during the summer months and somedays it’s just easier to hit the snooze button.

      #3 Pixel Peeping

      This is a tough one for me as I do this on every photo I edit - half the time I’m not even sure what I’m looking for. I consistently find myself zooming so far into an image that I can actually see individual pixels. I realize people don’t look at photos like that whether they’re online or printed, so why am I doing it? 

      Worst Habits In Landscape Photography

      #2 Fix it in Post

      The habit that’s been nagging me the longest - this has to do with identifying distracting elements within your composition and rather than adjust your composition, you think, “I’ll just fix it in post”.

      #1 Sensory Overload

      The feeling of rushing around trying to quickly setup your composition when you arrive at a location. Sometimes I need to rush, but more often than not I have time before the “good light” arrives, but I constantly have to calm myself down, breath and take my time identifying the best composition. I usually operate better this way. 

      Worst Habits In Landscape Photography

      Those are my 9 worst habits in landscape photography - hopefully you’re not familiar with any of them as you’ll be in a much better position than me. 

      What are your worst photography habits?

      Mark

      Check out my Photo & Video Gear Kit!

      📨 Join 52k Readers

      The Morning Blaze - my free, email newsletter where I share photography education, tutorials, & inspiration I’ve gained throughout my journey from beginner to professional landscape photographer.

        I respect your privacy. Unsubscribe at any time.

        3 Camera Settings To Master For Landscape Photography

        When you purchase a new camera how much time do you spend reading the manual? Same here, I find most camera manuals rather difficult to follow along and I for one very rarely use them. What’s interesting is that camera manuals only describe the technical “how-to” side of things like how to turn on your camera or how to attach a lens, but it doesn’t tell you how to truly become comfortable with your camera. In this 18 minute video, I review three camera settings every photographer should master for landscape photography and three simple tests you can perform at home that’ll help you do just that. 

        1. Shutter Speed Test

        How to adjust your shutter speed is something the manual will explain, but understanding what you can expect from certain shutter speeds is something that takes practice. There’s two simple tests I performed that really helped me to better understand this. All that’s needed is a camera, tripod, sprinkler & water. Just setup your tripod and camera a few feet away from your sprinkler, put your camera in shutter priority mode and begin taking exposures using different shutter speeds. First find out what shutter speed is required to freeze the motion in the water - for me it was a shutter speed of 1/500 second (below, left). Then start to slow your shutter speed down and take notice on the impact it has on the water. The image on the right was taken with a shutter speed of 1/10 second. Another helpful test is to see how slow of a shutter speed you can hand hold and still walk away with a tack sharp image. This is super helpful information to understand when you’re in a quickly developing situation and you don’t have time to setup your tripod. 

        3 Camera Settings To Master For Landscape Photography 02

        2. ISO Performance Test

        Your camera manual will tell you how to adjust your ISO, but it won’t tell you how high of an ISO level you can apply that will still result in a “useable” image. For this test I placed an old camera on a fence post in my backyard and began taking exposures while increasing the ISO each time. The ultimate goal being to determine the highest ISO level that results in an acceptable image for your taste. I also took it a step further to see what the max ISO of 102,400 looked like on my Sony a7rii (below right) - I would never use this, but I found it interesting just to see what it would look like.  

        3 Camera Settings To Master For Landscape Photography 03

        3. Depth Of Field Test

        Understanding the depth of field you can expect from a certain aperture is critical when it comes to understanding the relationship between your camera and lens and is most certainly something the manual isn’t going to tell you. This test makes it easy to understand how close your foreground element can be and what aperture is required to get everything in focus from foreground, mid-ground, to background. I found that when I focus on infinity, or in this situation the tree line in the distance, I can use f/11 and can get everything in focus from the background all the way up to about 5 feet from my lens. This is typically my go to aperture for my 16-35 mm lens, so understanding how close I can place my foreground interest is super helpful when composing shots while on-location. 

        Screen Shot 2019-04-24 at 11.25.25 AM.png
        3 Camera Settings To Master For Landscape Photography 05

        We spend a small fortune on our photography gear and understanding exactly what you can expect from certain settings under certain situations is invaluable information to be comfortable with and will surely aid in your overall enjoyment of photography and at the end of the day that’s the most important thing. 

        Mark

        Check out my Photo & Video Gear Kit!

        📨 Join 52k Readers

        The Morning Blaze - my free, email newsletter where I share photography education, tutorials, & inspiration I’ve gained throughout my journey from beginner to professional landscape photographer.

          I respect your privacy. Unsubscribe at any time.

          Wide Angle Lenses - 5 Challenges To Overcome

          When it comes to landscape and outdoor photography a wide angle lens is by far the most popular tool. Wide angle lenses are great for capturing grand sweeping vistas, getting up close and exaggerating foreground elements, and just an all around great tool for exploring your creative side. But, it’s not all roses, there are certainly a few things you want to be aware of when it comes to shooting and post processing your wide angle images.

          Wide Angle Lenses - 5 Challenges To Overcome

          Using Too Many Filters

          Vignetting caused by the use of multiple filters is a common issue with wide angle photography. This type of vignetting can occur by either using a polarizer or multiple filters. There’s a rather simple resolution for this in Lightroom when the vignette is caused by lens distortion, but when the vignette is caused by filters, well that’s a destructive workflow that cannot easily be resolved. You want to pay close attention to your corners when using multiple filters, if you see a subtle vignette creeping into your frame, try zooming in until the vignette disappears. If you're using a polarizer and see unnatural darkening in a portion of your sky, you'll want to reduce the amount of polarization you're applying and/or zoom in until the vignette is resolved.

          Chromatic Aberration

          Chromatic aberration is something that occurs with all lenses, but wide angle lenses seem to be a bit more susceptible to this. The dreaded purple and green fringing is most commonly found in the corners of images that are brightly backlit.

          Wide Angle Lenses - 5 Challenges To Overcome 02

          The good news is that it’s relatively easy to remove chromatic aberration using Lightroom. There’s two ways to accomplish this, an 'Auto' feature that will automatically locate and remove any chromatic aberration and a 'Manual' option that you can use if the auto method doesn't produce your desired results.

          Balancing Light & Color

          One of the many benefits of using a wide angle lens is its ability to capture a large scene, but this can also be the cause of multiple issues as well. When photographing a large area the odds are high that you'll capture imbalances from both a light and color perspective.  Imbalances in light usually results in an area of brighter exposure versus an area of darker exposure. Read the full blog here.

          Mark

          Check out my Photo & Video Gear Kit!

          📨 Join 52k Readers

          The Morning Blaze - my free, email newsletter where I share photography education, tutorials, & inspiration I’ve gained throughout my journey from beginner to professional landscape photographer.

            I respect your privacy. Unsubscribe at any time.

            5 BEGINNER LANDSCAPE PHOTOGRAPHY MISTAKES TO AVOID

            Making mistakes when starting something new is a common part of the learning process, and the sooner you can identify and fix them, the faster you’ll progress within your new endeavor. When I first started in landscape photography I certainly made my fair share of errors, but I didn’t realize it at the time, so I ended up repeating them over and over again. In this 20 minute video, I discuss the five biggest landscape photography mistakes I made when I was starting out, in hopes that you can relate to at least one of these and correct it much faster than I did.

            1. Flat & Confusing Compositions

            The majority of the photos I took in the beginning consisted of dull and confusing compositions. This image below is a prime example of a photo that lacks a main subject. Is it the rocks in the foreground, the island in the mid-ground, or the palm frond hanging down from the top? This lack of a clear subject can leave the viewer confused as to what they’re supposed to be looking at.  

            5 BEGINNER LANDSCAPE PHOTOGRAPHY MISTAKES TO AVOID

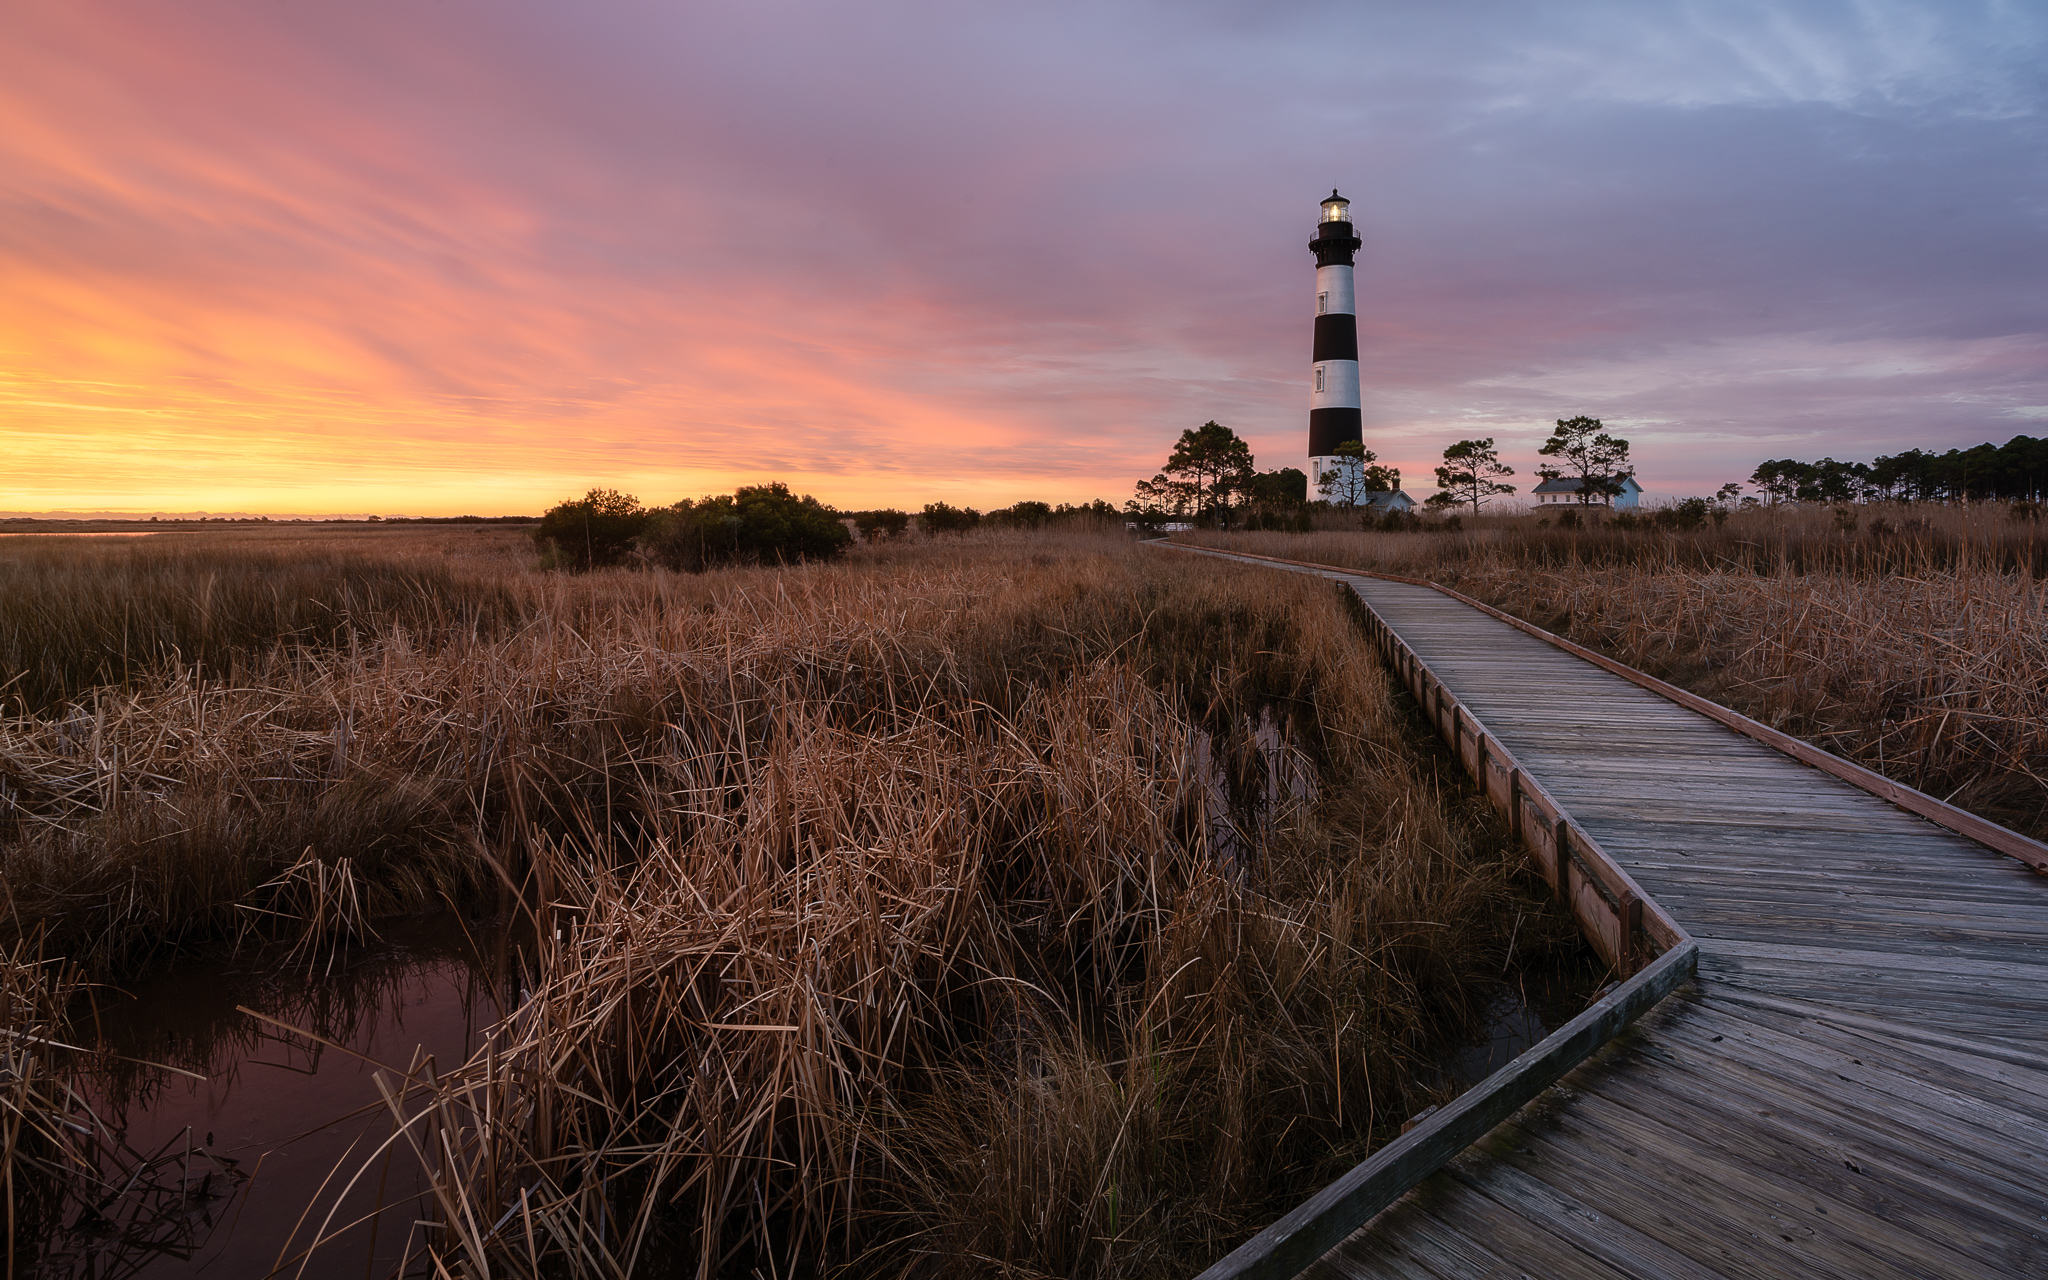
            This image is the complete opposite of that. The main subject of this image is obvious - the boardwalk leading up to the lighthouse. I prefer simple images that have a clearly defined purpose and this image fits the bill for me. 

            5 BEGINNER LANDSCAPE PHOTOGRAPHY MISTAKES TO AVOID 02

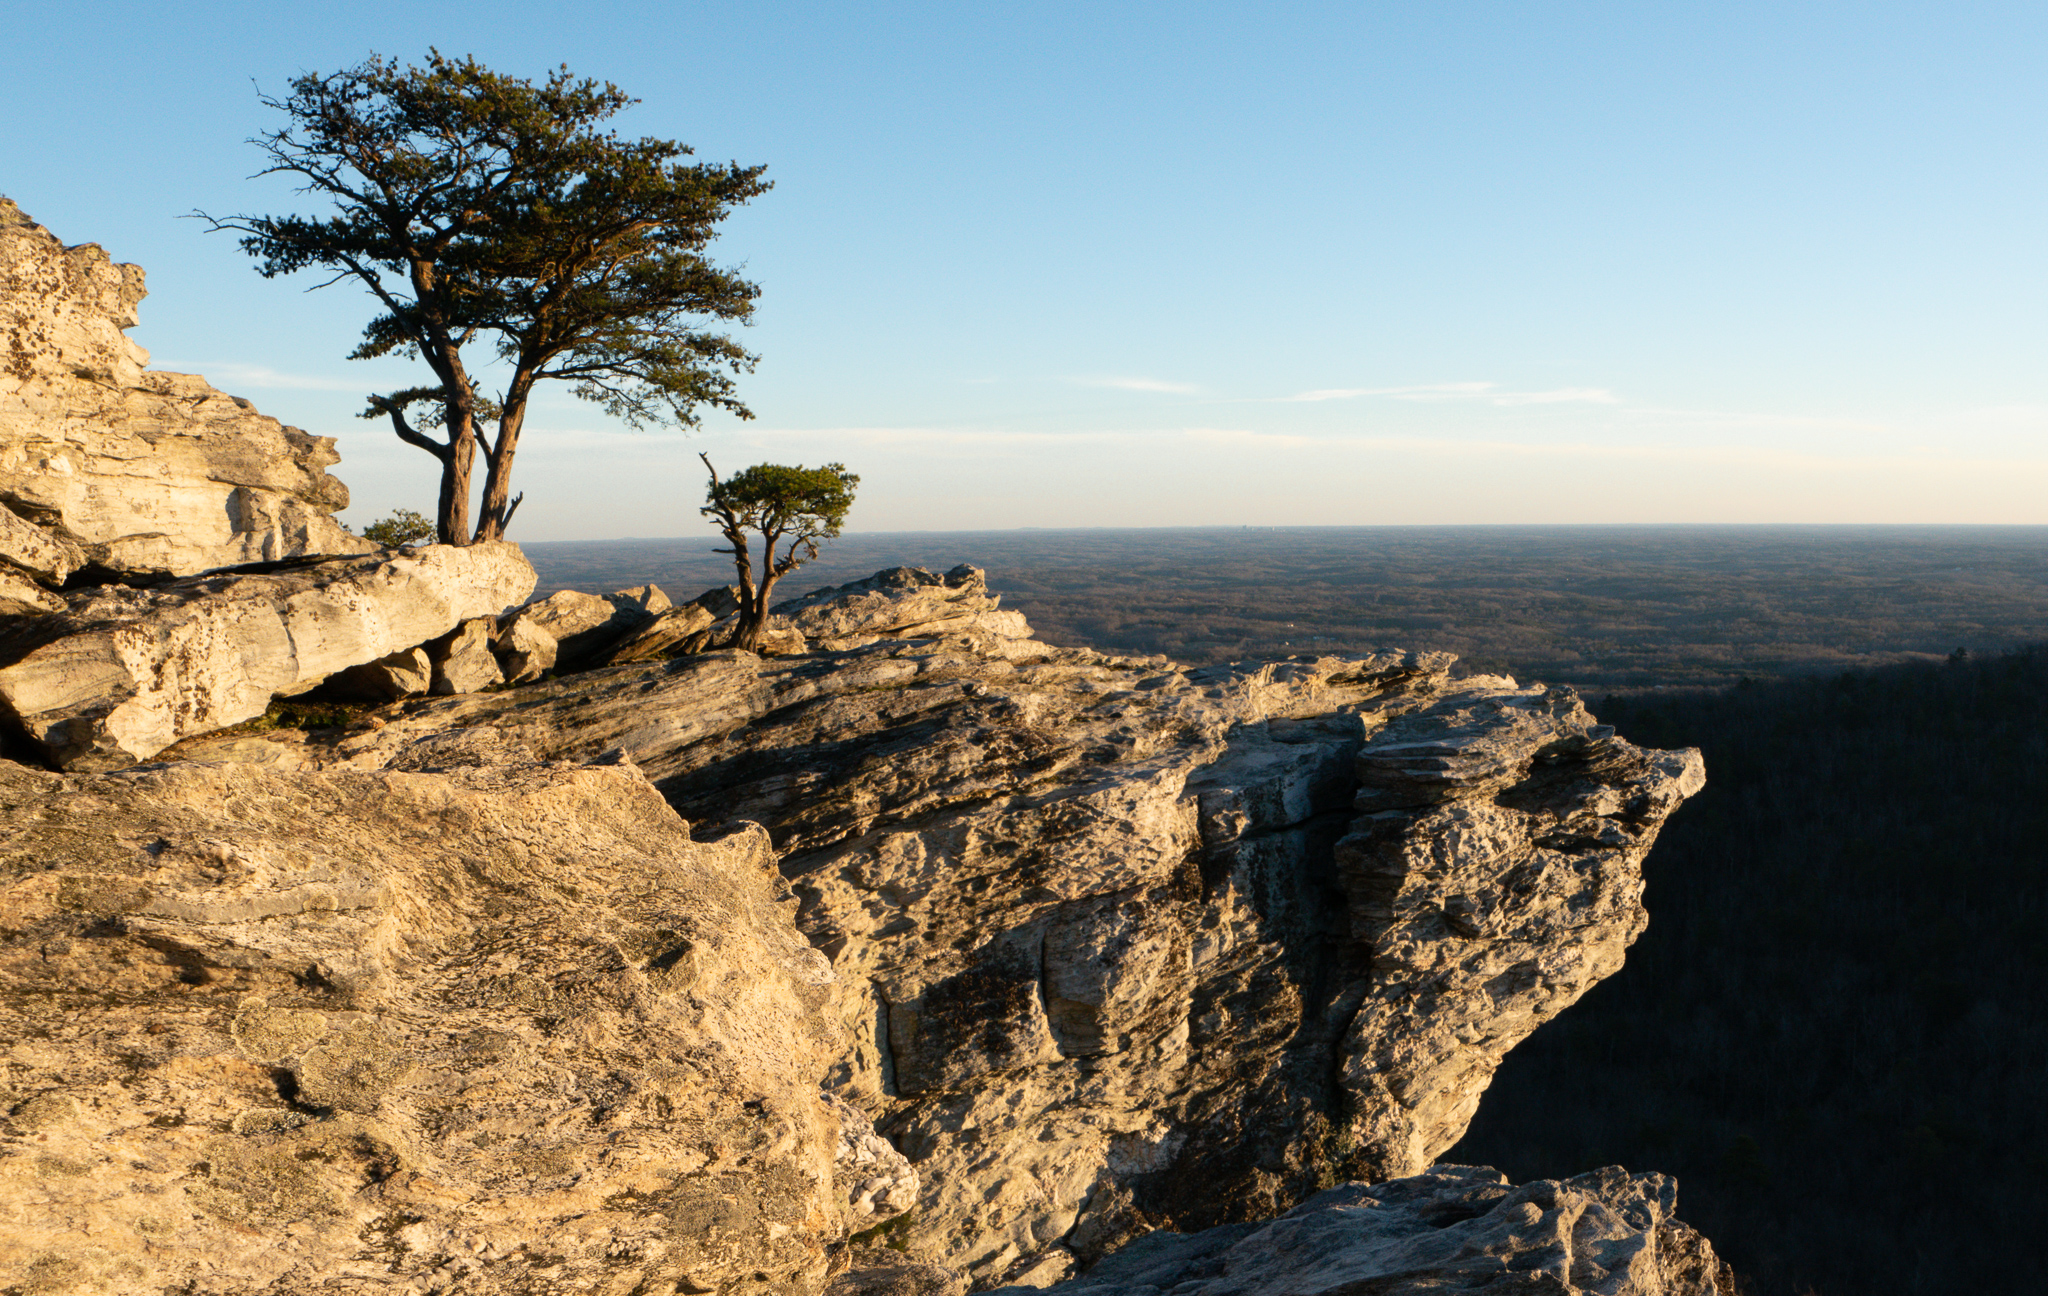
            The second part of this has to do with depth. I recall being proud of the image below when I first captured it, but when I look back on it now I realize how flat this actually is. There isn’t a strong foreground element and the background drops off beyond the tree resulting in a flat photograph.  

            5 BEGINNER LANDSCAPE PHOTOGRAPHY MISTAKES TO AVOID 03

            Now this image here includes a much greater sense of depth as there are multiple foreground mid ground and background elements to draw the viewer in thus creating a three dimensional feel. 

            5 BEGINNER LANDSCAPE PHOTOGRAPHY MISTAKES TO AVOID 04

            2. Ignoring Your Light Meter

            Paying attention to the light meter along with my histogram not only helped me to ensure that I wasn’t overexposing parts of my image, but more importantly helped me to better understand the exposure triangle and how aperture, shutter speed and iso work in harmony. 

            5 BEGINNER LANDSCAPE PHOTOGRAPHY MISTAKES TO AVOID 05

            3. Shooting During Harsh Light

            When you’re a beginner it can be difficult to fully understand the impact harsh mid day light has on your photo. Below is a great example of this - this image was taken roughly 20 minutes after sunset. 

            5 BEGINNER LANDSCAPE PHOTOGRAPHY MISTAKES TO AVOID 06

            This image of the same scene was taken 90 minutes before sunset - completely different result. 

            5 BEGINNER LANDSCAPE PHOTOGRAPHY MISTAKES TO AVOID 07

            4. Focusing Too Much On Gear

            I used to spend more time researching “better cameras” than I did practicing and learning the fundamentals of the camera I did have. During my first year of landscape photography I went from a $400 Nikon 3200 to a $3,500 Sony a7rii in a matter of a few months. In hindsight, I wish I would have kept my Nikon and saved the thousands of dollars and spent that money on traveling to new locations so I could practice my newfound photography skills. I would have walked away with not only better photos from my travels, but more importantly experiences I’d never forget.  

            5 BEGINNER LANDSCAPE PHOTOGRAPHY MISTAKES TO AVOID 08

            5. Always Shooting At Eye Level

            This was the easiest mistake to overcome once I realized I was doing it. When I first arrive at a location now, I make sure to leave my camera in my bag and spend as much time as possible walking around getting familiar with the location before settling on a composition. Once I determine the composition, I work towards finding the best angle to capture the image I’m envisioning. No longer do I arrive on location and immediately pull out the camera and extend the tripod to eye level and begin shooting 

            5 BEGINNER LANDSCAPE PHOTOGRAPHY MISTAKES TO AVOID 09

            Fixing mistakes is much easier once you know you’re making them, but the hard part is when the mistakes go unnoticed. This can cause you to continue making the same errors over and over for an extended period of time, subsequently slowing down your progression in your newly acquired venture.

            Mark

            Check out my Photo & Video Gear Kit!

            📨 Join 52k Readers

            The Morning Blaze - my free, email newsletter where I share photography education, tutorials, & inspiration I’ve gained throughout my journey from beginner to professional landscape photographer.

              I respect your privacy. Unsubscribe at any time.

              3 Reasons to Create Your Own Lightroom Presets

              When I first began dabbling in the world of landscape photography, I was enticed by the instant gratification of purchasing Lightroom presets. I was originally drawn in by the fact that I could instantly download these presets and I could instantly import them into Lightroom and instantly “improve” my own photos. I spent the majority of my first year of photography fussing around trying to make other peoples presets look good on my photos and eventually through in the proverbial towel. It wasn’t until last year that my mindset surrounding presets began to change. In this 13 minute video, I discuss three reasons why I think everyone should create their own Lightroom presets. 

              1. Better Workflow Efficiencies

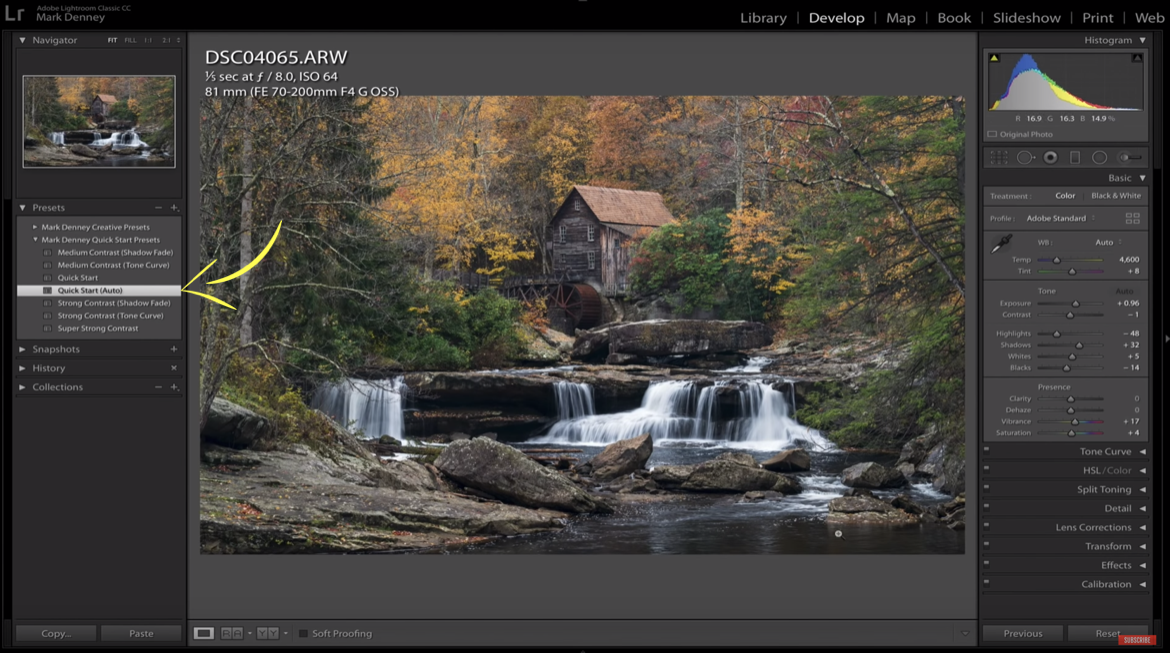
              I found that when I began my editing process I would repeatedly start by applying the same “robotic” edits to my images - Enable Lens Profile Correction > Boost the Vibrance > Reduce the Saturation > bring down the Highlights > bring up the Shadows and so on. I thought to myself why not create a preset that would allow me to apply all of these initial edits without having to select each individual adjustment. 

              With that said, I created a series of “quick start” presets that have proven to be an incredible time saver for my Lightroom editing workflow - I just apply them at the start and then make the fine adjustments after that. If you have your own set of mundane steps you habitually apply to your photos, then a quick start preset might be beneficial to your overall editing workflow.   

              3 Reasons to Create Your Own Lightroom Presets 01

              2. Find Your Own Creative Style

              In the past when I would purchase presets I felt that I was suffocating my own creativity as I was leaning on someone else’s creative style as a way to “improve” my own photos. I ultimately ended up constructing my own creative presets where each individual preset contained a singular edit like a split tone combination, or a specific tone curve that I liked as opposed to an entire edit contained within a single preset. I consistently struggled when applying purchased presets to my photos as they always contained an entire edit of an image and the odds that an entire edit is going to look good on any photo is slim to none. 

              Once I built my own creative presets, I would apply an edit to a specific image and then apply a split tone or tone curve preset or both on top of my original edit - this approach is when I began having success with presets.  

              3 Reasons to Create Your Own Lightroom Presets 02

              3. Practice Practice Practice 

              I know it sounds cliché, but it’s true - practice makes perfect. When I was using purchased presets I never took the time to dig into the specific edits that we’re used to create said presets, I would just apply them, spend about 20 minutes trying to make them look good and then export them - that was my workflow. But, it wasn’t until I started making my own presets that I began to understand the specific edits that I liked and what worked well and what didn’t work well on my own images. 

              3 Reasons to Create Your Own Lightroom Presets 03

              Putting the block on purchased presets is one of the best choices I made not only from a creative aspect, but also from a post processing stance - plus saving a few bucks along the way is always a good thing as well. 

              Mark

              Check out my Photo & Video Gear Kit!

              📨 Join 52k Readers

              The Morning Blaze - my free, email newsletter where I share photography education, tutorials, & inspiration I’ve gained throughout my journey from beginner to professional landscape photographer.

                I respect your privacy. Unsubscribe at any time.

                5 Simple Apps For Landscape Photography

                Am I the only one that finds some of the most popular apps used for landscape photography a bit overwhelming? Don’t get me wrong these apps are tremendously powerful tools and I own many of them, but I find that I rarely use them anymore. I prefer apps that have a simple user interface that enables me to obtain the details I'm looking for quickly and without having to dig through mountains of other information.

                In this 15 minute video, I discuss my 5 favorite apps and how I use them to access information quickly for my landscape photography. Hopefully you're not familiar with all of them and you’re able to pick up at least one new suggestion.

                1.  Clear Outside

                Besides the location itself, weather, specifically cloud cover is the most important element for me. Being able to accurately predict fog and mist or high clouds versus low clouds is wildly beneficial and Clear Outside is a great app to help you do just that. Having the ability to identify when high clouds are forecasted is a huge help in determining the likelihood of a long burning and colorful sunrise or sunset. 

                5 Simple Apps For Landscape Photography 01

                2.   MeteoEarth

                This is a great app to see the layers of cloud cover in motion and best of all it enables you to segment out high, medium and low clouds. It’s a tremendous benefit to see how the predicted clouds are expected to move in and out of a specific location. MeteoEarth in conjunction with Clear Outside is an immensely powerful combination for predicting if the cloud cover will be conducive for an outstanding sunrise or sunset.  

                5 Simple Apps For Landscape Photography 02

                3.   LightTrac 

                This is my favorite app of the lot due to it’s clean and superbly simple user interface. I prefer this app because within a matter of seconds I can determine exactly when and where the sun or moon will rise and set in any location in the world during any day of the year. No frills with this app just the pertinent information you need that can be easily accessed within seconds. 

                5 Simple Apps For Landscape Photography 03

                4.   WeatherBug

                This is one of the more popular weather apps available and rightfully so. Great user experience and quite straightforward to use. I find the hourly forecast to be a huge benefit and pretty reliable - it also has a slick lightning locator feature as well. This is great if you’re into storm chasing and looking to capture those intense and dramatic stormy skies.

                5 Simple Apps For Landscape Photography 04

                5. Google Earth

                One of the most powerful apps available and one that I never go on-location without first consulting. I prefer to shoot sunrise over sunset and find that most of the time I’m in complete darkness when composing my images and Google Earth helps me to easily research the surrounding area of a location before I ever even arrive.  

                5 Simple Apps For Landscape Photography 05

                I've been using these apps for quite awhile now and find myself relying on them more and more. They've become a necessary part of my photography workflow and are worth their weight in gold - especially since most of them are FREE!

                Mark

                Check out my Photo & Video Gear Kit!

                📨 Join 52k Readers

                The Morning Blaze - my free, email newsletter where I share photography education, tutorials, & inspiration I’ve gained throughout my journey from beginner to professional landscape photographer.

                  I respect your privacy. Unsubscribe at any time.

                  5 Signs You’re Over Editing Landscape Photos

                  One of the more difficult aspects of post processing is identifying when you’re starting to over edit a photo. It’s common knowledge what many of the characteristics of an over edited image are, but determining when you’ve gone too far - that’s the challenging part. In this 14-minute video, I breakdown five tips that have helped me to understand and identify when I’m beginning to over process an image.

                  Sign #1. Unrealistic Shadows & Highlights

                  A common issue with landscape photography is when you’re shooting into the sun and either you overexpose the sun, sky, or both. A quick tip before you make any adjustments is to change the profile from Adobe Standard to Adobe Neutral. Adobe Neutral is a flatter profile that’ll give you more latitude in recovering clipped highlights or shadows.  

                  5 Signs You’re Over Editing Landscape Photos Image 01

                  In order to resolve the overexposed area, if you reduce the highlights to a point that you begin to see an unnatural ring around the sun then you’ve gone too far.

                  5 Signs You’re Over Editing Landscape Photos Image 02

                  On the opposite side, if you’re increasing the shadows to a level that your image begins to loose structure and appears flat, you’ve once again gone too far. Shadows are an important aspect of an image as they add three dimensionality and structure and should be preserved. 

                  5 Signs You’re Over Editing Landscape Photos Image 03

                  Sign #2. Adding Too Much Contrast

                  Contrast is king and can certainly make or break a photo so understanding when you’re going overboard is critical. Too little contrast and your image appears flat and lifeless, too much contrast and you lose detail in your shadows and your image looks muddy.

                  When making contrast adjustments keep a close eye on your shadows, when you begin to lose detail in the darker areas of your photo, reducing the contrast could be in order - unless that’s the look you’re going for. 

                  5 Signs You’re Over Editing Landscape Photos Image 04

                  Sign #3. Over-Sharpening & Clarity

                  This could be the most common issue amongst over edited landscape photos, and it’s also the easiest to identify. To see the affects of over sharpening you have to do a bit of “pixel-peeping” - zoom in and look for a glow or halo along an edge when you toggle the sharpening on and off. If your edges are glowing then you’ve applied too much sharpening or clarity to your image. 

                  5 Signs You’re Over Editing Landscape Photos Image 05

                  Sign #4. Extreme Vignetting

                  As with much of photo editing, a vignette is meant to enhance a photograph and not distract. If the first thing you notice when you look at your photo is the vignette then you’ve gone too far.

                  When I’m looking to direct the viewers eye, I’ll create a custom vignette using an inverted radial filter in order to place the center around the actual subject of my photo. I find this approach to be more intentional as opposed to the standard vignette tool available in the ‘Effects’ panel within Lightroom.

                  5 Signs You’re Over Editing Landscape Photos Image 06

                  Sign #5. Oversaturated Colors

                  In my opinion, this is the most difficult adjustment to identify when it’s starting to look garish. There isn’t an easy way to determine this, but if you zoom into an area where you can see fine detail and turn the saturation all the way up, you’ll notice that most of the detail is lost.

                  Outside of this though there really isn’t a definitive way of identifying over saturation outside of just using your best judgment to replicate the natural colors you saw when you captured the photo. 

                  5 Signs You’re Over Editing Landscape Photos Image 07

                  I think many of us have fallen victim to these signs of over editing at one point or the other, I know I certainly have, but it’s all part of the learning process. 

                  Mark

                  Check out my Photo & Video Gear Kit!

                  📨 Join 52k Readers

                  The Morning Blaze - my free, email newsletter where I share photography education, tutorials, & inspiration I’ve gained throughout my journey from beginner to professional landscape photographer.

                    I respect your privacy. Unsubscribe at any time.

                    9 Inspiring Landscape Photographers on YouTube YOU SHOULD FOLLOW

                    shutterstock_1041026248.jpg

                    It wasn’t until 2015 that I began using YouTube for more than just a means of entertainment, but rather for the video centric super search engine that it is. When I first became interested in landscape photography I would scour YouTube for as much pertinent information on the topic as I could discover which ultimately led me to create the following list of 9 Inspiring Landscape Photographers on YouTube You Should Follow.


                    1. Fototripper - Gavin Hardcastle:

                    Gavin is relatively new to YouTube, but I can assure you that he’ll have one of the larger landscape photography followings on the platform by the end of 2019. His energetic and witty humor will keep you entertained and informed as he takes you along on his photographic adventures.


                    2. Ben Horne:

                    Ben is a large format landscape photographer that spends a great deal of time shooting throughout  Zion National Park. Ben started creating what he calls “video journals” in 2010 before vlogging was even a thing. His story telling ability along with his creative eye for composition will not only captivate you, but educate you as well.


                    3. Nigel Danson:

                    I started following Nigel’s YouTube channel towards the end of 2017 and have enjoyed watching his meteoric rise through his weekly on-location videos. He strikes a splendid balance between entertainment and education - his weekly video uploads are the best thing about Sunday mornings!


                    4. Nick Page: 

                    Nick is not only one of the most popular landscape photography personalities on YouTube, but he’s also the host of the Landscape Photography Podcast. His channel is a mix between on-location videos, post processing tutorials and the occasional gear review. Regardless the video topic, you’ll be drawn to his genuine charismatic personality along with his easy to comprehend teaching style.


                    5. Thomas Heaton:

                    What list would be complete without mentioning Thomas Heaton. Thomas uploaded his first YouTube video in 2014 and has since amassed a following of over 320,000 subscribers. With his relaxed demeanor and attention to detail, his video’s take you along on his photographic journeys as he captures some of the most “stunning” landscapes from around the world.   


                    6. Alan Brock:

                    Alan is a Tennessee based large format landscape photographer and has the largest Aviation & Large Format Photography channel on YouTube:) He spends a great deal of time photographing areas of Zion National Park and the Great Smoky Mountains. I’m not exactly “in to” large format landscape photography, but I do enjoy watching the meticulous attention to detail it requires.


                    7. Simon Baxter:

                    Simon’s YouTube videos are not only highly informative, but they possess a zen like quality that’ll put you at ease. Simon takes you along his woodland photographic travels along side his beloved labradoodle, Meg. Simon recently became a full-time landscape photographer and often shares his stories of the transition from web developer to landscape photographer.


                    8. Morten Hilmer:

                    Morten is primarily a wildlife photographer, but he does flirt with the occasional landscape scene. His enthusiastic approach to photography and amazing sweater collection will leave you wanting to grab your gear and immediately head out into the great outdoors.


                    9. Evan Ranft:

                    Evan’s photographic passion lies within street photography, but he ventures outside the city limits of his hometown in Atlanta, Georgia from time to time to photograph landscapes. Evan’s cool & laid back personality along with his helpful insight into his on-location creative workflow will have you binge watching his YouTube channel in no time.


                    My OWN Channel:

                    I’ve enjoyed developing my own channel on YouTube over the last year consisting of on-location videos, Lightroom post processing tutorials and the occasional gear review.

                    Below are a couple of my latest videos. Thanks for reading and sharing!

                    Mark

                    Check out my Photo & Video Gear Kit!

                    📨 Join 52k Readers

                    The Morning Blaze - my free, email newsletter where I share photography education, tutorials, & inspiration I’ve gained throughout my journey from beginner to professional landscape photographer.

                      I respect your privacy. Unsubscribe at any time.

                      7 Lightroom Tips To Transform Your Winter Photos

                      The frigid winter months provide an exceptional opportunity to capture unique photos, but they aren’t the easiest to create due to extreme weather conditions and the many post processing nuances related to snowy winter photography. In this video I review 7 Lightroom tips that has helped me along the way with my winter post processing workflow. 

                      1. Change Your Background

                      This tip actually has nothing to do with your image, but rather the canvas you’re working on. Right clicking the background and changing the color to white creates a good reference point for absolute white and will certainly help you with the remainder of your edit.  

                      Lightroom Tips to Transform Your Winter Photos 01

                      2. Adjusting White Balance

                      Adjusting the White Balance can be a tricky proposition due to the reflective nature of snow. If you use the eye dropper to target a neutral color (snow) this will almost always result in Lightroom over warming the photo. I’ve found that setting the white balance to Auto and then reducing the settings by half provides a good starting point to begin the rest of your edits.  

                      Lightroom Tips to Transform Your Winter Photos 02

                      3. Resolve Exposure Issues

                      Many of my winter photos usually require a bit of positive exposure in Lightroom since most camera’s metering systems like to under expose snow. I’ll usually hold down the Option key(Mac) and drag the exposure slider to the right until I see pixels beginning to bleed through. I do this to determine how far I can push the image from an exposure perspective and then I back it off until I find an exposure level that looks good. 

                      Lightroom Tips to Transform Your Winter Photos03

                      4. Choose Your White & Black Point

                      I often try to fill out the histogram by setting an absolute white and black point, but I approach winter photos in a slightly different manner. With a snowy scene I’ll pull up the white point as far as I can before clipping the highlights, but rather than bringing the black point down I’ll bring that up as well. I like the softening effect this creates in the photo - sometimes I’ll even dial in a bit of negative Clarity to exaggerate the ethereal look. 

                      Lightroom Tips to Transform Your Winter Photos 04

                      5. Add & Remove Contrast

                      Next time you edit a winter image try removing global contrast using the contrast slider, then add contrast back in using the tone curve. I prefer this approach as it will typically result in a smoother less contrasty look, again creating a softer feeling image.  

                      Lightroom Tips to Transform Your Winter Photos 05

                      6. Get Creative With Colors

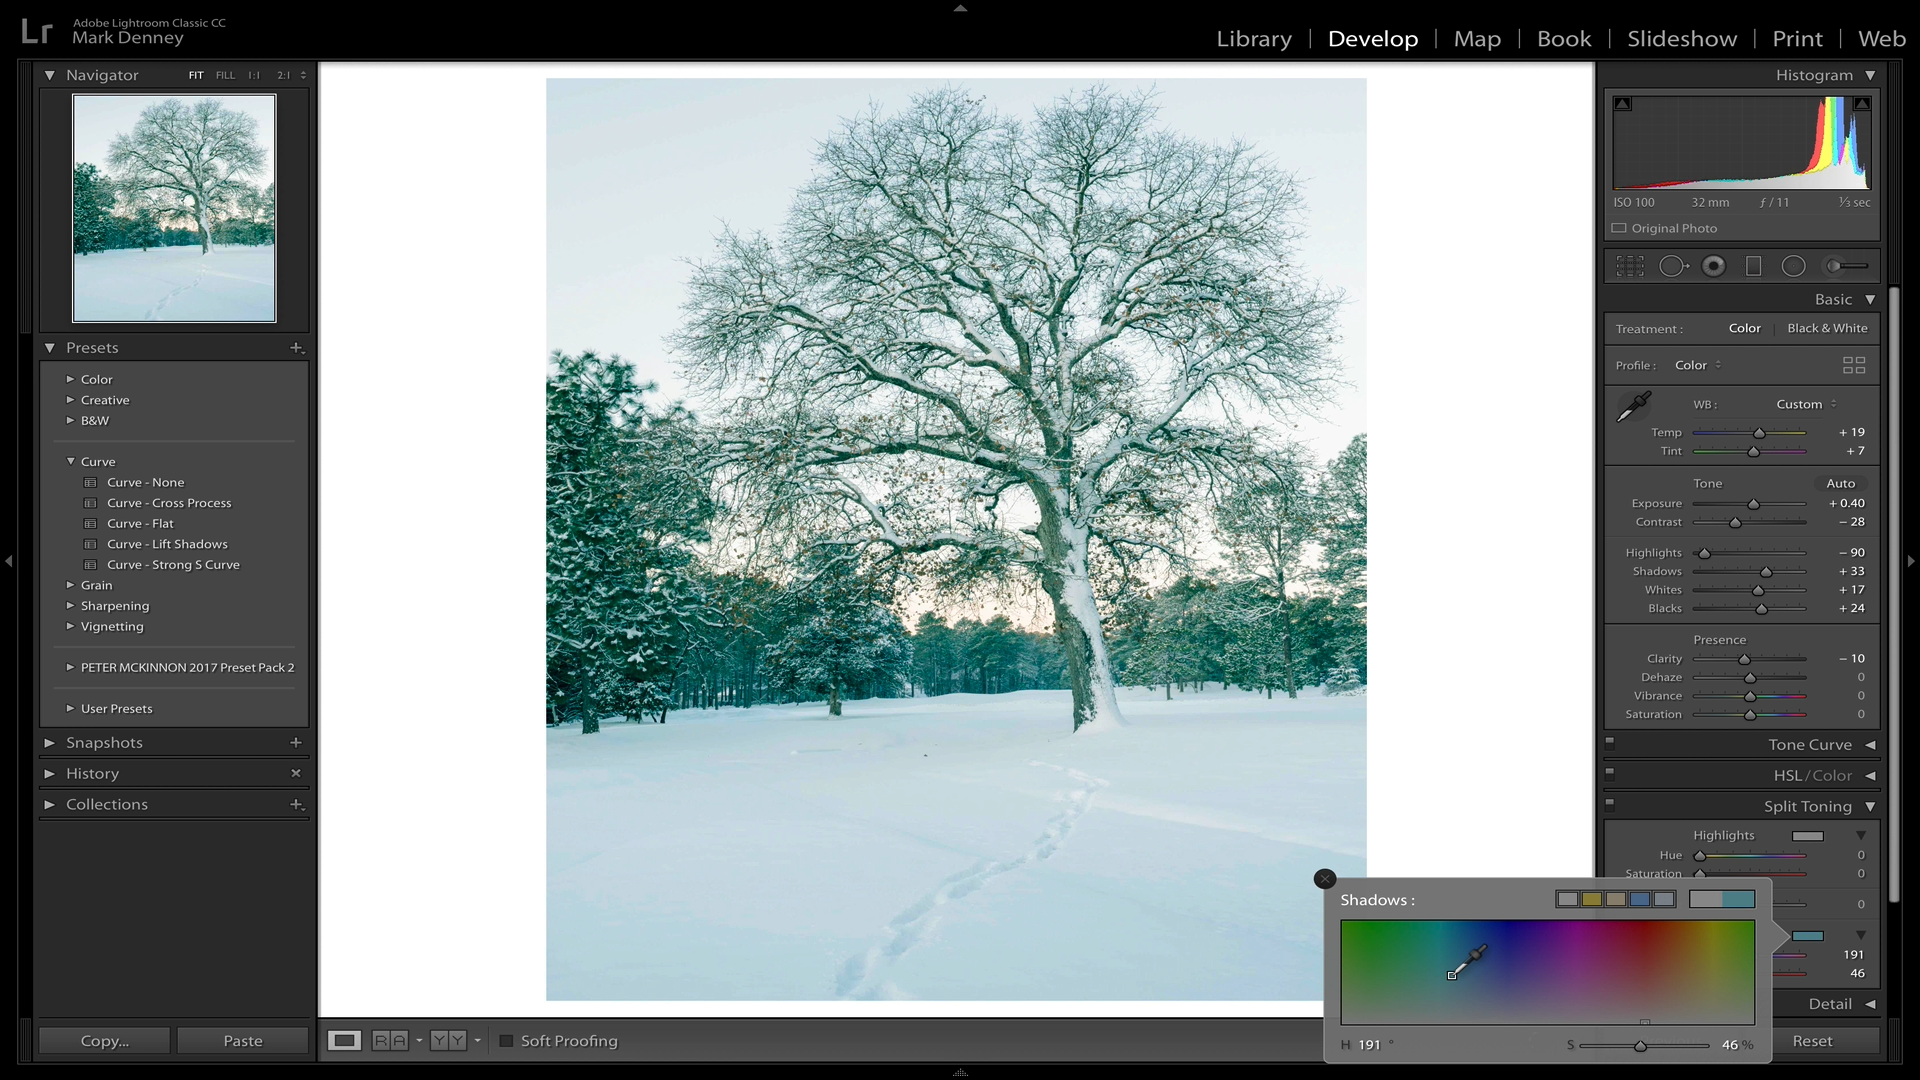
                      When I think of a creative edit I immediately think of colors. There’s many different ways to get creative with colors within Lightroom, but I find that adding a subtle green or blue tone to the shadows using split toning produces a great look.  

                      Lightroom Tips to Transform Your Winter Photos 06

                      7. Walk Away

                      This should be the easiest step in the process, but it’s often the most difficult to accomplish. I recommend this with any image, but taking a break from your edit and allowing your eyes to reset is certainly time well spent. It becomes difficult to see minor changes that you’re making to an edit after you’ve been staring at it for awhile, especially winter photos. 

                      Winter is probably my overall favorite season for photography, but it certainly comes with a unique set of challenges during post processing and while on location. The additional work is usually rewarded though with unique images that many folks wouldn’t dare venture out in the elements to capture. 

                      Mark

                      Check out my Photo & Video Gear Kit!

                      📨 Join 52k Readers

                      The Morning Blaze - my free, email newsletter where I share photography education, tutorials, & inspiration I’ve gained throughout my journey from beginner to professional landscape photographer.

                        I respect your privacy. Unsubscribe at any time.