
Are you finding it challenging to achieve the “perfect” white balance in your photographs? You're not alone. Even seasoned photographers often grapple with the complexities of white balance correction. In this guide, we'll delve deep into the nuances of white balance, offering valuable insights and practical tips to help you conquer this essential aspect of photography.
The Significance of White Balance
Before we dive into the intricacies of white balance correction, let's understand why it's so important. White balance refers to the adjustment of colors in an image to ensure that whites appear neutral and colors are accurately rendered. Different light sources emit varying color temperatures, leading to color casts that can distort the true colors of your subject.
Consider this: sunlight bathes your scene in warm, orange tones, while shade lighting imparts a cool, bluish tint. As photographers, our objective is to neutralize these color casts, allowing us to faithfully represent the scene's true colors and capture its essence.
Exploring White Balance Correction Methods
1. Leveraging the Eyedropper Tool
One of the most commonly used methods for white balance correction involves utilizing the eyedropper tool in editing programs like Lightroom. By selecting a neutral area in your image - such as a white or light gray surface - you can effectively adjust the white balance. Experiment with different areas until you find the perfect balance that accurately represents the scene's colors.

2. Automatic White Balance
Another popular approach is relying on automatic white balance settings provided by your camera or editing software. While convenient, this method may not always produce the desired results, often resulting in overly warm or cool tones. Use it as a starting point and fine-tune the white balance manually to achieve optimal results.
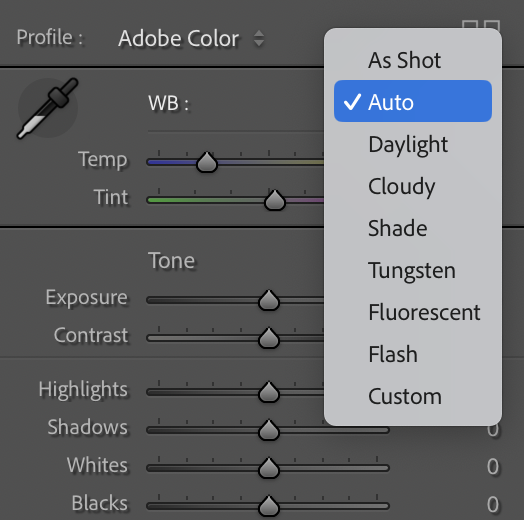
3. Utilizing Presets
Many editing programs offer preset white balance settings tailored to specific lighting conditions, such as daylight, cloudy, shade, fluorescent, and tungsten. While these presets can be helpful, they may not always match the scene's unique lighting accurately. Use them as a reference, but be prepared to make manual adjustments as needed.

4. Manual Adjustment by Eye
For photographers with a keen eye for color and precision, manual adjustment by eye is an option. However, this method requires practice and experience to achieve consistent results and may not be suitable for beginners.
A Proven Workflow for White Balance Correction
Now that we've explored different white balance correction methods, let's outline a systematic workflow to streamline the process and ensure optimal results.
✅ Step 1: Capture in RAW with Auto White Balance
Always shoot in RAW format and let your camera determine the initial white balance with auto white balance. RAW files provide greater flexibility in post-processing, allowing for extensive adjustments without compromising image quality.
✅ Step 2: Early White Balance Adjustment
Begin your editing process by addressing white balance early on. Avoid leaving it as an afterthought, as adjusting it late in the process may necessitate revisiting other post processing settings. Establishing the right white balance at the outset sets the stage for a seamless editing workflow moving forward.
✅ Step 3: Eyedropper Tool and Saturation Adjustment
Utilize the eyedropper tool to select a neutral area in your image, such as white or light gray. Then, temporarily increase saturation to +100 to identify any color casts or dominant hues that need correction.
✅ Step 4: Fine-Tune Temperature and Tint
Adjust the temperature and tint sliders to balance out any dominant colors and achieve a harmonious blend across the image. Aim for a natural look that accurately reflects the scene's colors while maintaining visual harmony.
✅ Step 5: Saturation Reset and Final Touches
After achieving the desired white balance, reset saturation to its default level and make any final adjustments to perfect your image. Fine-tune other parameters such as exposure, contrast, and sharpness to enhance the overall visual impact.
Conclusion: Understanding White Balance for Stunning Results
Understanding white balance is an essential skill for photographers seeking to capture the true essence of a scene and convey its mood and atmosphere effectively. By mastering the principles of white balance and employing a systematic workflow, you can elevate the quality of your photographs and unlock their full potential.
Watch Video Here
Have a great week!
Mark D.
