🔥Better Photos Fast

Get your FREE Lightroom Color Editing Course & Learn How to:

✅ Create Color Harmony

✅ Improve Tonal Range

✅ Establish Color Separation

✅ Make Colors Tastefully Pop!

    I’ll never share your email address with anyone. Unsubscribe at anytime. Email Policy

    Histogram or Artistic Expression - What Matters Most?

    How literal should you interpret a histogram? Where do the lines intersect between artistic expression and photographic technicalities? It’s important to first recognize that a histogram is nothing more than a mathematical algorithm. It doesn’t grasp the concept of what looks good versus what looks bad and it certainly doesn’t equate your artistic vision into its calculations either. It wasn’t until I became fully aware of how a histogram operates that I was able to determine where my own artistic expression overcomes the technical side of photography. If you look up the definition of histogram you’ll discover this, “A graphical representation of the tonal values of an image.” With that said, I see two use cases for the histogram, as an in camera exposure guide and a reference tool used during post processing. In camera, I use this as a means to quickly determine “acceptable” exposure and to ensure that I’m not losing any detail in the highlights or shadows of my image.

    When it comes to post processing images in Lightroom, you’ll notice a combination of the luminance (grey) and RGB histogram. This might look intimidating at first, but once you spend some time with it, you’ll quickly become comfortable with the information it provides. Along the X axis, moving from left to right, you have black tones, shadows, mid-tones, highlights and whites..simple as that!  

    Histogram02.png

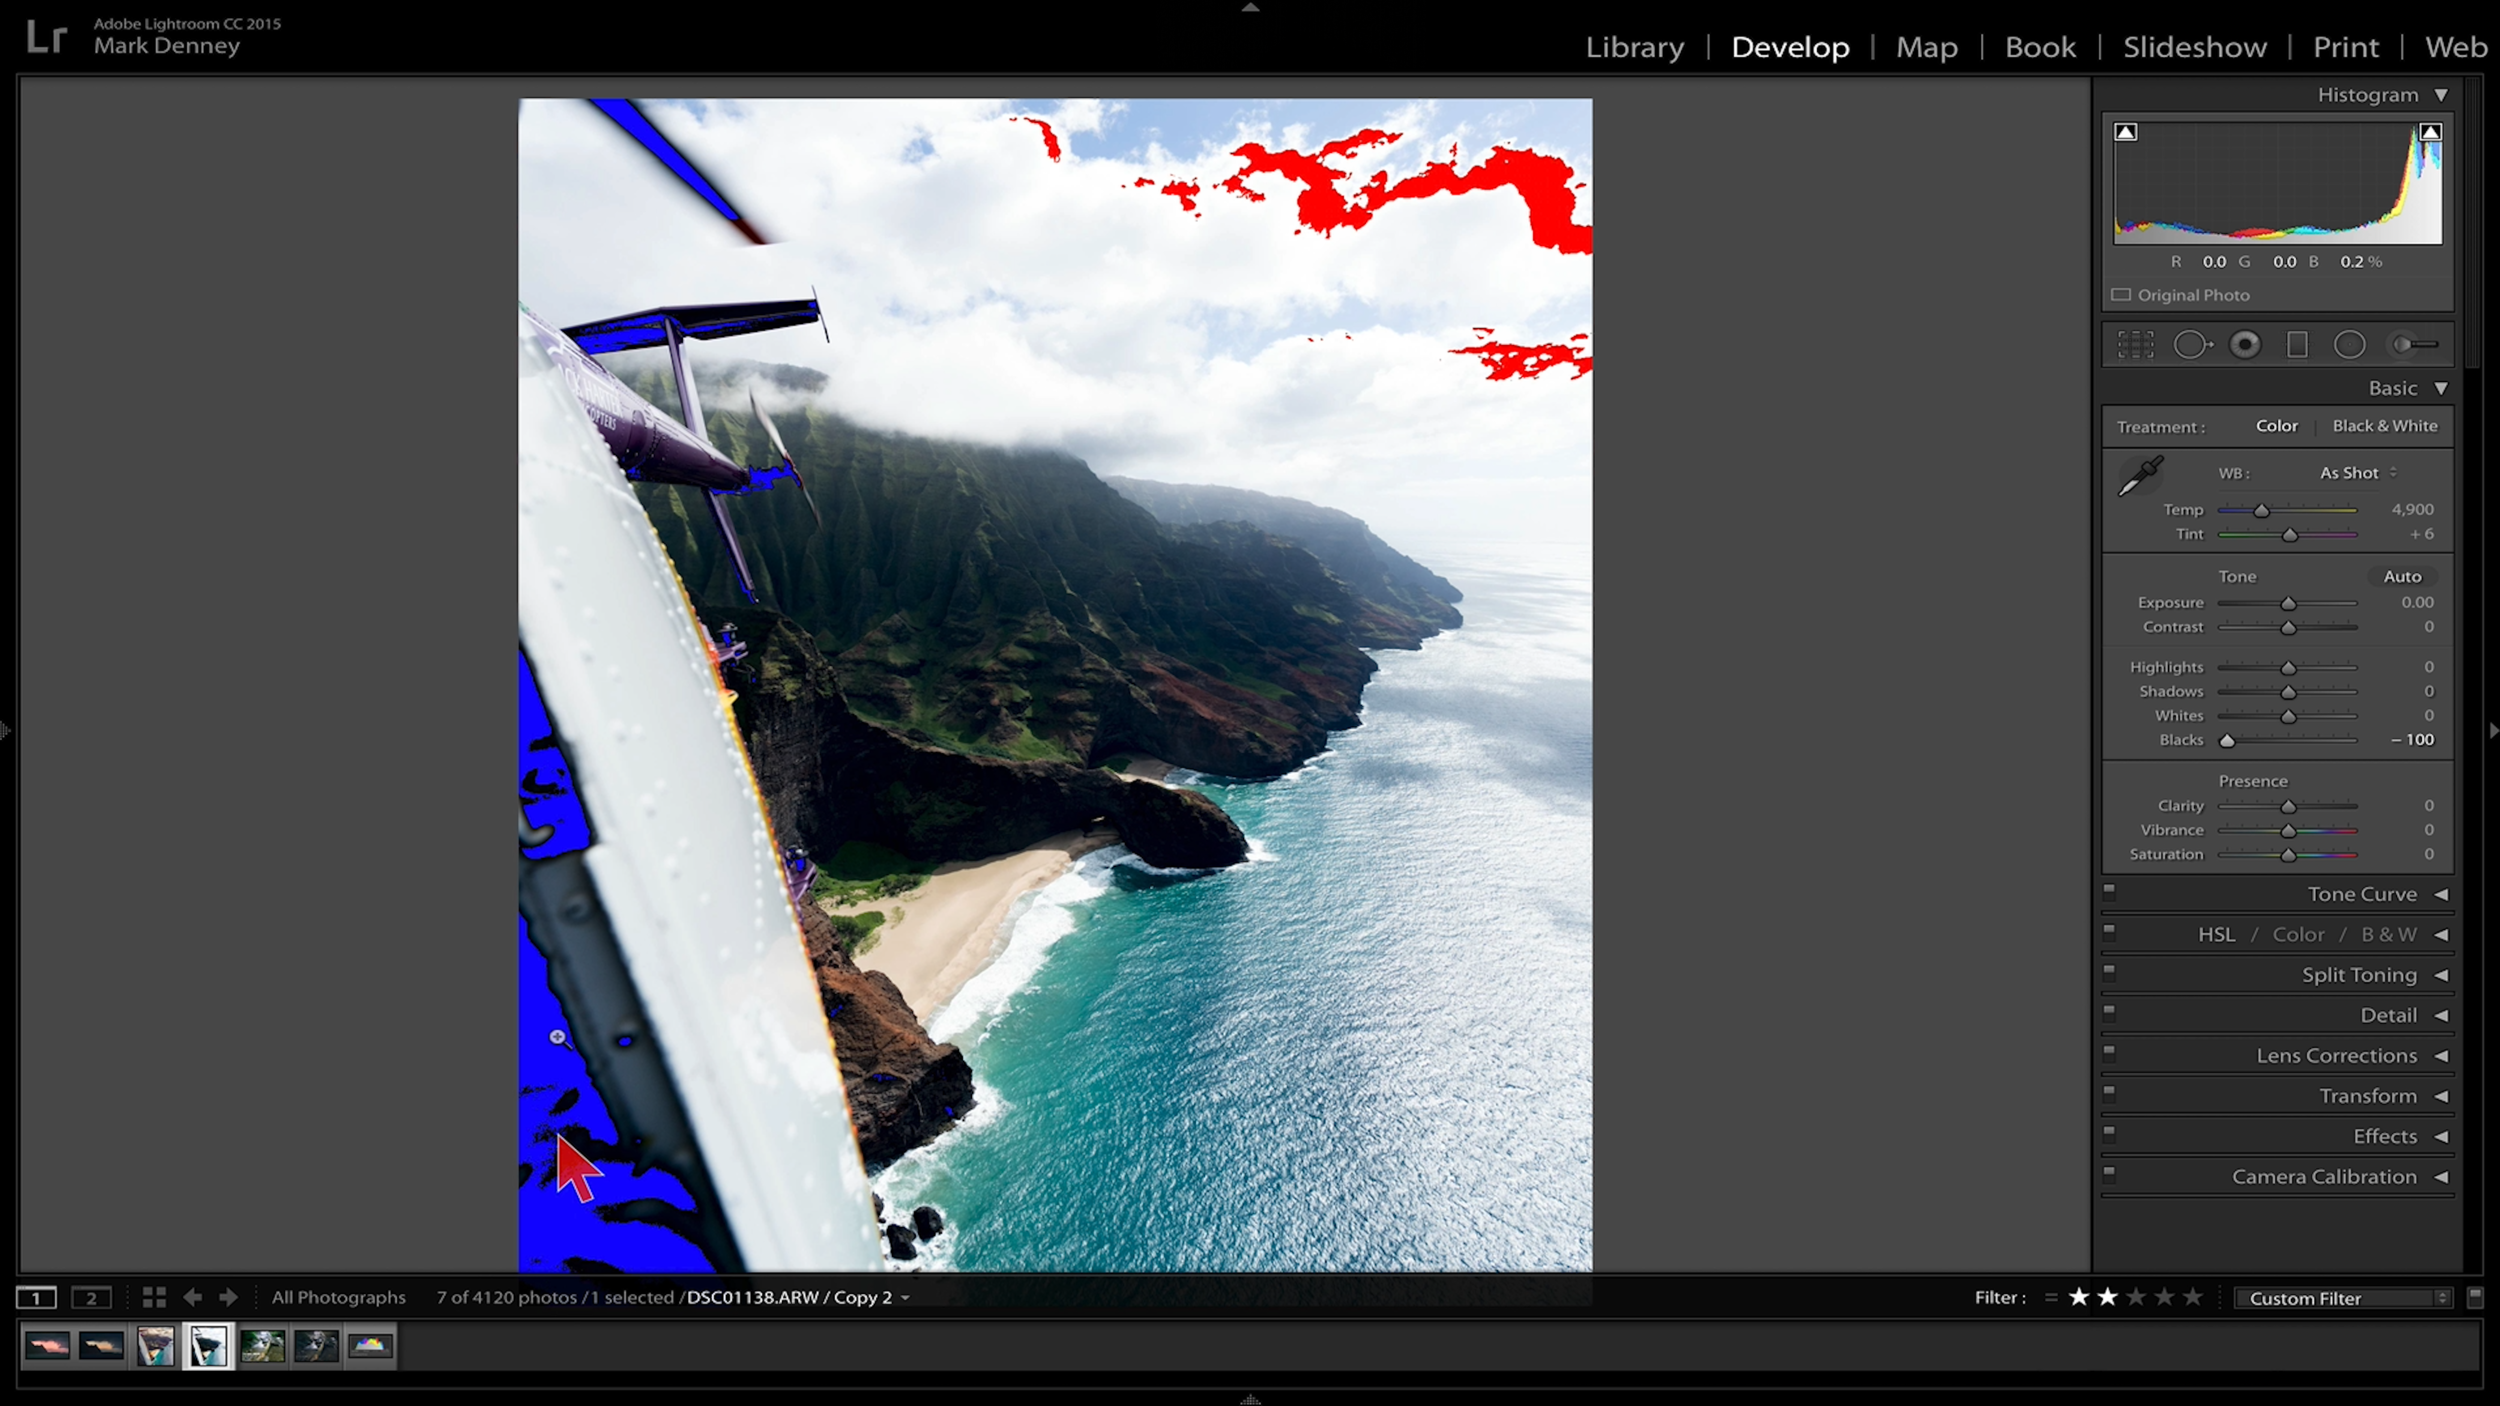
    I find the most useful histogram feature in Lightroom to be the clipping indicators that allow you to easily identify areas of your image that have clipped or “blown out” highlights or shadows. In order to see this use the shortcut key (J) to toggle the indicators on and off. Clipped highlights are displayed in red and clipped shadows are visible in blue.  

    Histogram05.png

    Below is the final image after some additional edits and resolving the clipped areas, notice the difference in the before and after histogram.  

    Histogram Article 06.png

    So where does this leave us? Once you’re comfortable with how to translate a histogram and understand how to use the resulting information during post processing, it becomes easier to discern between your artistic vision and the exposure technicalities. The below example illustrates this point well. This is a RAW file from a recent backpacking trip where I envisioned a dark, subdued image with a moody edge to it, as you can see it’s quite underexposed with a large amount of shadow clipping which I was able to correct. 

    Histogram Article 07.png

    If I hold down ‘Shift’ and double click ‘Exposure’, Lightroom indicates that according to the histogram this image requires over 3.5 additional stops of exposure in order to “properly” expose the photo - below is the result. 

    Histogram Article 08.png

    This is obviously not what I envisioned the end result to appear like. Below is the final edit I landed on that closely aligns with my original artistic vision for the scene. If you were to look only at the histogram, you could easily draw the conclusion that this photo was underexposed, but in reality it’s exactly how I envisioned the end result  - I love it! 

    Histogram Article 09.png

    I believe we all have similar images and situations as this in our portfolios where the photo may not be “technically” sound, but it matches the output in our minds and at the end of the day - that’s really all that truly matters.

    Mark

    Check out my Photo & Video Gear Kit!

    📨 Join 52k Readers

    The Morning Blaze - my free, email newsletter where I share photography education, tutorials, & inspiration I’ve gained throughout my journey from beginner to professional landscape photographer.

      I respect your privacy. Unsubscribe at any time.

      Focus Stacking Made Simple!

      The popularity and widespread use of focus staking in landscape photography has dramatically increased over the last few years. The concept typically reserved for macro photography has quickly won over countless outdoor photographers worldwide. With more and more landscape enthusiasts using wide angle lenses to capture images with dramatic foreground elements, it’s become nearly impossible to create front to back pin sharp photos. If you’re not familiar with what focus stacking is, fret not - the concept is very straightforward. It’s simply the act of taking a series of images with each photo focused at a slightly different distance from your camera and combining only the sharp portions of each, thus creating one final image that’s perfectly sharp throughout. I recommend shooting at least a total of three images, one for the immediate foreground, one for the mid-ground and one focused on the background. Now once you have your series of images captured, it’s time for the real magic. I’ve come across numerous different approaches to create focus stacked images, but none that are as quick and simple to produce as the process I’m going to outline here.

      Once you have your series of images captured, load them into Lightroom - I usually apply a quick edit to one of the images and sync the edit across the entire series.  

      FocusStackingBlogEntryPhoto.jpg

      Next, open all the images as layers in Photoshop. Make sure all three layers are highlighted then go to Edit> Auto Align Layers and select Auto. 

      FocusStackingBlogEntryPhoto-2.jpg

      For the final step select Edit> Auto Blend Layers and choose Stack Images.  

      FocusStackingBlogEntryPhoto-3.jpg

      I’m not sure what Adobe wizardry goes into this, but somehow Photoshop knows to allow only the portions of each image that are in perfect focus to show through while simultaneously creating a mask to block out the areas not in focus. 

      Focus Stacking.gif

      The end result is a photo that’s in complete focus from front to back - easy as that. Once you have your series of images loaded into Photoshop the entire process takes less than 90 seconds - well worth the extra effort if you ask me! 

      Mark

      Check out my Photo & Video Gear Kit!

      📨 Join 52k Readers

      The Morning Blaze - my free, email newsletter where I share photography education, tutorials, & inspiration I’ve gained throughout my journey from beginner to professional landscape photographer.

        I respect your privacy. Unsubscribe at any time.

        How to Find the ‘Sweet Spot’ of Your Lens for Sharper Photos

        When it comes to purchasing a new lens there are two questions that immediately come to mind for me, how much is it and how sharp is it? Now I know there’s more to the lens buying process than overall sharpness, but as a landscape photographer - sharpness is king! As I was recently conducting my research process into yet another lens purchase, I began to reflect on the overall lack of knowledge I possessed when it comes to anything outside of the standard specs of my lenses (aperture & focal range). This revelation was brought on by the multitude of lens reviews I read along with the common phrase of “lens performance” aka the “sweet spot”. I’ve always heard of the proverbial “sweet spot” and understand this to be the aperture range where a particular lens performs the best, but never took the time to conduct this test on any of my own lenses. The most interesting part of this is that quality lenses make up the majority of my investment in photography and yet they’re the one piece of gear I honestly know the least about. 

        So, before I rushed out and purchased yet another lens, I decided that I must spend the 20 or so minutes to determine exactly what the sweet spot is for each of my lenses, I mean after all, I could have been missing optimal performance on my lenses all this time and would have had no idea. Plus, this is one of those things where once you do it, you never have to do it again, assuming you don’t forget what the sweet spot is. So, I grabbed a vintage camera off

        How to Find the ‘Sweet Spot’ of Your Lens for Sharper Photos 01

        my shelf to use as my test subject, one because it looks cool and two because there’s small writing around the lens. I find it much easier to distinguish overall sharpness when looking at letters and numbers as opposed to anything else. I placed my subject on a fence post in my backyard and grabbed my camera, tripod, and 70-200m lens.  

        How to Find the ‘Sweet Spot’ of Your Lens for Sharper Photos 02

        Once setup, I began snapping images at each f stop value starting at f/22 and working my way all the way down to f/4. My first series of images was captured at a focal length of 135mm and the second set would be zoomed all the way in at 200mm.  If you decide to perform this test on your own lenses the focal distance is purely up to you, this can be any distance that you choose. I would however recommend that you refocus your camera each time you change the f stop value. I used auto focus for this and placed my focus point dead center of my subject and never moved it, just auto refocused each time and fired away. Once I completed both series of images (135mm and 200mm), I loaded all the photos into Lightroom and began to review the results. 

        How to Find the ‘Sweet Spot’ of Your Lens for Sharper Photos 03

        When analyzing the results, I found it beneficial to utilize the split screen feature within Lightroom while looking at two images simultaneously where I could zoom in 4:1 on my subject.  I started with the 135mm series at f/22 and worked my way down. Right out of the gate I discovered how much diffraction impacted this particular lens when stopped down to f/22, it wasn’t only f/22 that was impacted either, but also f/20, f/18 and even f/16. Albeit, f/16 looked noticeably better than f/22, but nevertheless it still wasn’t as crisp as it could be.  

        How to Find the ‘Sweet Spot’ of Your Lens for Sharper Photos 04

        So, identifying the overall diffraction tolerance was an unintended, but wildly beneficial piece of information that I wasn’t anticipating to uncover from this exercise. If you’re not familiar with what diffraction is, it’s when light “diffracts” or begins to break up when passing through a small opening, which ultimately limits the overall resolution of your camera. As I progressed throughout the series of images, it was becoming increasingly obvious that I was nearing the range of optimal performance. Now I’ve always heard that generally speaking a lens performs the best 2-3 stops above wide open, so I was interested to see if that holds true here. After about 5 minutes of analyzing the images I was able to determine that my 70-200 lens had a sweet spot in the range of f/6.3, f/7.1, f/8 and maybe f/9, which interesting enough wasn’t inline with the generalized assumption of 2-3 stops above wide open. The results also differed from my personal assumption that this lens performed the best at f/11. Something that blew me away was when I decided to compare the sweet spot of f/6.3, with f/22 which suffered from the largest amount of diffraction, f/22 appeared to be completely out of focus and not even a usable image.  

        How to Find the ‘Sweet Spot’ of Your Lens for Sharper Photos 06

        When I reviewed the images that were zoomed into 200mm, I was also surprised to uncover that the sweet spot actually shifted a bit, the zone of optimal performance now also included f/10 as well. 

        So at the end of the day, is this the most exciting photography exercise, no, but is this extremely beneficial information to understand, absolutely! If you decide to test your lenses at home, I would suggest jotting down the findings of each lens in order to alleviate the need to reexamine them in the possible event that you might forget, but after a relatively short amount of time this information will become second nature and you’ll be confident knowing that you’re getting the most out of your largest photography investment, your lenses. 

        Mark

        Check out my Photo & Video Gear Kit!

        📨 Join 52k Readers

        The Morning Blaze - my free, email newsletter where I share photography education, tutorials, & inspiration I’ve gained throughout my journey from beginner to professional landscape photographer.

          I respect your privacy. Unsubscribe at any time.

          5 Signs You're Progressing in Photography

          Recognizing personal progression and improvement is a wildly beneficial yet often overlooked exercise for our confidence. It’s human nature to want to be “better” at things, we don’t have to be the best right now, but we all want the affirmation that were improving and moving in the right direction. Photography is no different and in the digital age can feel rather short-lived as the majority of images created are shared on social media and eventually with time, slide off into the digital archives rarely to be seen again. We tend to only view what we've created in recent months and when doing this we lose the ability to appreciate and recognize how we're progressing over the long term. What I’m proposing is this, take the time to rewind the clock and compare your earlier work against what you’re creating now in order to identify your self progression. I've come up with five questions to ask yourself to help you determine the areas that you're progressing in photography - if you can answer ‘Yes’ to any of these questions, then congratulations you're moving in the right direction! 

          First, are you a better composer? Can you say that you’re creating consistently better composed images now than you were a year or two years ago? It doesn’t matter if you’re using the rule of thirds, repeating patterns, or foreground, mid-ground and background elements to create depth. As long as you’re paying extra attention to where you place elements within your scene, thats a great sign of compositional progression. 

          5 Signs Your'e Progressing in Photography 01

          Secondly, are you using your histogram on a regular basis? Is your histogram no longer an obscure color chart dancing without rhyme or reason on the back of your LCD? Is it a tool you reference with each image you capture? The more photos you create that have a histogram output that looks similar to this, the less you’ll have to manipulate your exposure during post processing resulting in cleaner, crisper images.  

          5 Signs Your'e Progressing in Photography 02

          The third question is this, are you shooting with multiple lenses? The quality of lenses you’re using is irrelevant, what matters is that you have a choice to make when approaching a scene. Do you want to go wide and capture everything or do you want to compress the scene with a 

          5 Signs Your'e Progressing in Photography 03

          70m-200m or perhaps isolate details in the distance? Just having to make a choice as to the lens to use to create the vision you have in your head will make you a better photographer. 

          Fourth, are you shooting in better lighting conditions and understanding why you’re doing so? Soft ambient side light created from the sun sitting low on the horizon during the “golden hours” creates incredible opportunities to show texture and add dimension to your images.

          5 Signs Your'e Progressing in Photography 04

          Photography in harsh lighting conditions can turn the most picturesque scene into a mess of hideous shadows, but shooting in ideal lighting conditions can easily transform any image into a masterpiece.  

          5 Signs Your'e Progressing in Photography 05

          And for the fifth and final question to ask yourself, are you a better post-processor now than you were then? Post processing is one of those skills that is refined over time and requires a great deal of practice and trial by error. Once you’ve edited thousands of images you’ll begin to create your own style and figure out what works and what doesn’t from a visual perspective, but this process takes time, practice practice practice, and a bit of patience. 

          I’m a big believer in goal setting and this exercise has become part of my end of year ritual in order to celebrate my progression year over year and to identify the areas that I need to develop further in the future.

          Mark

          Check out my Photo & Video Gear Kit!

          📨 Join 52k Readers

          The Morning Blaze - my free, email newsletter where I share photography education, tutorials, & inspiration I’ve gained throughout my journey from beginner to professional landscape photographer.

            I respect your privacy. Unsubscribe at any time.